This add-on provides a simple, secure way for volunteers, contract workers, or employees to log their hours and any other information about their work shift.
This add-on plugin for Participants Database and the Participant Log plugin provides a simple, secure way for volunteers, contract workers, or employees to log their hours and any other information about their work shift.
A “timecard” is a record of a block of hours that someone worked or volunteered. Timecards keep track of the time in, time out and total hours. Other information can be stored with the timecard as well.
There are several ways to configure how the plugin works. First, it provides a way to identify whose hours are getting logged: this can be a simple as selecting from a list or you can provide one or more fields that the person enters in order to identify themselves. For secure interactions, a password can optionally be required.
Once the person has been identified, there are two ways the timecard can be recorded: A clock in/clock out card where a simple click sets the current date and time a shift started or ended. Or, the time in and/or time out can be manually entered. This is useful if the timecard is filled out after the fact.
Timecards are a special application of the Partcipant Log plugin: each timecard is an entry in a Participant Log that is created and confgured for that purpose. A timecard log is attached to a Participants Database record which belongs to the person who is logging their hours.
The first thing that must be done to use the Timecards plugin is to define the Participant Log that you will use to store the timecards. This is done by opening the Participant Log plugin settings page and creating a new log. If you already have a log that you are using for keeping track of people’s time, you can use that, but you’ll probably have to modify it by adding of changing the configuration of some log fields.
The timecard log must have at least these 3 fields: two Date fields, which are used to record the time in and time out, and a Decimal field that is used to record the total hours for the timecard.
You can add any other fields you want to the log. For example: the name of a supervisor, what project was worked on during the shift, notes about what happened, etc. These fields can be optionally shown on the timecard form so they can be filled in when the timecard is recorded.
Once you’ve got your timecard log set up in the Participant Log settings, open the Timecards settings page. Before you configure the timecard, you must select the log that the timecards will use. Select the log and save that to move on to configuring the Timecard interface.
Configuration
There are two stages to recording a timecard: first determine whose hours are getting logged and then save the timecard to the log.
The first stage is configured in the “Record Selection” part of the settings. The most important setting here is the selection method, and each method has its own set of configuration values. The two methods are “Selection” and “Validation.”
Selection – In this mode, a selector is shown and the person can simply select their name from the list. The selector has a search capability, so if there are a lot of names, the name can be found by typing in part of the name. You might use this mode if the logging is performed by a staffer who needs quick access to any record or if you’re on a private intranet. If it is on a public website, the selector can be secured by requiring that the user be logged in.
Validation – In this mode, one or more input fields are shown and the person types in their identifying information. This can optionally include a password. This method is suitable to remote timecard logging where the timecard log interface is on a public website.
Setting up the “Selection” Mode
In selection mode, the first thing to configure is the “Selection Field” setting. This is a field from the main Participants Database that is used to identify a record.
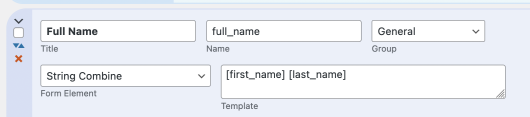
A good way to set this up is to use a string combine field to build a name for each record. For example, a string combine field with a template that combines the first name and last name. This will give you a dropdown list where it will be easy to find the specific record you need. Use the link above to get an explanation of how to set up a string combine field.
suggested configuration for a string combine field suitable for use as the selector field
Since this selector could give unauthorized persons access to individual timecards, there is a setting for the “Selection Role” which is a way to allow only a logged-in user with a specific role (or higher) access to the selector. If you need to control access to the timecard slector, this is one way to do that.
Another way to secure the selector is to put the timecard shortcode on a page that only logged-in users can access or is protected by a password. These things can be set up in the editor for the page that the timecard shortcode is on.
Setting up the “Validation” Mode
In validation mode, the record is selected by entering identifying information. This could be an email address, and employee ID number, etc. anything that will positively idenfiy the person. This can also be more than one field: first name and last name, for instance. If you need to increase the security of the portal, you can include a password field.
Configuring the Timecard Interface
This is done in the “Timecard Settings” section of the settings and it configures how the person will log their hours. There are two basic ways the timecard interface works: A single click to log the current time, or a manually-entered date and time. You might use the first method in a situation where the person is required to log in and out when they begin and end their shift. The second method is for when you want to make it possible to log a shift after the fact.
Single Click Clock In or Out
When this mode is selected, you have several options for configuring the appearance of the timecard. In this mode, it can be as simple as just a single button.
The way this works is after the person’s record is selected, the timecard interface is displayed. If the person has not clocked in yet, they will be presented with a “Clock In” timecard (with a clock in button), and there are settings that are specific to this case, such as additional fields to be shown and filled in. If the person is already clocked in, they will see the “Clock Out” interface and the date and time they last clocked in. There is a separate setting for the fields and messaging that are shown in this case.
If the person forgets to clock out, there is an expiration time you can set to handle this: if the person who forgot to clock out tries to clock in after the expiration time, they will see a “Clock In” interface, plus a reminder that they never clocked out last time. This is to let the person know that the previously open (not clocked out) timecard should be closed with the correct clock out information by an administrator (or they can do it themselves on the record edit page for their record). If the expiration time is 0, the person will be shown the “Clock Out” interface no matter how long it’s been since they clocked in last.
Manual Clock In and Out
In this mode, the timecard is presented with inputs for the date and time of both the clock in and clock out. This is so the timecard can be filled in with any date and time. When the timecard is opened, the clock in time can have the current date and time filled in as the default. If the timecard is open, the current date and time will be placed in the clock out inputs.
In this mode, you may configure a set of additional fields that are shown for the person to fill in. If the field is configured to be “read only” the person can set the value, but can’t change it the next time the timecard is opened. If any of the fields are marked required, the person must fill in those fields to save the timecard.
Placing the Timecard Interface on your Site
Access to the timecards is provided by the [pdb_timecard] shortcode. Place the shortcode into a shortcode block for best results.
When a user visits the page with this shortcode, they will be presented with the record selection interface, where they can select their record and then log their hours, as explained above.
If you need to limit which records are available in the interface, you can use the “filter” attribute in the timecard shortcode, it works exactly the same way as in the [pdb_list] shortcode. For example, to allow only approved records, you could use a shortcode like this:
[pdb_timecard filter="approved=yes"]
Other attributes you can use in this shortcode are “orderby” and “order” which can be used to sort the list (selection mode only) and of course the “template” attribute if you want to implement your own custom template.
Settings
Timecard Log
This shows which log is being used to store the timecards. This will need to be set before the rest of the settings become available.
If you want to change which log you’re using, there is a button at the bottom of the page that provides a way to do that.
Record Selection Section
Selection Method
This determines how the record will be selected when the timecard page is first opened. Each of these options has its own set of settings, with some settings in common.
In the Selection mode, a dropdown selector with a list of available records is shown. The user selects which person they want to fill in a timecard for.
In the Verification mode, the user types in idnetifying information such as an email address, empoyee ID, etc. that identifies their record. This mode an also include a password if you have a password field configured in Participants Database.
Selection Field
This is active in selection mode, it names the Participants Database field that is used to populate the selector. It’s a good idea to use a string combine field for this so you can build a list of names that make it easy to find the right record. This is explained in more detail in the plugin Instructions section.
Selection Field Label
This is the label that goes with the selection field in the above setting.
Selection Role
To restrict access to the selector so that only logged-in users may access timecards, set the minimum WordPress user role with this setting. Minimum role means that if you set this to “editor” an animistrator will also have access.
Record Selection Help
Active in both selection modes, this provides a general prompt for interacting with the record selection interface.
Validation Fields
This applies to validation mode only: select one or more Participants Database fields that will be used to identify the record. The information this provides must match only one record. If you want to ask for a password, that is configured separately.
Password Field
If you want to ask for a password to valdiate the user, select the password field here. This password is saved with the Participants Database record and requires that a password field be configured. This is not a WordPress account password.
Validation Submission Button Label
This is the label for the button that is used to submit the record validation and select the timecard.
User Not Found Message
In validation mode, if the information entered does not match a Participants Database record, this message will be shown.
Check for Predetermined User
If this is checked and the site already knows the current user’s record ID, skip record selection and just open the timecard. Keep this unchecked if you need to be able to select records independently of who is logged in. This setting is useful if you have people accessing their record using the Participant Login form, or you are using the Participants Database User Profile plugin which links a PDB record with a WordPress account.
Timecard Settings
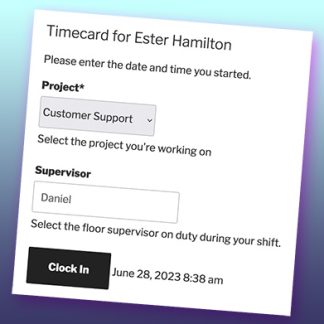
Timecard Title
Thsi is a template for building a title for the timecard. This title tells the user what they are looking at and who the timecard is for. The value tags in the template have wheir values drawn from the person’s Participant Database record.
Timecard Mode
This sets the overall interface for the timecard. Each of these modes has its own set of settings, with some settings in common to both.
Single Click Clock In/Out mode only allows the person to clock in or out with the current date and time. Use this if you need people to clock in at the moment they begin work, and clock out when they stop. The clock in/out timestamps can always be set or changed by an administrator.
Manual Clock In/Out shows a date and time input for the clock out and clock in timestamps. This makes it possible for someone to clock in or out after the fact.
Clock In Timestamp Field / Clock Out Timestamp Field
This sets which Participant Log entry fields are used to record the clock in and clock out timestamp. Both of these are required and each must be a “date” type field.
Timecard Total Hours Field
This is the Participant Log entry field that records the number of hours that were logged in the timecard. This must be a “decimal” type field in order to record fractional hours.
You can control which fractions of an hour are allowed here with the use of the “step” attribute in the field definition. For example, if you’re only interested in logging quarter hours, set the step attribute to 0.25
Label for the Clock In Button / Label for the Clock Out Button
In Single Click mode, the clock in and clock out timestamps are set by clicking a button. These settings set the label for those buttons.
Clock In Log Entry Fields / Clock Out Log Entry Fields
In Single Click mode, this is how you configure which additional log entry fields are preseted with the clock in/out button. The Clock In fields are shown when the timecard is first opened and the person is clocking in, the Clock Out fields are shown when the person is clocking out at the end of the shift.
Use Current Date/Time as Default
In manual entry mode, if this is checked, the current date and time will be pre-loaded into the timestamp entry fields. If the timecard is just getting opened, this will be in the clock in inputs. If the timecard is already open and is waiting for a clock out, the default will be placed in the clock out fields.
Missing Time Entry Message
In manual mode, if the timestamp has a date, but no time, this message is shown to prompt the person to enter a time.
Timecard Entry Fields
In manual mode, these are the additional log entry fields that will be included in the timecard so that the person can fill them out. If you have any dynamic fields (like calculated fields or string combine fields) that need to be updated in the entry, they must be included here too.
Timecard Submit Button Label
In both modes, there is a button that submits the timecard to be saved. This setting sets the label on that button.
Timecard Expire Time
The purpose of this setting is to provide a way to hadle someone forgetting to log out. This sets the number of hours that a timecard will stay open, waiting for the person to clock out. If the expiration time passes, the timecard is considered expired. When the person opens their timecard next, they will see a message informing them the last timecard was never clocked out. At that point they will be clocking in on a new timecard. If this is set to 0, the timecard will never expire.
Timecard Messages
All the settings in this section are templates, meaning that value tags can be used to bring in values from the person’s record and timecard. A value tag is the name of the field in brackets, and this will be replaced by the specific value from the record or timecard. Remember that this uses the field name not the title.
Clock In Thanks
This message is shown to acknoweldge that the person just clocked in. This message is active in both timecard modes, but in manual mode, this will only be shown if the timecard is submitted without a clock out date and time.
Clock Out Thanks
This message is shown when the timecard is submitted with a clock out date and time or in single click mode, when the clock out button is clicked, closing the timecard. You can use this massage to show the total hours on the timecard by adding the name of the total hours field as a value tag, for example:
Timecard Expired Message
If the person’s timecard has expired, this message will be shown when they open their timecard. Usually, this would be used to tell the person to let the admin or supervisor know they didn’t clock out so the timecard with the missing clock out timestamp can be completed. When a timecard is expired, the next time the person opens their timecard, they will be starting a new timecard.
New Timecard Message
This message is shown when a new timecard it opened. It is a good place to put a greeting or general instructions for using the timecard interface.
Open Timecard Message
This message is shown when the timecard is opened to clock out.
Change the Timecard Log
If you need to change the Participant Log the timecards plugin is using, there is a button for that purpose.
It will delete any settings that are based on the log configuration (such as the clock in/clock out field configurations) but it will leave other settings alone. No log data will be deleted.
Additional information
Site License
Multiple, Single
Reviews
There are no reviews yet.
Be the first to review “Participant Log Timecards” Cancel reply
Product-specific technical support can be found here:
If you find my plugins useful, and would like to encourage or support its further development, please drop a little something into the tip jar or give the plugin a rating.
This website uses cookies to improve your experience. We'll assume you're ok with this, but you can opt-out if you wish.AcceptRead More
Privacy & Cookies Policy
Privacy Overview
This website uses cookies to improve your experience while you navigate through the website. Out of these, the cookies that are categorized as necessary are stored on your browser as they are essential for the working of basic functionalities of the website. We also use third-party cookies that help us analyze and understand how you use this website. These cookies will be stored in your browser only with your consent. You also have the option to opt-out of these cookies. But opting out of some of these cookies may affect your browsing experience.
Necessary cookies are absolutely essential for the website to function properly. This category only includes cookies that ensures basic functionalities and security features of the website. These cookies do not store any personal information.
Any cookies that may not be particularly necessary for the website to function and is used specifically to collect user personal data via analytics, ads, other embedded contents are termed as non-necessary cookies. It is mandatory to procure user consent prior to running these cookies on your website.


Reviews
There are no reviews yet.