Description
Provides a way for your users to keep private selection lists of Participants Database records.
This plugin adds a “Wish List” functionality so your logged-in users can keep their own lists of selections.
- Multiple Wish Lists can be defined
- Site users easily maintain their own lists of selections with an intuitive interface
- Users can give their lists any name they want
- Wish lists can be securely shared with anyone with a private link
- Users can export their lists to a spreadsheet
This plugin adds a new field type: Wish List, which when displayed in a list of records for a logged-in user, shows a checkbox for each record in the list. This gives the user an easy way to select or deselect records for that list. This list display has all the functionality of the regular Participants Database list display, so the user can do things like perform a search and then select or unselect records from the search results.
Instructions
After installing and activating the plugin, you will have a new field type: Wish List.
You create a wish list by adding a new Wish List field. For each wish list you want to offer your users, you need a corresponding wish list field. If you want your users to be able to keep 3 wish lists, you’ll need to add 3 wishlist fields.
The wish list field, when included in a Participants Database list display ([pdb_list] shortcode), shows a checkbox. This checkbox is used to select or deselect records to be included in the wish list. These checkboxes will only be shown to a logged-in user.
Adding a Wish List Field
On the Manage Database Fields page, go to the field group where you want to add the wish list. The group will determine the visibility of the wish list field, so in most cases, you’ll want to put it into a field group that is set to “private”.
If you want to give the user the ability to name their list, this can be enabled in the Wish List settings. If you’re using this feature, it’s a good idea to initially create the field with a generic name (for example: “Wish List 1”). This will end up being a placeholder name for the list, the user will see this name until they rename their list.
How the Wish List Field Works
In the database, the wish list field stores a list of the the user IDs of the users that have selected that record for their own lists.
A wish list field will display differently depending on the context. In the list display, if the user is logged in, they will see a checkbox for selecting or deselecting the record. If the user is not logged in, the wishlist field is not displayed at all.
For the single record and record edit displays, the field will display a list of the users that have added the record to their wish lists. In the record edit display, the field is not directly editable by the user, they must use the list interface (where their selections are made) to change the wish list.
Controlling Wish List Visibility
There are two ways that a wish list is visible: first is from the perspective of the user, where the wish list is the curated list of records that have been selected by the user. This is displayed with the wish list shortcode, as explained below.
The other way a wish list is displayed is from the perspective of the Participants Database record. If the wish list field is in a public or private group, when the record is displayed, the wish list will show a list of all the users that have selected the record in their own wish lists. It is possible you may want to keep this information secret (that is, private to the wishlist owner only), in that case, place the wish list field in an administrative group.
Giving Your Users a Way to Set Their Wish Lists
Once the wish list field or fields is added, you need to provide a way for your users to add or remove records from their wish lists. This happens in the regular Participants Database list display using the [pdb_list] shortcode. To do this, the list display must be configured to include wish list fields and the user has to be logged in.
To give the user access to select records for their wish list, include the Wish List field or fields in the list display. You can do this in the “Manage List Columns” page or in the list shortcode using the “fields” attribute if you’re using a separate shortcode for this.
You may want to set up a special page for the purpose of letting users edit their lists. When a logged-in user opens that page, each record will have a checkbox for each list where the user can select or unselect the record for inclusion in the list.
Optionally, a “select all/deseclect all” checkbox is shown above the list so that the user can easily add all of the results of a search to their list (for example) or to clear the list to start a new one.
When a participant list that includes wish list fields is displayed to a user that is not logged in, the wish list fields won’t be shown, and an optional message prompting the user to log in is displayed.
Each user that is using wish lists has their wish list selections stored in their user metadata.
The Wish List Display
This plugin adds a new shortcode [pdb_wishlist] that is for the purpose of displaying wish lists. Wish lists are only displayed to logged-in users.
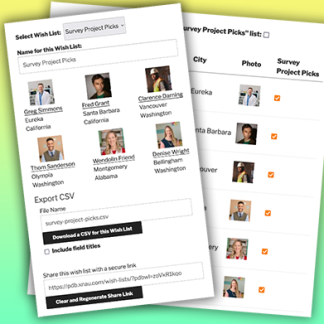
If more than one wish list is defined, a logged-in user is given a selector to choose which list to display. The display will show only the records that have been selected for that list.
The columns the wish list display includes is defined in the Wish List settings, but this can also be set in the shortcode using the “fields” attribute.
If user custom list naming has been enabled, an input is also shown where the user can rename the list. Once that is done, the list will be labeled with the user’s custom name. This custom name will only be seen by that particular user, all other users will see their own custom name (if they have defined one) or the wish list field’s global name as defined by the administrator.
When an administrator views the Wish List display, they may select which user’s lists to show. The admin selects the user, and then when the wish list is selected, it will show that user’s selections for the selected list. The wish list selector will show both the user’s custom name and the global name (as defined in the wish list field definition) for the wish list.
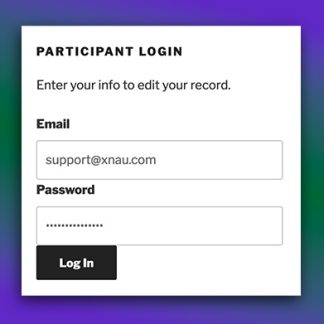
The Wish List display will only display wish lists for a logged-in user. If the user is not logged in, a login prompt is shown instead of the wish list display.
If enabled in the settings, it is possible for the user to export the currently selected list to a spreadsheet with a CSV file. The fields included in this export are configured in the plugin’s settings. Additionally, a link to each record can be included in the export.
Wish lists can be securely shared with others. If this is enabled, the wishlist display will offer a private “share link” which will show the wish list to anyone with the link. The share link is configure din the plugin settings, you can define a special page for this–helpful if you have the wishlist display on a protected page.
Display Templates
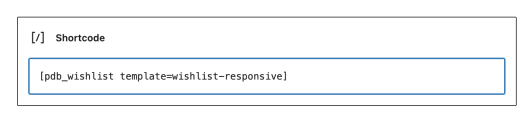
There are two templates available for the wish list display: the default, which is a table-based display, and a responsive block-based template. The default template is used if you don’t specify a template in the shortcode. If you want to use the responsive template, the template name in the shortcode should be “wishlist-responsive”.
It is also possible to create custom templates for the wish list display if you need.
Settings
User Settings
User Identifier – When a list of users is shown, this is how the user will be identified.
Minimum User Role – The is the minimum role for a user that is allowed to keep wish lists. This can be a custom role if you are using a plugin that gives you a way to define custom user roles.
List Interactions Settings
These are settings that pertain to the [pdb_list] shortcode, where the logged-in user can make wish list selections.
Show the List Login Prompt – If checked, show the login prompt to a not-logged-in visitor to the page where the list selections can be made.
List Login Prompt – This is the text of the login prompt. You can embed a link to the login page using the [login][/login] tags around the clickable text. This link will bring them back to the original page after they log in.
Show Select/Deselect All Checkbox – Preference to show the select all/deselect all checkboxes. You may want to hide this if the wishlist selections are going to be pretty small most of the time.
Select All Label – When the select all/deselect all checkboxes are shown, this setting defines how they are labeled. If there is a “%s” is in this setting, it will be replaced with the name of the wishlist.
Wish List Shortcode Settings
These settings pertain to the configuration of the Wish List display, which is shown using the [pdb_wishlist] shortcode.
Login Prompt – if the wish list display page is visited by someone who is not logged in, this is the login prompt that is shown. The [login][/login] tags can be used to apply a link to your site’s login page to the text between the tags. This link is constructed to redirect them back to the wish list page after they log in.
Default Wish List – this is the wish list that is shown by default, before the user has made their selection of which wish list to view.
Wish List Display Fields – use this interface to set up the fields that will be shown in the wish list display. Click the field on the left to add it to the display. Click on the right to remove it. The fields will display in the order added.
Wish List Selector Label – label for the selector used to select which wish list to view. The wish list selector is not shown if only one wish list is defined.
Allow User Wish List Names – this preference allows the user to give wishlists their own name. The user’s custom name will be shown instead of the global name once this is defined. It is only seen by that one user and administrators. Other users will see the global name until they define their own custom name.
Wish List Change Name Label – this is the label for the text input where the user may set their custom wishlist name.
Allow User List Export – preference to allow user to export a CSV of their wish list.
Export Button Label – label for the CSV download button.
Wish List Export Field List – use this interface to set up the fields that will be included in the wish list CSV export. Click the field on the left to include it in the export. Click on the right to remove it.
Include Record Link in Export – when checked, a link to each record’s single record page will be included in the export. The exported fields must inclue the Record ID field for this to work.
Provide a Wish List Share Link – this enables providing a sharable link to the selected wishlist. This link includes a code that gives exclusive access to view the wishlist.
Share Link Label – this is the text of the label for the wish list share link.
Share Link Destination Page – this is the page that the share link will go to. This is helpful if the main wishlist display is on a protected page (could be since only logged-in users can see it). This setting lets you designate a page for purpose of displaying a wish list when a share link is used. Place a [pdb_wishlist] shortcode on the page to show the wishlist. You must set this before the share links are shared!
Reset Share Link Button Label – the share link provides a way for the wishlist owner to reset and regenerate the share link. Using this button will make all previously shared links invalid, and provide a new share link. This setting sets the text that is shown on the button.
Invalid Share Link Message – if an incorrect or invalidated share link is used, this is the message that will show instead of the wish list.


Reviews
There are no reviews yet.