Description
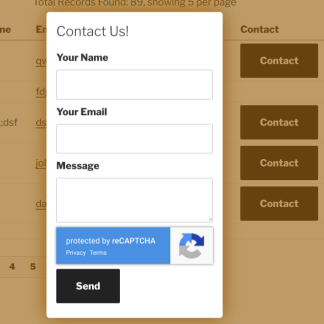
This plugin makes it possible to define dynamic interactions with Participants Database signup and record edit forms.
A “dynamic interaction” is when the content or structure of the form is altered by the user’s actions. A classic example of this is when the user selects a state, the city selector will only offer cities in that state. Interactions such as this can make a complex form much easier to use for your users.
This plugin provides a way to define as many different interactions as you need. There are 4 basic interactions, all based on the user action of making a selection in a source field.
- Show or hide specific fields in the form
- Show or hide field groups
- Show or hide option groups in a target field
- Show or hide specific options in a target field
These dynamic features are implemented using javascript in the user’s browser, so this plugin is a way to add custom javascript to the form without doing any coding.
Instructions
Once the plugin is installed and activated, you can begin adding and configuring your interactions by selecting the “Dynamic Forms” item under Participants Database in the site admin.
A dynamic interaction is always initiated by the user making a selection, so these interactions can be triggered by select-type fields only. This is because it is necessary to have a specific, defined trigger (the selected value) for the interaction to know what action to take. Fields that can trigger a dynamic interaction must be one of these types:
- Radio Buttons
- Dropdown Selectors
- Checkboxes
When you define an interaction, it is placed on a “source” field, which triggers it. The interaction’s configuration will also have a set of “target values” that it will hide or show when the user makes a selection. The target values can be other fields in the form, groups of fields, or specific values in another field.
Once you are familiar with how these interactions can work, you may need to rearrange your form. For example, if the State selector is determining which cities are available in the City selector, you will probably want to arrange the form so that the user selects the state before they select the city.
Interaction Types
There are four interactions types you can set up:
- Show/Hide Form Fields – gives you a way to show or hide form fields based on the users selection in the source field.
- Show/Hide Field Groups – makes it possible to show or hide complete groups of fields in the form.
- Show/Hide Field Option Groups – for a single target field that is a selector type, you can show or hide groups of options. This requires that the target field have their options organized into “optgroups”.
- Show/Hide Field Options – for a single target field that is a selector type, you can show or hide individual options.
It is possible to create multiple interactions. For instance, if you need a single selector to control multiple fields, you can achieve that by creating several interactions on a single source field, each one with a different target field. You can also mix different types of interaction on the same source field.
Configuring Your Interactions
Dynamic form interactions can only be configured once the form has been set up. You will need to have your form fields defined before you add interactions to them.
Defining and Adding an Interaction
To create an interaction, open the Dynamic Forms page (found in the Participants Database menu in the WordPress admin section). At the top of this page, you’ll see two selectors: the Interaction Type and the Source Field selector. An interaction is created by selecting the Type and the Source Field and then clicking the plus button.

Selecting an interaction type and a source field allows you to add the interaction. You can add as many interactions as you want, but there can be only one interaction between a specific source and target to avoid ambiguity.
Setting the Source/Target Option Map
Once an interaction is added, you must configure the source/target map. This is very simple: for each value that can be selected in the source field, a set of target values will be shown. Any values that are not set as shown in the map will be hidden.
Select the source value on the left, then select the target values that will be shown for the selected source value. If there are a large number of options to select, you will need to scroll through the list to find them all. When you’ve selected the target values, they will be automatically saved when you select a different source value or you click away.
If there are a lot of items to choose from, a “select all” checkbox will be shown. You can use this to select or deselect all the items in the column. You may need to click it twice to get the desired result.
Once you’ve configured the interactions, save the settings. You should test your forms to make sure they are working as intended.
Dynamic form interactions will be active on both Signup and Record Edit forms on the frontend. They are not active in the backend or admin section.
Requiring a Selection in the Source Field
If the source field is set to be required, and no selection has been made (for example the first time the user fills in the form) then all the elements that can be hidden by a source selection will be hidden until the user makes a selection. For example, if the source field determines which set of fields is shown, then before a selection is made, all the fields (except for any fields that would be shown in every case) will be hidden.
To explain this further, to use the example of a state selector that controls which cities can be selected: if the state selector has no selection, then no cities will be shown until a state selection is made by the user.
The source field must be set to “required” and there must not be a default value set for the source field for this to work as described. If the source field has a default value, then the interaction targets will preload with that selection.
Conflicting Interactions
When adding a new interactions it is possible that it will be in conflict with an existing interaction. In some cases, the plugin will prevent this with an error message. These are the restrictions:
- Only 1 interaction that shows/hides field groups can be placed on a single source field.
- Only 1 field value or options group show/hide interaction between the same source field and target field is allowed. This is prevented by not allowing the target field to be selected in the interaction configuration.
Settings
There is only one general setting for this plugin.
Transition Time – sets the speed of the structural change. This does not work for table-based form layouts when you are showing or hiding form fields, the fields will instantaneously appear or disappear. This is because it isn’t possible to slowly remove a row from a table.


DEBRA RICKS (verified owner) –
This is a fantastic plugin. I was able to sort state and regions into usable groups that are automatically shown depending on what country is selected. This made is all so easy. Highly recommended.