Provides several new ways to send emails with Participants Database, including email on approval, resend signup email, and custom email to selected records in the list.
This plugin extends Participants Database by providing several new ways to trigger and send custom emails. This add-on also provides a highly flexible way to define multiple email templates for many purposes. These templates can be configured to send on various events from Participants Database and it’s add-ons. All the email templates make use of “value tags” that are substituted with the value from the member’s record so you can personalize your messages.
Send “Welcome” Emails
Manually send the Participants Database signup thanks email to one or more members on your list. It makes a good way to welcome members who have been added to the database, you can give them their private link and any other information you want to give them, including multiple attachments.
Send Any Template Email to The List
This add-on gives you the ability to send your custom email to selected members on your list. Just define your email template, select the records that should receive it, and send!
Send Notifications Out when a Blog Post is Published
If you’ve got Participants Database signups opting in to your mailing list, let them know when you’ve posted something new! You can even send them the whole article with images.
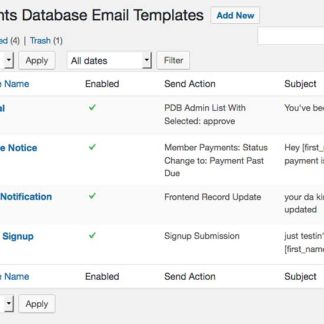
Multiple Signup Email Templates
This plugin gives you the ability to define multiple signup email templates that are configured to be sent based on the content of the signup: for instance if you had a signup form for teachers and students, they would each receive a different “welcome” email when they sign up. There are many other ways these can be configured. The template also defines the “thanks” message shown on the page after submitting the signup, so different “types” of signups could see a different thanks message.
Welcome Email on Approval
One of my most-asked-for features, this gives you the ability to only send the “welcome” email to signups that have been approved. An email template can be configured to send when the state of the “approved” field changes to “yes.” Of course, many other possibilities are available, using a flexible conditional event configuration.
SMS Text Notifications
It is possible to configure an email template to send an SMS message to your mobile phone. Most cell sevice providers have an SMS Gateway that can be accessed via email. You can use this to get text notifications when people sign up (for instance) or on any of the email triggeres available in the email template.
Mass Email Information
Although this plugin has the ability to send email to a list of recipients, the number of recipients in a single mailing is limited to 100 or less. More info…
Future Expansion
This plugin provides the email templates to other Participants Database Add-Ons that need to be able to send emails, so that all of your Participants Database custom email templates are configured and organized together. This plugin also makes it easy to add your own custom email functionality.
Multilingual Support
With the ability to create multiple email templates firing on the same event, you can use the site’s currently selected language to determine the language of the email that is sent. This is explained in the instructions under the “Comparing Against the Current Locale Setting” heading.
How It Works
This add-on works by enabling the creation of multiple email templates that can be triggered to send on a variety of different events and actions. An email template consists of all the elements you need to define an email, such as the subject, recipient, body, etc. This is called a template because the elements of the email may contain “value tags” (just like in the Participants Database email settings) where information from the user’s record can be included in the email through the use of a placeholder.
Sending Automatically
Each email template has a “Send Action” that determines when the email will be sent. There is a selection of useful actions available to choose from such as when a signup occurs or when a record is updated. Emails can also be sent manually. Other Participants Database add-ons that need email functionality will add their actions to the list so that you can use your custom email templates for that as well.
Sending to Selected Records
Participants Database has a new feature, the “With Selected” bulk actions that are now available on the admin record list. With this add-on, it is possible to trigger the sending of an email on those actions as well. This is how you would, for instance, send a “welcome” email to members that had been added to the list, or to notify members that their application had been approved.
Sending When Certain Conditions are Met
It’s possible to set an email template to send when a record is updated. By setting a condition on the trigger, it’s possible to have that email send when a field is changed to a specific value. For instance if someone indicates they want to join a committee, the chair of that committee could receive an email letting them know someone is interested, supplying their contact info.
For actions that are related to the updating of records, there is an option to only send the email if the value of a record has changed. This means that if you have an email set up to trigger when a certain value is selected, the email will only be sent the first time that value is selected. Subsequent updates to the record values will not trigger the email template.
Instructions
Creating an Email Template
After installing and activating the plugin, the first thing to do to configure this add-on is to define your custom email. In the admin menu, under “PDb Email Templates” select “new template” and you’ll be shown a screen where all the components of your email template are defined.
Each template has a name that is used to identify the template and its purpose. Below that, you have fields for defining the sender name and email, and also the recipient name and email. All of these fields can be filled using a value tag so that, for instance, the email goes to the name and address defined in the record.
An email must have a subject, you can use value tags there as well if you want to personalize the subject line.
The body of the email may contain HTML, styled text, links, images, etc. and use value tags as well.
Below the email body, you can set up email attachments. Simply select the file you want to attach, and it will be sent with the email when it goes out. To add another attachment, click on “add attachment” and choose another file to include.
Value Tags
In the email template and subject settings, you can use value tags to show a value from the record that is associated with the template. These tags take the form of [fieldname] and you can include any defined field in the record that way.
There are also additional value tags that can be used:
[record_link] provides a link to the user’s editable record
[admin_record_link] provides a link to the record in the admin
[single_record_link] provides a link to the record (not editable) display page
[date] shows the current date using the site’s date format setting
[time] provides the current time using the site’s time format setting
[change_log] shows a table with all the before/after changed values
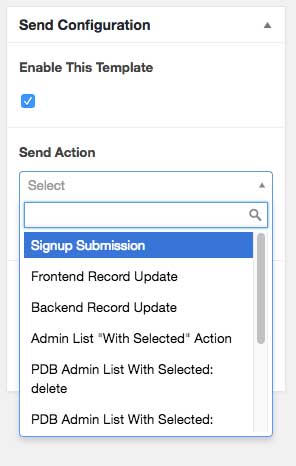
Configuring the email send action
Configuring the Send Trigger
Each email template is configured to be sent under certain conditions. Usually, this is when a specific event occurs, such as a record update, or a record gets approved.
Under the “Send Action” title is a dropdown selector where you can choose the event or action that will trigger sending this template email.
Sending Manually
To send an email to selected records on the list manually (such as a newsletter or announcement) select Admin List “With Selected” Action for your action. The sending occurs on the Participants Database admin list participants page: select the records you want to get the email, then select your email template in the “with selected” action dropdown. Hit “apply” and confirm to send the email to all selected records.
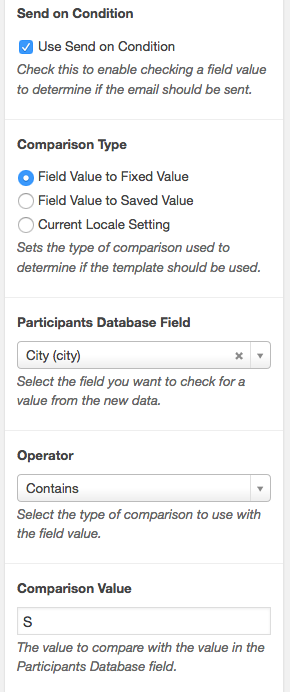
Setting Up Conditional Sending
The Send on Condition Panel
When an email template is triggered, you can check the values in the current record (an email send event is always associated with a record) to see if the template should be used. There are three basic ways the conditional send can be used:
Compare the value of a field in the current record against a fixed value
this is best for determining what kind of record it is so you can use different templates for different kinds of records
Compare a value in the current record against the previously saved value
this is for triggering an email if a specific value in the record has been changed
Compare the currently selected locale against a list of locales
this is so you can define different templates for different languages
Comparing Against a Fixed Value
If you need to send a particular email based on the value of a field in the record, this will allow you to do that. For instance, you could have two different “welcome” emails for your members, one for each of two types of membership. The incoming value is compared to the comparison value and if the operation resolves as “true” the email is sent.
The comparison value can be any value you need to compare. It can also be a comma-separated list of values. If any of those values resolves as “true” the email template will be used.
Send on Field Value Change Only
If the condition is set to trigger when a specific value is selected, this preference will only trigger the email the first time the value is selected.
Comparing Against a Saved Value
This is used when you want to send out an email when a particular value in the record has been changed. For instance, if a member changes their email address, an administrator gets notified.
Comparing Against the Current Locale Setting
If you have a multilingual site, you can set up a different email template for different locales. There are two ways to do this, depending on how the multilingual aspect of your site works.
You will need to have an email template for each language you want to support.
If the site provides a way to let the user select their preferred language, the selected language will be the “current locale” value. You can use that value to select the email template to use. In this mode, the comparison value should be one or more language codes (separeted by a comma if there are more than one) that the template should be used for. It is important that the language code in the comparison value exactly match the code the website is using. A list of the codes WordPress uses can be found here.
It is also possible to use a value in the record to determine the email template. If the user can select a preferred language in their record, you can use that value to determine which template to use. You do this using the “Field Value to Fixed Value” setting, and the comparison value works the same as it would using the current locale value.
User Feedback Messaging
For the “signup submission” and some other actions, the user is presented with a feedback message on the screen, and this can be customized on a per-template basis as well. Just put your message in the “user messaging” field and it will be presented to the user. Each template has it’s own user messaging field, so each type of signup (for instance) can have different messaging.
Email Session Send Limit
This plugin is not intended to be used as a mass-emailer: it has a built-in limit to the number of emails that can be sent in a single session. This means that if you try to send an email to more than 100 (the default limit value) recipients, only the first 100 will be sent. The main reason for this is the plugin does not have the capability for extended operation that would be needed to send to a larger list of recipients. Technically, the script sends all the emails in one operation and most servers will have a limit to how long a single operation can run, typically 30 seconds.
The easiest way around this limitation is to send your emails in batches of 100. If that is not practical, I’d suggest you use either a newsletter plugin or a 3rd party mass-email service.
Another consideration is the plugin does not provide a mechanism for an “opt-out” or unsubscribe which is required by law on mass email in some areas. If you are using shared hosting, in most cases sending mass email is not allowed, and there will be a low limit to the number of emails sent in a hour. While it is possible to override the plugin email session send limit value, this is not a supported use of the plugin.
An Example of Using a Comparison Against a Fixed Value
To illustrate this, let’s suppose you have a registration form for two different kinds of registrations: one for students and one for teachers. To set this up, create a new template, (it will be for the students) and set the “Send Action” to Signup Submission. Enable the “Send On Condition” checkbox and below that, you’ll see new fields.
First is “Participants Database Field” set that to the name of your “type” selector in your signup form, so that the template knows which field to check.
Next, select an Operator: in this case you want “Equals” because you’re testing against an exact match, as you’ll see.
Now, set up the comparison value. To check the submitted value against a specific string, choose “Comparison Value” and then below that, type in the value that the template will look for. If the applicant is a student, the comparison value might be “student.” If the incoming registration submission has a “type” value that equals “student” then use this template and send the email.
Next, you set up another email template for the teachers. It will be checking the same field, but for the value “teacher.”
Sending an Email When a New Blog Post is Published
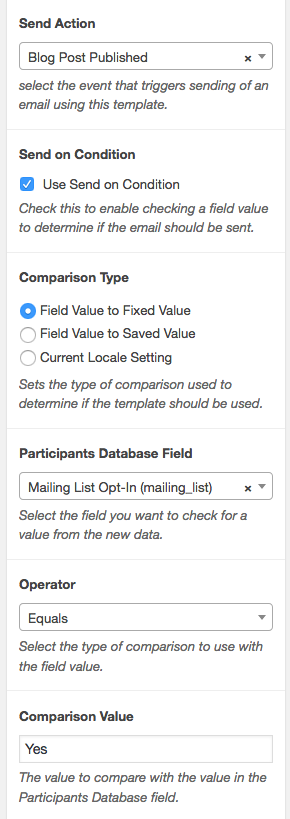
If you’d like your list to receive an email when you post something new, use the “Blog Post Published” email action in your template.
You can use several tags in the email to include content from your blog post: [post_title], [post_content], [post_excerpt], etc. The [post_content] tag will include the whole article, including any images. (embedded media such as audio or video won’t work, however) To provide a link back to the post, use the [post_permalink] tag to generate the link. The post featured image can be included with [post_thumbnail].
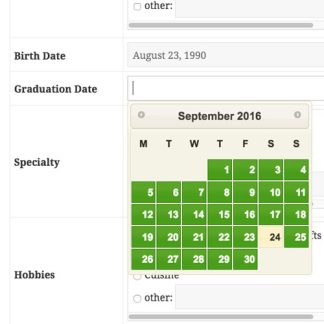
Set up your “Send on Condition” to only send to those who have elected to receive your mailings. For example, if you have a checkbox for people to opt-in to your list use that as your condition for sending the email…such as in the example to the right here.
This is not a “mass-email” feature, you will be limited to 100 emails generated by this action. See above for the reasons why these limits are in place.
The “Blog Post Published” email action can also be used to send notifications to a plain list of emails also, of course.
SMS Messaging
It is possible to configure an email template to send a message to a cell phone. To do this, you need to know the cell service provider’s SMS Gateway email address. You can usually find it easily with an internet search using your service provider name and “SMS Gateway” Once you know the gateway email address for your phone, just use that as the “recipient” and when the email template is triggered, it will be sent to the mobile phone as a text message.
Of course, this will have no support for formatting and very limited support for images and media, but links will work fine.
It is not possible to send an SMS message if you only know the phone number, you must know the service provider for the number as well.
Settings
The Email Expander Add-On does not use a settings page, instead, each template has it’s own configuration.
Email Title
Gives the template a name. If you have several templates, it’s a good idea to use something descriptive here so you can find the template next time you need to edit it. You can change this any time, it won’t affect the template’s function.
Email Setup
Sender Name, Sender Email
The email should be from a legitimate sender so the recipient knows it is not spam. Value tags are allowed.
Recipient Name, Recipient Email
These will often contain value tags so that the email is sent to the person registering. This could also be any fixed email address. The name is optional.
It is possible to send the email to multiple recipients. If you want to include a fixed email address as a CC or BCC (such as to an administrator), there are fields for that below. If you need to send to multiple email addresses using value tags from the record, you can enter those here as a comma-separated list of email addresses, for example: [email],[email_2]
Subject
The subject line of the email, can use value tags.
Email Body Template
The is the main part of the email, you can put HTML, headings, images, styles, etc., but be aware that many email clients have limited ability to render HTML Keep it simple for best results.
Extras
CC, BCC Recipients
Just under the attachments are settings where you can add additional recipients to the email. BCC recipients won’t be visible to other recipients, while CC recipients’ emails will be visible to all recipients. This field does not process value tags, you can add more recipients using values tags in the Recipient Name and Recipient Email fields above.
Attachments
This section allows you to include files with the email. Simply select a file (either from the media library or upload a file) and the user will receive the file when they get the email. You can include multiple files by adding more attachment lines. Remember that any attached files will have to be downloaded by the recipient, so keep it small to avoid problems on the receiving end.
User Messaging
Some actions use this field to show the user a message after the action has occurred, such as after submitting a signup form. This gives you a way to customize the user feedback message according to the email template that was used to send an email.
The Send Configuration
Each email template may have a “Send Action” that determines when the email will be sent. Some of these are automatic, some are manual: waiting for an action by an administrator to be sent.
Signup Submission: the email will be sent when a signup form is submitted. This action duplicates the default action of Participants Database, and so if this template gets used, it prevents the default email from being sent. This means that if you set up a template here that sends on certain conditions, the regular signup email will be sent unless those conditions are met.
Frontend Record Update, Backend Record Update: this action happens when a record is updated. The frontend update happens when a user edits the record after accessing it with their private link, or when the frontend record edit form is used in any other way.
Frontend Record Pre-Submit Update: this action happens just before the updated record is saved on the frontend. This gives you a chance to check for a changed value because you’ll have both the new and old values to check against.
Multipage Record Update Thanks: this email is triggered when a user completes a multi-page record edit form. It requires that the user end up on a page with the [pdb_signup_thanks] shortcode when the final page is submitted.
Admin List “With Selected” Action: this gives you a way to define a custom email that is sent manually to a selected list of recipients by an admin in the backend. If you set up a template with this action, it will appear in the bulk actions dropdown in the Participants Database admin list page so you can send your custom email to the selected members.
Note that this will only send to a limited number of recipients, 100 or less to avoid script timeouts, so it can’t be used to send out to your list of thousands. Also, be sure you know your web host’s mass email policy to avoid problems with your hosting.
Admin List With Selected: delete, approved, unapproved: this action is triggered when a bulk action is performed on the list. An email will be sent to every selected record when this action is triggered.
Send on Condition
This setting gives you a way to determine if the email should be sent. Enable this to have a condition checked before sending the email.
Participants Database Field
This selects the field that is tested. It must be a field that is included in the submission, either as a user input or as a hidden field.
Operator
This gives you several ways to make a comparison to determine if the email should be sent.
Comparison Value Source
When the value in a record is checked, it will be checked against the comparison value. This value can come from one of three places: either as a literal value, against the saved record, or against the current “locale” value.
Comparison Value checks the record value against a set value. This value is found in the “Comparison Value” field below.
Send on Field Value Change Only when checked, will only send an email when the record value is changed to the comparison value. It will not trigger if the comparison value matches, but isn’t getting changed. (this is only available when the comparison source is Field Value to Fixed Value)
Saved Value checks the incoming or new value against the previously saved value. This value is only valid when the trigger is a record update because it requires that the record be in the database beforehand. The purpose of this is to give you a way to check against a changed value, so that the email will only be sent when your selected field value is changed by the user or an admin.
Current Locale Setting: this value is the current language selected. If you have a multilingual site, this gives you a way to send a different email depending on the language chosen. It will be the usual WordPress language abbreviation, usually something like “FR_fr” or “BR_pt”.
Prevent Duplicates
If this is checked, an email that uses the same template going to the same address as an email that was sent in the last 24 hours will be blocked as a duplicate. This is mostly to prevent accidental resending.
Additional information
Site License
Multiple, Single
10 reviews for Email Expansion Kit
Rated 5 out of 5
DEBRA RICKS (verified owner)–
I love this plugin. It has allowed me to setup tailored emails to our members. Very easy to use. Fantastic! A big thank you to Roland.
Rated 5 out of 5
Mike (verified owner)–
A huge THANK YOU for the plugin and the great add-ons. It works perfectly. Unlike many other plugins it is not bloated with javascript that often slows down the dashboard. I would prefer to have the PDb Email menu item nested under the main PDb menu. But this is probably a matter of personal taste. I hope, you will keep up the good work for many years.
Rated 5 out of 5
Brian Donnelly –
HI Roland –
I have tried a few different ways to get a tiled image to use as my Newletter background and nothing seems to work. I’m putting a CSS in the body section in the “Test” or code view. Can you please help me with this? (( I cant post in here the CSS I’m using because your WordFence app is stopping me from posting it))
Thank you
Roland Barker (verified owner)–
Things to check:
Make sure the CSS rules are enclosed in a style tag.
Check your image URL by pasting it into your browser location bar. If the URL is correct, the image will appear.
Read up on how the background-image CSS directive works, make sure you don’t need to add other rules to make it work.
I’m sorry I can’t be specific about what is wrong in your case.
Rated 5 out of 5
Brian Donnelly –
I have to say this Plugin and its Expansion Kit for drafting and sending newsletters to our volunteers is PERFECT! We have a small non-profit prison ministry so our database is not huge but communication going out monthly is key. Thank you all for your developing this –
Question – Anyone know how we might tile a background image in the Newsletter? We are using the Avada theme on WordPress :)
Roland Barker (verified owner)–
The only way to do this is to add some CSS rules to the newsletter body, you’ll need to know the absolute URL of your background image. Put something like this into the email template body…you must use text mode.
<style>

body {

background-image: 'https://your-domain.com/image/ background image.gif';

}

</style>
It might not work at first, you’ll need to adjust it for your specific needs.
Rated 5 out of 5
CM –
Looks great, with this add can you use it as a general communication tool to email back and forth with a participant? With a record of the emails send back and forth?
Roland Barker (verified owner)–
No, there is no provision for a threaded series of communications like that. I would suggest you look into one of the help desk or customer support plugins out there for that kind of thing.
Rated 5 out of 5
Randy (verified owner)–
To say I am a WordPress novice is an understatement. Despite my limitations, I was able to built a complex, functional app for my website using Participants Database and several of his add on extensions
Roland has created a fantastic plugin and his support is unrivaled. Highly, highly recommended
Roland Barker –
Thanks Randy, I really appreciate your comments!
Rated 5 out of 5
Dmitry Kulokov –
Hi, its possible send auto email when setup date in records is now?
Roland Barker –
Yes, you have to schedule a cron for that. Take a look at this article:
How is this Email Expansion Kit differ from MailChimp Integration? Which is the add-on for me to send out group email to my selected “participants”?
Roland Barker –
The Email Expansion Kit provides general-purpose email services to Participants Database and its add-ons. It is capable of sending an email to selected recipients from Participants Database, but it is limited in the number, probably round 100. It’s not set up to be a mass-emailer, which is what 3rd-party mass email services like MailChimp are for. If you need to send emails out to large numbers of recipients, then MailChimp is a good way to go. You must have an account at MailChimp to use the service.
Rated 5 out of 5
Marion (verified owner)–
This is so brilliant! Thanks a lot for this add-on, it’s worth every penny.
Rated 5 out of 5
Ole –
I don’t know how I have lived without this plugin for so long.
Worth every cent – works flawlessly!
Great work – again – Roland
If you find my plugins useful, and would like to encourage or support its further development, please drop a little something into the tip jar or give the plugin a rating.
This website uses cookies to improve your experience. We'll assume you're ok with this, but you can opt-out if you wish.AcceptRead More
Privacy & Cookies Policy
Privacy Overview
This website uses cookies to improve your experience while you navigate through the website. Out of these, the cookies that are categorized as necessary are stored on your browser as they are essential for the working of basic functionalities of the website. We also use third-party cookies that help us analyze and understand how you use this website. These cookies will be stored in your browser only with your consent. You also have the option to opt-out of these cookies. But opting out of some of these cookies may affect your browsing experience.
Necessary cookies are absolutely essential for the website to function properly. This category only includes cookies that ensures basic functionalities and security features of the website. These cookies do not store any personal information.
Any cookies that may not be particularly necessary for the website to function and is used specifically to collect user personal data via analytics, ads, other embedded contents are termed as non-necessary cookies. It is mandatory to procure user consent prior to running these cookies on your website.

DEBRA RICKS (verified owner) –
I love this plugin. It has allowed me to setup tailored emails to our members. Very easy to use. Fantastic! A big thank you to Roland.
Mike (verified owner) –
A huge THANK YOU for the plugin and the great add-ons. It works perfectly. Unlike many other plugins it is not bloated with javascript that often slows down the dashboard. I would prefer to have the PDb Email menu item nested under the main PDb menu. But this is probably a matter of personal taste. I hope, you will keep up the good work for many years.
Brian Donnelly –
HI Roland –
I have tried a few different ways to get a tiled image to use as my Newletter background and nothing seems to work. I’m putting a CSS in the body section in the “Test” or code view. Can you please help me with this? (( I cant post in here the CSS I’m using because your WordFence app is stopping me from posting it))
Thank you
Roland Barker (verified owner) –
Things to check:
Make sure the CSS rules are enclosed in a style tag.
Check your image URL by pasting it into your browser location bar. If the URL is correct, the image will appear.
Read up on how the background-image CSS directive works, make sure you don’t need to add other rules to make it work.
I’m sorry I can’t be specific about what is wrong in your case.
Brian Donnelly –
I have to say this Plugin and its Expansion Kit for drafting and sending newsletters to our volunteers is PERFECT! We have a small non-profit prison ministry so our database is not huge but communication going out monthly is key. Thank you all for your developing this –
Question – Anyone know how we might tile a background image in the Newsletter? We are using the Avada theme on WordPress :)
Roland Barker (verified owner) –
The only way to do this is to add some CSS rules to the newsletter body, you’ll need to know the absolute URL of your background image. Put something like this into the email template body…you must use text mode.
<style>
body {
background-image: 'https://your-domain.com/image/ background image.gif';
}
</style>
It might not work at first, you’ll need to adjust it for your specific needs.
CM –
Looks great, with this add can you use it as a general communication tool to email back and forth with a participant? With a record of the emails send back and forth?
Roland Barker (verified owner) –
No, there is no provision for a threaded series of communications like that. I would suggest you look into one of the help desk or customer support plugins out there for that kind of thing.
Randy (verified owner) –
To say I am a WordPress novice is an understatement. Despite my limitations, I was able to built a complex, functional app for my website using Participants Database and several of his add on extensions
Roland has created a fantastic plugin and his support is unrivaled. Highly, highly recommended
Roland Barker –
Thanks Randy, I really appreciate your comments!
Dmitry Kulokov –
Hi, its possible send auto email when setup date in records is now?
Roland Barker –
Yes, you have to schedule a cron for that. Take a look at this article:
Automatically Sending an Email using the WordPress Cron
Thomas Sim –
How is this Email Expansion Kit differ from MailChimp Integration? Which is the add-on for me to send out group email to my selected “participants”?
Roland Barker –
The Email Expansion Kit provides general-purpose email services to Participants Database and its add-ons. It is capable of sending an email to selected recipients from Participants Database, but it is limited in the number, probably round 100. It’s not set up to be a mass-emailer, which is what 3rd-party mass email services like MailChimp are for. If you need to send emails out to large numbers of recipients, then MailChimp is a good way to go. You must have an account at MailChimp to use the service.
Marion (verified owner) –
This is so brilliant! Thanks a lot for this add-on, it’s worth every penny.
Ole –
I don’t know how I have lived without this plugin for so long.
Worth every cent – works flawlessly!
Great work – again – Roland