This add-on creates a “Contact Form” field for Participants Database that can be used to add a secure contact form to your listings and record detail pages. The contact form field appears as a button that, when clicked, opens a form where the user can send an email to the email address in the current record.
This add-on requires the Email Expansion Kit add-on to define the email template used for the contact.
It is also highly recommended that the PDb reCaptcha add-on be present to prevent spam or bot submissions.
This add-on uses email templates that provide a lot of flexibility in configuring the email that is sent. It is easily possible to send copies to other recipients, include attachments, even trigger more than one template when a user sends the contact.
What the Button Does
When the contact button is clicked, a contact form is shown as an overlay to the current page. When the user fills out and submits the form, an email template is triggered to send. This template can be configured to include any needed information and can be configured to send to multiple recipients. It’s also possible to set up an email that is sent back to the user.
The contact form can be protected by the Google Invisible reCaptcha to ensure the submitter is a real human.
Typical Use Cases
business-to-business listings
business directories
real estate agent listings
club membership listings
white papers or technical article listings
This add-on will be useful if you are using Participants Database as a listing of agents, members or even businesses where you want to provide a way for your site visitors to contact individual listings via email. The actual email address does not need to be published.
You can use this add-on to confidentially send information about the record to the user, for instance as an automatically-fulfilled “request for info” where the information provided is not published and can only be seen in the email that is sent. It’s possible to set up a separate notification that is also sent to another recipient when information is requested this way.
Another possible use would be to provide people with a download that requires that they provide a name and email address before receiving the file as an attachment.
Multiple Contact Forms
It’s also possible to define multiple contact forms so that the user can send different kinds of contact emails. For instance, you could have a button for a sales inquiry and also a button for a support request.
Instructions
Start by installing and activating the add-on, making sure you also have installed the Participants Database Email Expansion Kit plugin.
Adding a Contact Button
The first step is to add a new “Contact Form” type field for your button on the Manage Database Fields page. You can call it “contact” or anything you want. This will add a contact button to your list and/or single record display in the same way that any other field is shown. You can show it with other fields, or show it alone by using the “fields” attribute of the shortcode.
The contact button is always associated with a single Participants Database record.
For instance, if you are showing a list of records that includes the contact button, each button in the list can send an email based on the information in that record: typically, it will be the email address. So, if your list is a list of club members, clicking on the contact button on a member’s listing could send an email to that member. That is only one example, the configuration of the button is very flexible, many other actions are possible.
The text on the button is configured in the add-on’s settings, but it is also possible to individually configure the button in the “values” section of the field definition on the Manage Database Fields page. This is explained in detail below.
What the Button Does
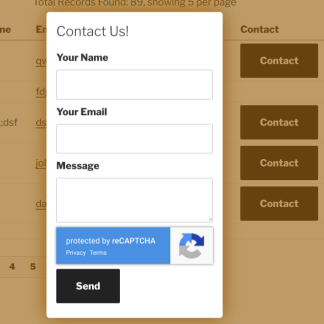
Once you have added your contact button field and configured it to appear in your list and/or single record display, it will show up as a clickable button. When that button is clicked, a contact form appears in an overlay on the page. This form includes an input for their name, email address and the message they want to send. Optionally, the user can enter a subject line.
When the user clicks the “send” button, the email is triggered with the entered information and also the data from the associated record.
reCAPTCHA
If you have Participants Database reCAPTCHA installed, the form will include an “invisible” recaptcha device that will verify that the user is a human.
To configure the reCAPTCHA for this add-on, you must use “invisible” API credentials, the regular reCAPTCHA v2 credentials won’t work.
Go to your reCAPCTCHA developer page. You will see a list of all your API keys. Under “Site Type” you will see if the key you are using is v2 or Invisible. If the keys you are using are v2, you should create a new set of keys (you can’t change existing keys) for your site, and make sure they are the “invisible” type. Use these new keys in the settings for Participants Database reCAPTCHA. The usual reCAPTCHA on your signup forms will continue to work with the new keys.
If you don’t use reCAPTCHA, the contact forms will still work, but they won’t be protected against automated submissions from non-human users. In many cases, this is OK, the contact forms are not easily detected by bots, or perhaps in your case the page with the contact buttons is not public.
Setting Up the Email
When a users submits the contact form, an “email event” is triggered with the submitted data. For that event to actually send an email, you must use an email template that determines what will be in the email, who it goes to, and all that stuff.
Go to the PDb Email Templates screen and create a new template. Set the Send Action to “Contact Button Email” so that the template will be triggered when the contact form is submitted. Fill out the rest of the template to set up what the content of the email will be and who it will go to.
Using Value Tags
In your template, you can use “value tags” that will be substituted with the values in the form submission. It’s important to understand that the data you will have access to in this template is all the record data from the record that was displayed or clicked on to send the contact email. There will, of course, also be all the information the user entered into the contact form.
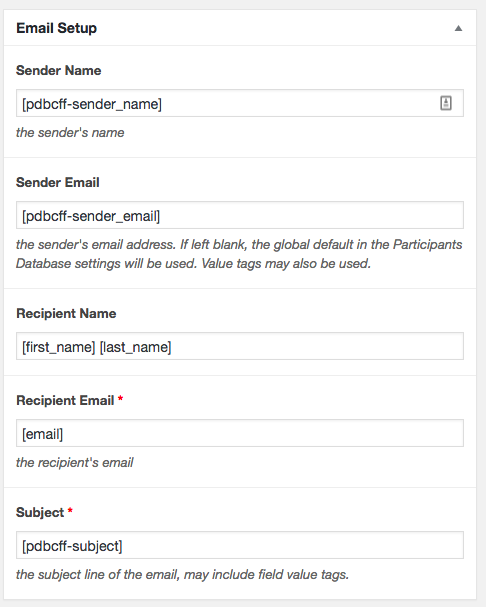
To set up a typical contact email where the record the user has selected is the person to whom the contact email is sent, put the participant record email in the Recipient Email space. You can also fill in the Recipient Name with fields from the record as well. (See the screenshot below for what that looks like.)
Information from the contact form uses field names that are prefixed with “pdbcff-” (short for Participants Database Contact Form Field) so that they will not conflict with information from the record. The fields from the contact form that you will be able to use are:
pdbcff-sender_name
pdbcff-sender_email
pdbcff-subject (this is the “Global Subject Line” setting)
pdbcff-body
This image shows how a typical contact email template might be configured.
The “Body” of the email template would probably contain only the [pdbcff-body] tag, but you could add other text and use the pdbcff-body tag to place the message from the user in the body of the email.
Of course, this is only a starting point. Your template can easily be customized to your particular needs. You can also use the CC and BCC sections to send duplicate emails to other people. It is also possible to place multiple email templates on the same event if you need different emails to go to several recipients.
Defining the Email Subject
Email subjects are an important way to organize incoming emails for the recipient, and with this add-on you have a lot of flexibility in defining the subject of the email. In the add-on settings is a setting for the email subject line. This setting accepts value tags, so you can construct a subject that includes all the information needed to help manage the incoming emails. This means you can include any information from the record the user clicked on.
If you are allowing the user to enter their own subject, that information is available in the tag [pdbcff-subject]. If that tag is included in your subject line setting, the user’s subject will be shown. It is recommended that you also add text to the subject so that the email can be easily identified as coming from the contact form… for instance:
That way, no matter what subject the user enters, the recipient will know this was a submission from the Participants Database contact form.
In the email template, the [pdbcff-subject] tag will show the Global Subject Line.
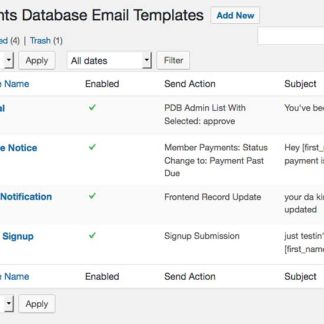
example of a configuration where each contact button field uses a different email template. This one is configured to send on a field named “contact”
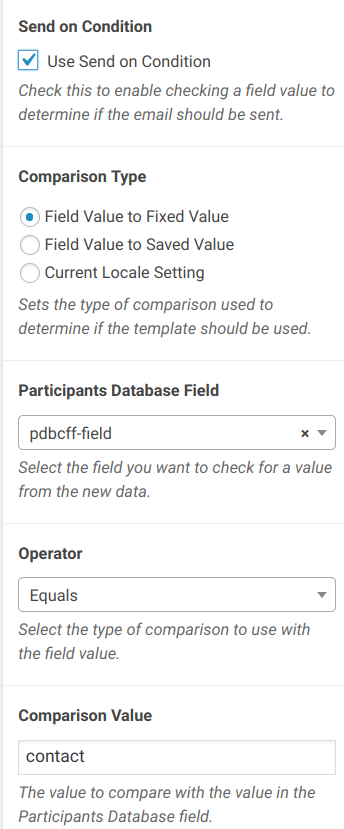
Using Conditional Sends
The Send on Condition setting can be used to determine if an email template should be used based on the user’s input or data from the record the contact button was attached to.
The typical use for this is if you have more than one contact form. In a setup like that, each contact form field will have a different name. In the conditional setup, one of the fields available is “pdbcff-field” which holds the name of the contact button field that the user clicked on. When you have more than one contact button field, this is how you would attach a different email template to each of your contact button fields.
Field-Specific Configuration Options
Many of this plugin’s configuration settings can be set on a per-field basis by defining the values in the “values” parameter of the contact button field definition on the Manage Database Fields page.
The values are set using the usual syntax for the “values” configuration field. For instance, to set a special title and contact button text, you could use a setting like this:
form_title::Support Request,contact_button::Get Support
Here is the list of options that can be set in the field definition:
sender_name_label – labels the “sender_name” input
sender_email_label – labels the “sender_email” input
message_label – labels the message input
subject_label – labels the subject input
subject_line – sets the subject of the email
placeholder – sets a placeholder text for the message input
form_title – sets a title for the form
contact_button – text for the contact button
submit_button – text for the send button
sent_message – text shown after a successful send
These configurations can also contain value tags that will be filled with data from the record…for example:
sent_message::your message has been sent to [first_name] [last_name]
Additional information
Site License
Multiple, Single
1 review for Contact Button
Rated 5 out of 5
DEBRA RICKS (verified owner)–
This has allowed our members to contact other members while keeping their email private. Something that I could not have done without this add on as it would require extensive coding above the level of my knowledge. I highly recommend this and other add ons. Roland has been fabulous at supporting me when I had a problem that was not caused by this add on, but by something else in my build. With his help and patience the problem has been solved. Thanks again Roland. I appreciate your super quick responses very much.
If you find my plugins useful, and would like to encourage or support its further development, please drop a little something into the tip jar or give the plugin a rating.
This website uses cookies to improve your experience. We'll assume you're ok with this, but you can opt-out if you wish.AcceptRead More
Privacy & Cookies Policy
Privacy Overview
This website uses cookies to improve your experience while you navigate through the website. Out of these, the cookies that are categorized as necessary are stored on your browser as they are essential for the working of basic functionalities of the website. We also use third-party cookies that help us analyze and understand how you use this website. These cookies will be stored in your browser only with your consent. You also have the option to opt-out of these cookies. But opting out of some of these cookies may affect your browsing experience.
Necessary cookies are absolutely essential for the website to function properly. This category only includes cookies that ensures basic functionalities and security features of the website. These cookies do not store any personal information.
Any cookies that may not be particularly necessary for the website to function and is used specifically to collect user personal data via analytics, ads, other embedded contents are termed as non-necessary cookies. It is mandatory to procure user consent prior to running these cookies on your website.


DEBRA RICKS (verified owner) –
This has allowed our members to contact other members while keeping their email private. Something that I could not have done without this add on as it would require extensive coding above the level of my knowledge. I highly recommend this and other add ons. Roland has been fabulous at supporting me when I had a problem that was not caused by this add on, but by something else in my build. With his help and patience the problem has been solved. Thanks again Roland. I appreciate your super quick responses very much.