Expands Participants Database into a relational database. Define different types of record to represent and interact with complex data structures.
This plugin also provides a way to use Participants Database as several separate databases.
Product Setup
How the Plugin Works
This plugin works by making it possible to define “types” for your records. A record’s type declares what the record represents, for example what job or role the person in the record has, or to what group the record belongs. These types or groups can be linked to each other, giving you a way to create an interrelated database representing different things and how they are related to and interact with each other.
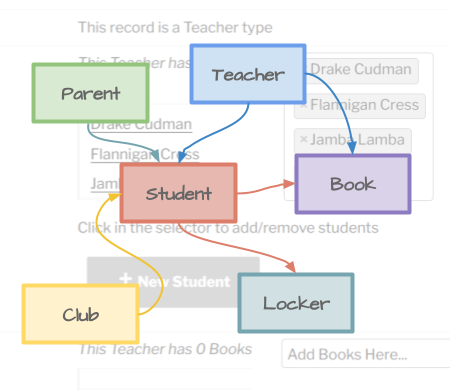
The example we will use to explain how to set up and use the plugin is a database for a school. In this example, the school database has 4 types: Teachers, Students, Parents and Books. Teachers will have Students, and Students will have Books. Teachers can have Books too, but not if a Student already has it. Parents will also have students, and this gives the Teacher a way to know who each Student’s Parent is, and possibly that other Students have the same Parents. This model could be expanded to include things like Administrators, Teams, Clubs, Lockers, etc.
Before You Begin
This plugin will be easier to set up if you have figured out the structure of your records beforehand. Like the example above, you will end up with several different types of record that can be related to each other in various ways. It will be helpful to take some time to think about how you want the data represented and what is going to give your users an intuitive understanding of how things are related. This plugin can lead to extremely complex structures (maybe even too complex!), so it is best to think it all through first so that you end up with the simplest effective database structure that fills your needs.
All type relations are modeled as “parent/child” relations, where a record of a parent type includes, controls, or possesses records of the child type. A record can be parent to some types and child to others. For example a Student is a child to a Teacher (Teachers can have Students), and also a parent to a Book (Students can have Books). Records can also be of several types at once, for example a record for a person who is a Teacher and also a Coach.
When independent or automatic types are used, these types can be used as ways to group records together and are often based on some fact about a person, such as where they live or what department they work for. Independent record types can also work as “tags” which are useful for assigning traits to a record. Records can and often will have several type designations of that kind.
Setting Up the Plugin
Here is a brief overview of the steps to take to set up the plugin.
Your first task is to determine what types you need. A “type” is a kind of thing that is represented in the database. For example, if you have teachers and students in your database, that’s two types you will need to define.
For each type you need to define, repeat these steps, which are explained in detail below:
- Select the “Add New Type” tab and define a record type with its names
- Open the tab for the new type
- Set the mode and determination method of the type
- Determine the field groups the type uses
- Set up the record title
- Configure how the type displays its members
Once you have your types defined, go back and set up the relations for the types that are relational.
 Defining a New Record Type
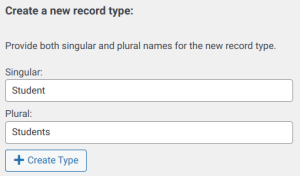
To define a record type, go to the Multi-Relational Db settings page, under the Add New Type tab you’ll see two text inputs. This is where you set the plural and singular names for your record type. For example “Student” and “Students” Type in your names and click “+Create Type” to create it. The configuration for the new type will be under its own tab on the settings page. The displayed name of the type can be changed any time, but the internal name for the type (which cannot be changed) is established with the singular name you chose. It’s best to keep that simple initially.
Setting up the Type’s Mode and Determination Method
Open the Multi-Relational Db settings page to configure your types. Each type will have a tab to access the configuration of the type.
The Record Type Mode setting determines the basic way the type behaves, and can be configured as “relational” or “independent.”
A relational type is related to other relational record types in ways which you define in each type’s configuration.
An independent record type is not related to other types, which provides a way to set up an independent database. Independent types can also be used for passive grouping, such as to create a group based on location where all records that are in the group’s configured location will be members of that group. Another way to use independent types is to function as “tags” that assign specific shared traits to records. Independent types can easily coexist with relational types, and a record can be of both relational and independent types.
The Record Type Determination setting sets up how a particular record knows which type it is. The determination can be automatic or manual. The record’s type determination is stored in the Type Determination field, found in the Internal field group. You don’t need to do anything with this field, but you can use it to see what types have been assigned to a record.
Manual determination means that an administrator will set the record’s type manually, which can be done in the admin record edit page or, for multiple records, on the admin List Participants page using a “with selected” operation. This is a good way to go for types where the record’s type doesn’t need to change: the admin sets what type it is and that’s it. It is always possible to change a record’s type, an administrator can add or delete type designations at any time.
Automatic determination is based on values in the record. This is well suited to types that work as a logical container or group of records. For example, you can define a type that is based on the record’s location, such as the country or state. If you set up the determination this way, a record’s type can change when the record is changed. For example, if the city of the record changes, that might put it into or out of a type that is defined by city.
The automatic determination uses the same format as the Participants Database List Shortcode Filter uses, so you can set up complex conditions for determining the type.
Records with Multiple Types
A record may have several types at once, although it’s best not to get too complicated with this. It works well for a record to have two or three type designations. For example, a Teacher (manual type) that is also a member of the Senior Staff (manual type) and UK country group (automatic).
Setting the Type’s Database Fields
Each type may have its own set of database fields to use, including the use of fields that other types are using. This is enabled with the Use Field Groups setting. Checking this setting opens the field groups selector.
The Enabled Field Groups configuration is based on field groups, so it may be necessary to visit the Manage Database Fields page to create and organize the fields you will need for each group. If you want to use some fields in common with other types, the common fields should be in their own group, since it is not possible to assign individual fields to a type. It is much more efficient to use common fields where possible. If, for example, several of your types have a “name” field, you should set that up as a single field that all the types are using, instead of the unnecessary complexity of having a separate “name” field for each type.

To set the fields the type uses, there is a multi-checkbox interface with all the available field groups. When when a record of the type is displayed or edited on the frontend, only these fields will be shown.
This setting does not determine which fields the record can have in its data, it only determines which fields the type can interact with and display.
Setting Up a Relational Type
Defining the Record’s Title
When setting up a relational database, it’s necessary for each record to have a name or title that is determined for it’s type. This is so lists of related records can be shown, also so that relations can be added/removed from a record. The Record Title Template setting determines how the title is constructed. This setting uses “value tags” to represent data from the record that will be used to build the record’s title. For example: [first_name] [last_name] Title templates may also include static text, but no HTML tags.

Bear in mind that if the source data for the title of a record changes, the title will be changed too, so it might be a good idea to choose something that won’t change to avoid confusion. Internally, the record is represented by its ID, so the title getting changed will not affect the record’s relations, the title is for display and interaction purposes only.
The record’s title is defined by the type, so if a record has more than one relational type, it’s title could be different for each type. The record title is always displayed in the context of the type, so it should be clear that the same record can be known by more than one title.
It is also important to understand that the record’s title may not be unique. This is OK as far as the plugin is concerned, the title is not used to identify a record, but it could lead to ambiguity when site users are interacting with records.
Configuring the Type’s Relations
To do this, you will need to have more than one relational type configured, so before you set this part up, create all the relational types you need to use.
Each record type can be put into a “parent” or “child” relation to other types. A “parent” type has or owns its “child” records. You can also think of the type relations as “container” or “contained” since you can use record types as a way to group records.
Setting the Relations
If the record type is supposed to be a child to other types, you select which parent types can have it as a child record using the Parent Types control. This is a series of checkboxes that determine which type the current type is a child to, and you can select multiple parent types.
The Child Types setting is read-only. If the type you are editing should be set as a parent to another type, you must do that in the child type’s configuration and select it as the parent.
The Exclusivity setting determines how many parents the child record can have. This would be used if the situation is such that (for instance) if one parent claims a child record, no other parent record can claim that same child record. See the Settings section on this page for more detail on using this setting.
Interacting with a Record’s Relations
When a type is set to “relational” mode, a new field is automatically added to the database called the “relational field.” The purpose of this field is to provide the UI for interacting with or displaying a record’s relations. The name of the field will match the name of the type.
To interact with or display a record’s relations, the relations field for the type must be included when you’re determining which fields are included in a particular display. To provide frontend interactions with the relations, the relations field should be in a public or private group. By default, the relations field is placed in an administrative group, so you will need to move it to another group in many cases.
Configuring the Relations Field Display and Interactions
A record’s relations are displayed using the relations field for the type. Each type has its own relations field, and so displaying the record’s type relations is controlled in the same way as any other database field. Generally speaking, a relations field shows the list of type relations that a record has, for example the Student relations field for a Teacher’s record would show a list of all the Teacher’s Students.
There are three contexts in which relations are shown: Record Edit, Single Record Display, and the List Display. For each one, you can set how it displays and (for the Record Edit display) what kind of interactions are allowed.
More information about configuring how the relations field is displayed in each context is found in the Settings section.
Relations fields are not shown in the Signup form because there is no way to determine the relations to a record that does not yet exist. It is, however, possible to set up a signup form that pre-sets the type of record that the submitted record will be. Automatic types will also be applied to records submitted through the signup form if the values needed to determine it are included in the submission.
The Type’s Relations Field
Each record type has a corresponding “Relations” type field in the main database. The type’s field provides you with a way to control how those relations are displayed and interacted with. The field stores the number of relations so you can filter and search by that number…for example show all Teachers with more than 5 Students.
You can configure the field’s visibility, title, etc. on the Manage Database Fields page. In particular, you will probably want to set the field group for the relations field, since the plugin makes a guess as to which group to place the field in when it is created.
The Relations field is used to display the list of records of the type that are related to the displayed record. In other words, the Student relations field can show a list of all the Teacher’s Students when viewing the Teacher’s record. Each Student record will show the names of their Teachers in the Teachers relations field. You can control how this field is displayed in the type’s definition.
Relations Field Configurations
There are several optional configurations that can be made in the relations field definition on the Manage Database Fields page. These configurations are placed in the attributes setting for the field.

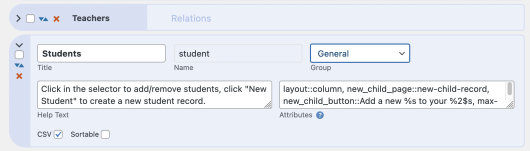
new_child_page sets the destination page for creating a new record of the type. This page must have the [pdb_record] shortcode so that the data for the new record can be filled in. The page slug name or page ID is expected here.
new_child_button sets the text for the “add new child record” button. This has a special format for placing the type name in the button: “%1$s” for the singular type name, “%2$s” for the plural name. For example: Add a new %1$s to your %2$ which would display something like: “Add a new Student to your Students”
layout selects the layout mode for the relations list. This can have one of two values: “column” generates a vertical list, while “row” generates a horizontal list. The default layout is “column.”
max-height sets a limit to the height of a relations list. If the list is longer than the max height setting will allow, it will be scrollable.
All the normal attributes can be used here as well.
Filtering or Listing by Relation using a Relation List Field
If you want to show a list of records filtered by a specific relation, this is only possible using a special field because in the database the relations field only stores the number of relations. You’d need this special field if, for example, you wanted to show a list of all the students with a particular teacher. In order to use a filter like this, we need a field in the database that stores a list of all the teachers that a student has which we can then filter on by matching the text in the field.
Setting Up a Relation List Field
A “relation list field” is a field that you need to create, and here’s how you do that: First, create a new field in the main database that is a “String Combine” type field. Give it a specifically descriptive name…in our example, we’ll name it “Teacher List” because it will contain a list of all the student’s teachers. You can put that into any field group, depending on whether you want it viewable on the frontend. In the field’s definition, set the “template” to access the relation field, which in our example will be “teacher”, the name of the teacher type. Here is what that looks like:

When that new field is saved, it will update all the records with the new field and its contents. Specifically, the field will contain a list of all the Teacher titles, as defined in the Teacher type. This is very important to remember when filtering on this field. The field’s content will be updated whenever the record is updated.
With that in place, you can easily filter by teacher, either in the admin when listing records or in a list shortcode using a list shortcode filter. For example:

That will show all the students for a teacher named “Shepard”. You notice we are using the “~” operator (which matches within the field value, not the whole field value), this is needed because it’s possible the student will have multiple teachers. The relation list field will contain a list of the titles for the teacher records, so if the title also includes a first name, and there is more than one teacher with the surname “Shepard” you can be more specific: filter="teacher_list~Adam Shepard".
You can have multiple fields of this type, for example, you might also want to make one that lists the students, then you can show a list of all the teachers for a specific student. The relation list field can also be used in things like email templates.
The Relational Map Display
On the Multi-Relational Database plugin settings page, there is a tab labeled “Relational Map” This is for the purpose of graphically displaying all they types that have been defined and their relationships to each other. Types that have multiple relationships to other types will appear more than once in the diagram.
You can click on the type’s box to see a list of all the records with that type and its relations to other records.
Viewing Record Types in the Admin Participant List

Once you have your types defined and records have their types assigned, you can view records by type in the admin List Participants page. There is a new selector in the filter “Type Designation” where you can select the record type to display.
Select “None” to show all records that have no type designation.
Using Record Types in Shortcodes
This plugin adds a new shortcode attribute: “type”. This can be used to focus the action of the shortcode on a specific record type. This can be used with both independent and relational types, giving you an easy way to set up registration for a specific type of record. For example to set up a registration for Students, you can use a shortcode like this:
[pdb_signup type="student"]
You can use the “type” attribute for other shortcodes too, for example to show a list of all the Teachers, you could use a shortcode like this:
[pdb_list type="teacher"]
You can set multiple types too:
[pdb_list type="teacher,student"]
Setting the Type in the URL
You can also set type value in the URL for a page with a Participants Database shortcode. This is done using the “pdbtype” variable. For example if your signup form is on /signup you would add it to the end of the url like this:
/signup?pdbtype=student
You might do this if you wanted to make it possible for users to create records of different types, but using the same page for all of them. You’d do that by providing a link to the signup page that included the name of the type that the new record should be.
This technique can also be used for other shortcodes, for example the list shortcode as explained above. This is a way to use the same page for several different types, but it can be tricky unless you have some technical knowledge how to set up special URLs in WordPress.
CSV Imports
As of Multi-Relational version 1.6, it is possible to set relations between records using a CSV import. This is a good way to set up a lot of records and their relationships from a spreadsheet. There are a few things to know in order to help make this operation successful.
There are two things to set in a record in order to establish its relationship with other records: the record’s type designation and its specific relations to a record or records of another type. It is not necessary to include both of these in the CSV: if you only want to change relations (but not types) with your CSV import, you should not include the pdbmrdb_type field.
If you are adding these records for the first time, you must do this in two separate import operations. This is because when setting the relations, the importer checks to make sure the relation in the imported data is valid, which means it must know what type the records are. It can’t do that if the types are getting set or changed by incoming data at the same time.
It is possible to use the same CSV file for this: you just have to import it twice. Make sure that the “Duplicate Record Preference” on the CSV Import page is set up to match the existing records so that the second import doesn’t create duplicates, but updates the existing records. On the other hand, it may make more sense to you to do this with two different CSV imports: the first containing all the record data including the type, the second need only contain the Record ID and the relations field data.
When you are importing records that are new records, you must set the type at that time. Each record has a field named “pdbmrdb_type” which should contain the names of the types you want to assign to the record. You can see the proper name to use under the settings tab for each type. If you need to set more than one type, use a comma-separated list of type names for the import value of the field. A correctly exported CSV file will enclose this list in double quotes.
Updating Relations with a CSV
Once the records have been imported, and the types set, you can import the relations. If the records already exist, you must make sure they have the correct types set before trying to import relations between them. When importing a CSV to update relations, the CSV only needs to include the record ID (which will be used to match the incoming data to a record) and the relations field or fields that need to be updated. Of course you can update other fields also at that time.
Relations are imported by using the relations field for each type. For example, let’s say you have Teacher and Student records in the database and you want to assign students to teachers. You can import the child relations or you can import the parent relations (don’t try to do both at the same time). If you decide to import the parent relations, in our example, the CSV data for a teacher would include the “students” field, and in that field would be a list of the record IDs for that teacher’s students.
Similarly, if you wanted to import the student data with their teacher assignments, you’d put a list of the teacher record IDs in the “teachers” field of the CSV.
Using Record Titles
As you know, each record in the Multi-Relational Database has a title based on its type. This is so you can display a list of records in an easily readable form. When exporting and importing via CSV, it is possible to use either the Record IDs or the Record Titles for the data. Titles are easier to read, but there can be problems if you try to use them for your CSV imports.
The two most common problems with using record titles in your CSV import data is first, it is possible for multiple records to have the same title, which means the importer wouldn’t know which record was referred to in the CSV data. Another problem is commas…if your record titles are configured to include a comma (or there is a comma in the field data used to create the title), this will cause problems because the CSV data is expected to be a comma-separated list of records.
If you’re sure your import won’t run into these problems, you can use titles for your import data, but in general it is best to use record IDs for this, as it is much more reliable.
Using the REST API
The multi-relational database is fully accessible to the Participants Database REST API. You can use all of the base REST endpoints to list, search, add, delete, and edit any record in the database. You can set the record’s type designations using the record edit or add endpoints. Please consult the Participants Database REST API page for the details.
The Multi-Relational plugin adds it’s own endpoints for interacting with the relations between records.
Do not attempt to use REST requests that change or create records to set relations, only the specialized endpoints below should be used for that purpose. This means that in general you should not include any “relations” fields in your REST requests, because these fields are maintained automatically by the plugin.
Get Requests
These are used to get information about the current relations that a record has. The request must include a parameter that names the relation you want to query.
Get Children: record/children/{record_id}?relation={relation_name} – this will return a list of the record IDs of all the children of the named type for the record.
Get Parents: record/parents/{record_id}?relation={relation_name} – this returns the record IDs for all parent records of the named type for the record.
For example, if you want to find the Students for a Teacher, and the Teacher’s record ID is 640, you’d use a request like this:
https://{your domain}/wp-json/participants-database/v1/record/children/640?relation=student
Post Requests
These are used to set the relations for a particular record. You can use these to add child records to a parent record, remove them, etc. Each post request must include the name of the relation in the “relation” key of the body. The ID or IDs of the records to add or delete must be in the “related_record” key of the request body. Multiple IDs are sent as a comma-separated list of record IDs.
You should use caution with these, as it is possible to (for example) add a child record of the wrong type to a record. Make sure that the relations configuration agrees with what you’re trying to do with these requests.
Add Child Relation: record/add_child/{record_id} – adds child records of the specified type to the record
Add Parent Relation: record/add_parent/{record_id} – adds a parent of the specified type to the record
Delete Child Relation: record/delete_child/{record_id} – removes the child records from the record
Delete Parent Relation: record/delete_parent/{record_id} – removes the parent record from the record
Note that deleting a child or parent record does not delete the record itself, it will only delete the relation between the records. Likewise, adding a child or parent relation does not add a new record, it only establishes a relation between existing records.
The Post Body for these requests should be in this form:
"relation" => {relation type name}
"related_record" => {record id}
The “relation” must be the name of a valid relation type, so if you are using the delete_child endpoint, the relation type must be a child type to the record identified in the final term of the endpoint. The “related_record” must be the record ID or IDs of records with the correct relation to the main record.
Product Settings
Global Settings Tab
Settings which apply to all record types.
Enable Relations CSV Import
Checking this enables setting the record relations using a CSV import.
Relations Import/Export Mode
This important setting determines how the information for each relations field will be exported and the expected format for an import.
“Record Title” means that the relations field will export a list of the related records using the record title as defined by the record type. When importing, the importer is expecting the record to be named by their title. It is recommended that you do not use this setting for importing relations via CSV as explained in the CSV Imports section of the plugin instructions.
“Record ID” means that the relations field data will be exported and imported as a list of record IDs. This is the recommended setting if you are going to import relations using a CSV.
Relations Overwrite Mode
When importing relations via CSV, this setting determines whether the existing setting should be overwritten or if the incoming relations data should completely replace those settings.
Add New Type Tab
This is where you initialize a new record type. Type in the singular and plural name for the type and submit. This will create the type’s tab where you can configure it.
Record Type Tabs
Each record type will have its own tab for its configuration.
Record Type Name
This is the read-only display of the identifier name for the type. This is the name you will use to identify the type in direct configurations, for example in the “type” shortcode attribute.
The type’s “name,” once established, cannot be changed, but the “labels” defined below can be changed at any time.
Record Type Label Singular
The singular display name for a single member of the type.
Record Type Label Plural
The display name for more than one member of the type.
Record Type Mode
The type’s mode can be either “Relational” or “Independent” This basic setting determines the behavior of the type: An Independent type won’t have other records related to it, although it will have members (records that are of the type). Independent types can be used to set up virtual multiple databases, each with their own registration forms and displays.
Record Type Determination
This sets the method used to determine what type a particular record is.
Manual means that the type is set by an administrator either when editing the record or on the admin List Participants page, using the “with selected” function “Add type designation” or “Remove type designation” and then selecting the type to add or remove. When editing a record in the admin, you can set the record’s type designations under the Record Info tab, using the Type Designation field.
A manual type can also be created with a signup form configured to create the type using the “type” shortcode attribute.
Auto means that the record’s type is determined by values in the record. The criterion used to determine the record type is configured using a filter configuration string. This filter works the same as List Shortcode Filters which makes it easy to create a complex set of conditions for the type determination.

In the example shown, the type would include all records from the city of Seattle. These determinations are updated whenever the record is updated. If the automatic determination filter setting is changed, all the records are checked for possible changes to the type assignments.
It is possible to use several auto types to assign multiple type designations to a record.
Use Field Groups
For some record types, you will want to only use field groups that are relevant to the type. The is often the case for types that are the main designation for the record. When this is enabled, you can control which field groups are used when displaying or editing a record of this type.
This is usually unselected for types that are used as general groupings or tags.
Enabled Field Groups
When “Use Field Groups” is enabled, this configures which field groups the type uses. This gives you a way to create independent datasets for different types of record.
Field groups are also used to provide fields that are common to multiple types.
The rules for which field groups are used can be complicated if the record has multiple types that use field groups. The general rule is that all the field groups for all types will be used, so if you are showing a record that is both a Student and a Teacher, enabled field groups from both types will be shown. If you need to choose a single type that determines the field groups, you can use the “type” attribute of the shortcode for that.
Record Title Template
For relational records, it is necessary to have a title for the record so the related records can be shown in lists. This setting defines how that title is constructed for each type.
The template works the same way as other templates in Participants Database work: you use a “value tag” to access a value in the record, the rest of the template is made up of literal characters such as spaces. For example, a basic title template for a record that represents a person could be:
[first_name] [last_name]
It is possible to add static text to the title template, but no HTML tags are allowed, since the title will often be wrapped in a link. Keep it simple, these titles are used to display lists, a too-long title will cause display issues.
Parent Types
This setting determine which types may be related to the currently edited type as a parent. For example if you’re editing the Student type, “Teachers” would be checked here because Teachers can have Students.
A warning when allowing multiple parent types: if a parent record has type designations for more than one parent type for a child, there will be configuration issues if an individual parent record is a parent to a child record in more than one way (this is called a “parallel relation”). It leads to a lot of complexity that may be unnecessary, so we recommend you avoid a setup like that.
To give an example of a parallel relation: a teacher in the school has their own child in a class. The teacher’s record ends up as both a Teacher and a Parent to a single Student record. If this is something you need to do, it is best to define additional child types, so each parent has a single relation to a particular child record via a single type. For the example given, you’d add a Child type which has Parent as a parent type (you’d remove Parent from the parent types for the Student type). Then the Student whose Teacher is also their Parent would have two types: Student and Child. The Teacher would be the parent of the Student and the Parent would be the parent of the Child. This will work much more intuitively than allowing the parallel relation.
Child Types
This is a read-only display of all the types that can have a child relationship to the currently edited type.
For example, a Student type would have “Books” listed here. To assign a child type to the current type, you need to save your changes and open the child type tab and select the parent type there.
Child Limit
It is possible to set a limit to the number of child records that can be attached to a record of the currently edited type. Each registered child record type has a limit setting. A setting of 0 means there is no limit to the number of child records of the type that can be attached.
For example, if you’re setting up the Teacher type, you can set the maximum number of students that a teacher can claim by setting the “Students” value in the Child Limit setting.
Exclusivity
This controls what child records will be available to a parent type based on whether another parent record has it.
Not Exclusive means that there are no restrictions on which parent can choose a particular child record.
Exclusive to the Parent means that the child record can only belong to a single parent of a type.
For example, if you have Teachers and Counselors and this option is selected for Students, then if a Teacher has a particular Student, no other Teacher can have them, but a Counselor can. Once a Counselor has selected their Student, no other Counselors may claim that same Student.
Exclusive means that only one parent of any type may have a particular child. For example, both Teachers and Students can have Books, but if either a Teacher or a Student has a particular Book, no other type can have it.
Relations Field Display Options
Every relational record type has a corresponding database field, which will be of the “Relations” type. This field provides control over how lists of relations are displayed. For each of the 3 display contexts there is a group of settings.
There are two built-in display templates that are used when displaying the list of related records: “responsive” and “table”. The responsive template is the default, if you want to use the table template, you can set that in the relational field’s definition by adding a “template” attribute…for example template::table. If you want to customize your own template, and you have some coding skills, there is a filter pdbmrdb-relations_list_template_{template_name} that you can you to supply your own template structure for the relations list display.
Record Edit Display
In the record edit display, a record can choose its relations based on its type. These controls configure those choices.
Child can Choose this Type: when checked, a record type that is a child of the currently edited type can choose it as a parent record.
For example if the current type is Club, this would be checked because Students (as a child type of Club) can choose which club to belong to.
Parent can Choose this Type: when checked, a record type that is a parent of the currently edited type can choose it as a child record.
For example, if the current type is Student, this would be checked because a Teacher can choose their Students.
Parent that can Create this Type: It is possible to allow parent-type records to create child type records. This control selects which parent type can do this for the currently edited type.
Show Related Record List: enabled showing a list of the related records. The link settings determine what kind of link is placed on the items in the list: Detail Link takes the user to the single record page to display the record. Edit Link takes the user to the participant record page to edit the record. No Link leaves the item unlinked.
Show Related Count: when enabled, shows a summary statement with the number of related records.
Single Record Display
Show Related Record List: enabled showing a list of the related records. The link settings determine what kind of link is placed on the items in the list: Detail Link takes the user to the single record page to display the record. No Link leaves the item unlinked.
Show Related Count: when enabled, shows a summary statement with the number of related records.
List Display
Show Related Record List: enabled showing a list of the related records. The link settings determine what kind of link is placed on the items in the list: Detail Link takes the user to the single record page to display the record. No Link leaves the item unlinked.
Show Related Count: when enabled, shows a summary statement with the number of related records.
Update Record Type
After making any changes to the configuration of the type, you must click this button to submit the changes.
Delete Record Type
Use this button to delete the type. It will remove all references to the type, but it will not delete any records. This action cannot be undone!
If you want to delete all records of a type, do this on the admin List Participants page: Use the filter to show all records of a type, then select all and use the “with selected” control to delete the records.
F.A.Q.
Can a parent record have multiple relationships to a child record?
Yes and no. You can set it up, but you won’t have separate control over each relationship.
While a record can have multiple types, a single record cannot have multiple relations to the same child type record…for example if a person (record) is both a Teacher and a Parent, it cannot be both Parent and Teacher to the same record that is a Student type.
If you need to have a setup like that, you can do that by creating more child types: for the example above, the child record would need to have two types such as Student and Child, that way the parent record can establish each relationship it has with the child record.
Are there any demos of the relational database like the teacher/student model you use an example that we could see the code?
I purchased the Participant Log and love it, as it did a great job for listing information on officers and representative information. I also purchased the Relational Database Plugin and thought I would use it for things like lists of states and other dropdown requirements, but it was easier to just use the built-in dropdown list values on the few fields as the lists were not going to change.
But, then I realized that I need to have one database of officer information, officer photo, names, addresses, telephone numbers, dates of service, location, etc. In this example, there are only 10 officers that I used the Participant Log to accomplish, before realizing that everyone would benefit from the same list of officers and could update the same information, or create one new officer and all the other records would see or change the new/updated officers when they went to that screen.
At first, I thought about just having it as a separate screen outside the tabs, but that would defeat the purpose of keeping everything together for viewing and editing, like the Participants Log did for us. I read the Multi-Relational Database information frontward and backwards and credit the type, applied the fields to the type tab, and started as an independent database since all records would see all 10 officers and be able to edit them. I inserted a shortcode field type. with [pdb_list type="officer"] on the Officer tab I created, and because there were no records, there was no apparent way of entering them like you have for Participants Log? I know you could use “pdb_signup type=”officer”] if there are no records, or if it was relational, I guess the Record Edit Display would be the cleanist and most simple? Since I want all officers to be able to be displayed/edited by all records, do I create a field (like checkbox where it is a 1 if checked) and link it to a hidden field that all officer records have that 1 to be related to the main/parent record as long as the checkbox is a 1 or not?
FYI — As time goes by, I would like to keep the officer records in there when they are inactive, so a simple field change to sort or display by active/inactive toggle would work nicely, I imagine?
Can you point me in the right. direction for what I want to do, code/demo examples? It is basicaly a 1 to many relationship, where the one can pull up a list of the many in a Tab to Add, Display, and Edit.
Thank you,
Robert
For relational record types, there is a concept of “ownership” where a parent type can create and edit child types, such as a teacher having the ability to register a student. This takes place by providing the teacher with special access to a page with the [pdb_signup] shortcode where they can register the new student. Likewise the teacher can edit the student’s record. This can only happen when the teacher is viewing their own editable record on a page with the [pdb_record] shortcode.
I’m sorry, I don’t have a demo of the relational database plugin, but it sounds like you are on the right track. It will become easier when you get more familiar with how it works. Participant Log cannot share information between users, but with Relational types, this is possible as you have seen.
If you want a user to be able to edit or create another record type, that user’s type must have a parent relationship with the type it can create or edit.
If you have more questions, it will be easier for me to give you a specific answer if the question is specific.
My Question is if I could realize the following situation with this plugin: Ex.: we have students with a special DB field INTERESTS and we have teacher wich want to match students with the same INTERESTS. So there is an existing db with students and interests and now i want the teachers, while they register them self, must fill an field INTEREST and after registration the teachers will see a list from only those students which matching this interests of the theacher.
Thanks for your answer and thanks for this great plugin.
Frank
Yes, it is possible, you will need to have some php skills. You create a custom template that uses the “interests” value from the teacher’s record to present a link to a page with the [pdb_list] shortcode on it. This link will include the interest value as a search term, so when they open the link it will show them a list of all the students with that interest. Take a look at this article for details on constructing a link that sets up a filter on the list display: Creating Links to Show a Filtered List Result
Hi. I have an issue. Im trying to add a “add-new-child” button to a parent single view page. Into your settings instructions, I see there editable options into the relations fields in manage database fields page, but my relations fields are not editables.
What could be happening?
Altering the record can only happen when using the record edit [pdb_record] shortcode to view the record. Record edits are not possible with the [pdb_single] shortcode, it is meant to be a read-only display.
Also, make sure adding child records (“Parent can Choose this Type”) is enabled for the child type.
I installed the Participants Database – thank you … but I need to do more, and I am guessing the multi-relational Database – what I want to do is to be able to monitor my fleet of Cars. I have 3 different locations with 3 cars each … i want to be able to log in with location #1 and update data for car #2, then log out and log in for location #2 and update data for car #1, and so on.
Any guidance you could give would be helpful … I assume this product will do this for me on my WordPress site? I also want to be able to run reports for each car at each location, like Gas consumption, Oil changes, repairs, Tires, and other stuff.
thanks again.. bob
You may not need Multi-Relational database for this, it will be simpler to use the Participant Log add-on to keep a log (or multiple logs) for each car. Each car will be a record in Participants Database.
The plugin doesn’t have a way to match a set of records to a logged-in user, so to access the cars for each location, you can use a filter to select which location you want to look at. You will need to have an administrative field in the record that says what location the car belongs to.
If you need it to be a separate log in for each location, then you can do that with some custom code.
This look great, and will hopefully do what I’ve been trying to bodge with the original plugin and logs. Is there an easy way to migrate records to the new multi relational setup, as the base info will be the same, I’ll just want to carve off some fields into child types etc.?
Thanks
I will probably need more information to answer this properly, but the way the Multi-Relational plugin works, all records are in the same database, they just have established relationships based on their type designation. So, “migrating” a record is as simple as setting its relational type designation. There is a way to do this with a large number of records on the admin List Participants page using the “with selected” function.
However, if you are talking about migrating Participant Log entries, that is a different matter. You will need to export the log entries as a CSV, and then modify the CSV and import them as regular PDB records.
Atm I have a lot of fields within one client record (client info, patient info, exercises etc). With the new plugin I would imagine a client would have a record, each client can have multiple patients (separate records?), each patient can have multiple exercises (again separate records?). So I will need to move those patient/exercises etc fields to separate record types?
I was using a log to add additional patients per client (albeit in a very clunky way), the other logs will stay as logs.
Hope that makes sense.
Thanks
It will be complex, but the whole thing can be done using a set of spreadsheets. If you’re familiar with working with spreadsheets, to won’t be too hard. I’ll describe it in a general way, there will be a lot more to this than I will say here. I would recommend you set up the multi-relational plugin and work with it so you understand how it works before trying to convert your whole database.
First, you’d set up your types in the Multi-Relational Database settings: client, patient, exercise. Make sure you have a column that identifies the record so that you know which record belongs to whom when youre assigning the relations later on. Use this column as the identifier for each type: could be the person’s name or an id number.
Make sure you have a backup of your database handy in case things go wrong and you need to start over, very important.
Basically, you’d export all of your records with all of the data and import them to a spreadsheet. You would add a new sheet to the document for each type: client, patient, exercise. By selectively mirroring the data from the first sheet into the secondary sheets, you’ll divide the data from each record into 3 (or more) records. Each of those will need to have the “pdbmrdb_type” column where the type designation would go.
Note that for something like the exercises, if there are only 10 different exercises, you will only need 10 exercise records, you don’t need a separate one for each patient, they will share the ones that are the same. If a patient is keeping a log of when they do their exercise, this wil be in a Participant Log field that is attached to the exercise record. Each patient will then have their own personal log, even though they are doing the same exercise as other patients.
When the generated sheets for each type are imported into the database, they will all be new records (the previous records, you can delete, you don’t need them any more) with a set type designation.
The logs will need to be exported and placed in another sheet in the document. You will need to figure out how to integrate that data into the process.
Once all your types are imported to the plugin, you will need to do the assignemnts. You can’t import the assignments because they are in a separate database. Setting up the assignments will require that you open each parent record (client, patient) and assign their child records. There isn’t any easier way to do this.
Thanks, that sounds like a major overhaul, but worth if it I can work the logistics.
Btw, I’m not getting email notifications of your replies on this support thread (not sure if anyone else is).
Thanks
Thanks for letting me know about the notifications, it may be that you are not subscribed to the thread? It does look like notifications are going out, you got a couple earlier this month, but not on this thread.
Yes, I get them for other threads. I fill in my email (and tick the save box) just like the others, can’t see anything else I need to do to subscribe (I’m sure I didn’t do anything different for the others)?
Thanks
I have created a Parent & Child called Dispatcher & Dispatcher Schedule. On the List Particpants I have chosen “Type Designation (pdbmrb_type)” which results in following radio buttons for “Dispatcher” and “Dispatcher Schedule”. When I choose “Dispatcher” for my listing, “Dispatcher Schedule” records are shown in the list as well. On the Multi-Relational Db page for “Dispatcher” under the Record Edit Display, I have the Show Related Record List box unchecked.
This shouldn’t happen should it?
Good catch, yes it should not work that way…it’s becuase one of your types contains the name of the other, but of course, that should be OK.
You’ll see an update soon that fixes this.
OK. The old download I had expired on 3/28/23 so I purchased a new one and downloaded it. Installed fine, but when I activated it got the following….again. I have WordPress 6.2
Warning: Undefined variable $admin_group in /homepages/32/d920848143/htdocs/clickandbuilds/KeoweeCares/wp-content/plugins/pdb-multi-relational/pdbmrdb/type/new_type.php on line 141
Warning: Cannot modify header information – headers already sent by (output started at /homepages/32/d920848143/htdocs/clickandbuilds/KeoweeCares/wp-content/plugins/pdb-multi-relational/pdbmrdb/type/new_type.php:141) in /homepages/32/d920848143/htdocs/clickandbuilds/KeoweeCares/wp-admin/includes/misc.php on line 1431
Warning: Cannot modify header information – headers already sent by (output started at /homepages/32/d920848143/htdocs/clickandbuilds/KeoweeCares/wp-content/plugins/pdb-multi-relational/pdbmrdb/type/new_type.php:141) in /homepages/32/d920848143/htdocs/clickandbuilds/KeoweeCares/wp-includes/functions.php on line 6896
Warning: Cannot modify header information – headers already sent by (output started at /homepages/32/d920848143/htdocs/clickandbuilds/KeoweeCares/wp-content/plugins/pdb-multi-relational/pdbmrdb/type/new_type.php:141) in /homepages/32/d920848143/htdocs/clickandbuilds/KeoweeCares/wp-admin/admin-
Do you have error messages getting printed to the screen? That is one reason for those “Cannot modify header information” warnings. The first one can happen if you don’t have any administrative field groups defined. You can ignore it.
1. Error messages are printed at the top of screen of WP dashboard as soon as I activate. I immediately hit Deactivate and they went away. Last time I tried to keep working and eventually got locked out. I had to restore from backup.
2. I do have administrative field groups defined in my Partipants Database.
Does this have anything to do with issue?
Site Health – Status
The authorization header is missing
I just issued an update to the Multi-Relational plugin that doesn’t show that warning
Thank you for the new update. It loaded fine with no issues. I have not had time to verify its operation, but I can access it under the Participants database just fine.
Thanks again.
I tried to install an old version of Multi-Relational Database and it apparently corrupted my site. I was able to install the latest update, but eventually got locked out. I am pursuing the backup installation now. Just want it confirmed this should not happen when I once again try to install the latest version. Follows the errors:
Warning: Undefined variable $admin_group in /homepages/32/d920848143/htdocs/clickandbuilds/KeoweeCares/wp-content/plugins/pdb-multi-relational/pdbmrdb/type/new_type.php on line 141
Warning: Cannot modify header information – headers already sent by (output started at /homepages/32/d920848143/htdocs/clickandbuilds/KeoweeCares/wp-content/plugins/pdb-multi-relational/pdbmrdb/type/new_type.php:141) in /homepages/32/d920848143/htdocs/clickandbuilds/KeoweeCares/wp-login.php on line 471
Warning: Cannot modify header information – headers already sent by (output started at /homepages/32/d920848143/htdocs/clickandbuilds/KeoweeCares/wp-content/plugins/pdb-multi-relational/pdbmrdb/type/new_type.php:141) in /homepages/32/d920848143/htdocs/clickandbuilds/KeoweeCares/wp-login.php on line 487
Warning: Cannot modify header information – headers already sent by (output started at /homepages/32/d920848143/htdocs/clickandbuilds/KeoweeCares/wp-content/plugins/pdb-multi-relational/pdbmrdb/type/new_type.php:141) in /homepages/32/d920848143/htdocs/clickandbuilds/KeoweeCares/wp-includes/functions.php on line 6896
These are the kinds of things that can happen with a downgrade, it’s always a risky move because an older version of the plugin can’t be designed to cope with the changes a later version made. The upside is nothing in that error log is a real problem, those are just warnings.
Do you want to post the original problem you faced with the latest version of the plugin and see if we can address that and get you back on the latest version?
No, I was not doing a downgrade. I purchased and downloaded the plug-in some time ago, but just got around to installing it. That is when I found out a newer version existed. I started getting errors with the old version. Installing the new version obviously only made it worse.
Anyway, I won’t make that mistake again. So now that I have restored to point before I installed the plug -in, I will go again and get then new version.
Based on your answer everything should be fine then.
Thank you.
OK, well, let me know if you run into trouble.
Hello, I just bought and installed the participant Multi-Relational Database and followed readme section for the installation but for some reason I am not seeing the option for Multi-Relational Database in WordPress. The documentation says start by adding a new type and I do not see that anywhere in my WordPress. Can someone please point me in the right direction? Thanks
The Multi-Relational Database plugin is an extension to the free Participants Database plugin. You must install and configure that plugin before setting up the Multi-Relational plugin.
Hello Roland, I the free Participant Database plugin is already installed and I am currently already using it. Also, I see “Participant Database Multi-Relational Db” under installed plugins” but when go to plugins I also see the below message. Could this be a problem even though the free plugin is working?
“Your license key is invalid. Without the license key the plugin can’t access updates API and there is no way to use instant support feature.”
That message is not from our plugin, so beyond that, what issue are you seeing?
Basically I downloaded and installed the Participants Database Multi-Relational Db plugin and I don’t see it in my WordPress application. In your documentation under setting up the plugin it says start by selecting the add new type tab but I don’t see this anywhere in WordPress unless I am just missing it. Should I see an option for Participants Database Multi-Relational Db under the free Participant Database?
Yes, the configuration for the multi-relational plugin is in the admin menu item under Participants Database. On the first tab, you’ll see the instructions for creating a type.
Hi Roland!
Today I noticed another problem: initially I made the settings so that each “parent” could choose his “children”. And this setting works well in the backend. But today I changed the settings so that the “children” can choose their “parents”, and the “parents” no longer have this possibility. But when I checked in the backend… everything worked as before, as if I hadn’t made any changes in the settings. So I started to make other changes and… any change in “Record Edit Display” has no effect… :( everything remains with the initial settings (parents choose children)… now I found that even if I create other types of ” parents” and other types of “children”, behave like the settings from the first types created… Can I do something to solve this situation?
Emanuel
Most likely this is some kind of caching, I’ve tested this and there’s no problem with the plugin that I can see. Caching that affects the admin section is usually at the server level, not a WP plugin or something like that. Check with your hosting provider if you don’t have access to the server cache, it should be temporarily suspended while developing your site.