
Adds enhanced image display, multi-file drag-and-drop uploads, and image management capabilities to Participants Database
Product Setup
This add-on for Participants Database works by putting all its image uploads into the WordPress Media Library. This opens up a whole range of possibilities for managing images in Participants Database.
Using this plugin is extremely simple: just install and activate the Participants Database Enhanced Images add-on. Now, whenever an image is uploaded in any Participants Database form, that image is added to your site’s Media Library, and all the sizes are generated. You can now see all the images in the Media Library and edit them there.
Image Sizes
When an image is added to the Media Library, WordPress automatically generates several different sized images so that the images can be loaded more quickly, speeding up your site. In the settings for the Image Expansion Kit add-on, you can select the size image you want to use for the List ([pdb_list]) and Single Record ([pdb_single]) displays. This will give you optimized image sizes and improved performance.
Custom Image Sizes
In addition to all the image sizes your site normally has, this plugin lets you define two custom image sizes for you to use in your Participants Database displays. See the settings tab for specific instructions on setting up custom image sizes.
Converting all your Images
The Image Expansion Kit settings page offers a utility to convert all your Participants Database images to Media Library images, generating thumbnails for each one. This is done in the background, so even if you have thousands of images, your site will not be affected while the operation is taking place.
Note: it is best to set up your Custom Image Sizes (if you are using them) before you perform the conversion so that the new sizes will be generated for all your images.
Image Captions
As of version 1.5, it is possible to add captions to image uploads. To do this, first you must enable captions in the plugin settings: check the “Enable Image Captions” setting to enable captions.

Next, to set up the text field that will hold the caption, create a new field with a name that uses the image field’s name and the word “Caption.” For example, if your image field is named “Photo” then you can create a caption field for that image by creating a text-line field named “Photo Caption.” Once that is set up, whatever is saved as the value in the Photo Caption field will be shown with the image field as its caption.
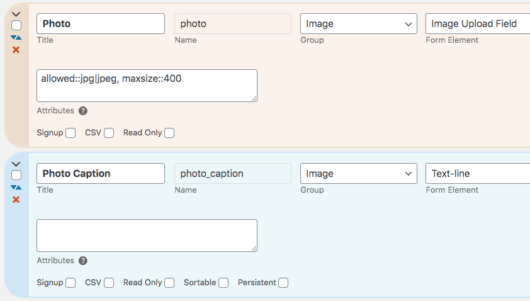
Each image field may have its own caption, for example, if the image field is named “picture” its caption field would be named “picture_caption”.
This same technique can also be used to set the “alt” tag for the image. Alt tags are used to represent the image when a screen reader is used. The alt tag provides a textual description of the image for the benefit of someone who can’t see it. In the example above you would create the alt field by creating a text field named “Photo Alt.”
Caption and alt fields are kept in sync with those values in the media item (as seen in the Media Library). If the media item has a caption defined, the caption field will show that value. If you change the caption field, the caption will also be changed in the media item.
Caption fields can only be a text-line type field and currently, captions are not available for multi-image upload fields. Also, note that how the captions appear is under the control of your WP theme. You can add your own CSS rules to alter the appearance of image captions, the plugin has no options for changing the appearance of captions.
Caption Fields in a Participant Log
If you also have the Participant Log add-on, and if you have an Image Upload field defined in a participant log as an entry field, you can also use the image caption feature.
To set this up, add a new field to the log (must be a Text Line field) and name it so that the first part of the name is the same as the image it is attached to, with ” Caption” added to it. (“Product Image” becomes “Product Image Caption”) This gives the user a way to add or change an image’s caption when the log entry is added or updated. Set the visibility to “private” so the caption field itself is only shown when the entry is getting added or edited.
Magnific Popup Lightbox
The add-on comes with an efficient lightbox script that pops open when the image is clicked, giving a full-size view of the image. This large-size image is only loaded when needed, speeding up your page load.
The lightbox also has a “gallery” mode that lets the user easily view all the images in the display.
The lightbox is enabled by setting the “Image Link” setting to “Lightbox” or “Lightbox Gallery” The List, Single Record and Record Edit displays each have independent settings for this.
Editing Images
All uploaded images can be edited using the Media Library. This allows you to crop, rotate, and perform other image edits in the WP admin. All images in the admin link to its image edit page so you have convenient access to editing.
 Multi-Image Uploads
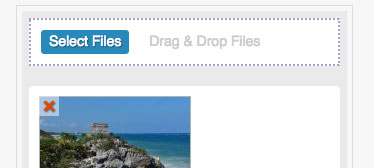
The add-on provides a new way to upload files with Participants Database: multiple-file drag & drop. This new form element provides a much improved user experience when uploading images: the upload takes place in the background and a preview of the uploaded file is immediately visible. It is possible for the user to add or delete files from the field at any time.
The Multi-Image Upload form element can be individually configured to limit the size and number of images uploaded. It is actually fully configurable and easily adapted to your language. Images are resized and display as thumbnails in the list, record edit and single record (detail) pages. The lightbox shows the images as an intuitive image gallery.
In the record edit screen, images can be re-ordered with a simple drag-and-drop interface.
To use the Multi-Image Upload form element, select it in the “Form Element” setting of a Participants Database field. The global settings for all multi-image upload form elements are in the settings for this add-on, but each field can have it’s own settings, placed in the “attributes” parameter of the field definition. The settings use the usual syntax of parameter::value, with each pair separated by commas.
Available settings are:
- maxfiles – maximum number of images that can be uploaded to the field
- maxsize – the maximum size of any one file in kilobytes
- button_text – the label for the file selector button1
- dragdrop_text – the label for the drag-and-drop target area1
- allowed – list of allowed file extensions, separated by the “pipe” character, such as jpg|png|gif2
For example: maxfiles::10,button_text::select images,allowed::jpg|jpeg|png
1Note: these settings will override the translation files. If you are setting up a multilingual site, it is better to set this in the translation files.
2Note: for security, all field-defined allowed file extensions must also be enabled in the global “Allowed File Types” setting in Participants Database.
Multi-File Upload Field
Works the same as the multi-image upload field, only it’s meant for non-image files such as text files, PDFs, word-processor documents, etc. You can set the allowed file types for the field in the same way as for the multi image upload element above. This one also adds any uploaded files to the Media Library. This new form element type was added in version 1.4.
The multi-file upload field has a setting to determine the link that is placed on the filename. The default link is the attachment page for the library item. You can also set it to link directly to the file or have no link at all. In the “attributes” setting for the field, you can put link::file or link::none to change the link setting.
 Use the WordPress Media Library to Manage Your Images
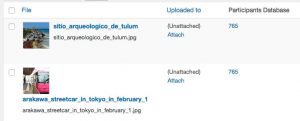
With this add-on all your image uploads are added to the Media Library for easy management and editing. The library display shows you which record the image is attached to, and provides a link to the Participants Database record for editing. Uploaded images in the record editor link to the Media File editor. It really makes managing large numbers of images a breeze!
The Media Library list view has a new filter where you can filter the list to show only Participants Database images, all images that are not Participants Database images or both.
Display Remote Images in an Image Field
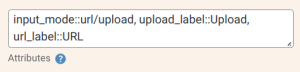
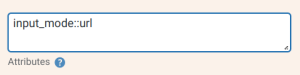 The image upload field has a “URL” input mode that allows the user to type in a URL to an image on your website or from another website. This is set up in the field configuration attributes as shown above. This feature is not available for the Multi-Image Upload field.
It is also possible to give the user a choice between uploading an image and typing in the image URL. The image field will show a radio button to select the input mode. There are 3 configurations you can use in the field attributes to set this up:
- input_mode – this can be “upload”, “url”, or “url/upload” for a field that supports either mode
- upload_label – sets the text next to the “upload” radio button
- url_label – sets the text next to the “url” button
Here is an example that uses all 3 configurations:
Images in the Media Library have a direct URL that can be used to display the image, which is shown on the edit page for the image. If you want to display an image from the Media Library, this is the URL to use.
Product Settings
General Settings
List Display Image Size
This setting selects the image size to use in all list displays. The sizes available are the defined image sizes of your site, but you can define a custom images size in the next section if the size you need isn’t available. The dropdown shows the name of the size and the dimensions in pixels, select the one nearest to the size you want the images to display for the most efficient load time.
Single Record Image Size
This works the same as the control above, but it is for the single record (or detail) display.
List Image Link
Note: in order for the image links to be placed, the “Link Image to Fullsize” setting must be checked in the Participants Database settings under the general tab.
This control determines what happens when someone clicks on an image in the list display. Here is a description of the options:
- Lightbox – the full-size image will open in the center of the screen, masking the page in the background
- Lightbox Gallery – the full-size lightbox image opens, but there will be < and > arrows so that all the images can be paged through in the lightbox
- Attachment Page – what this looks like depends on your theme, but it opens a special page for the image
- Image URL – this simply opens the raw image file in the browser window
- None – nothing happens when the image is clicked on
Single Record Image Link
Record Edit Image Link
Same as the above selector, but for the single record display and record edit display.
Delete Images With Record
When this is checked, images that are attached to a Participants Database record are deleted when the record is deleted. You may want to uncheck this if you are using the uploaded images for another purpose not related to the record they were uploaded with.
Custom Sizes
List Display Custom Size
This lets you create a custom size for use in all Participants Database list displays. Set the size of the image in pixels. If crop mode is not enabled, the image is resized to the largest possible size without cropping. In crop mode, the image is resized to fill the exact dimensions specified, cropping out any extra image area.
In order for the custom size to be used, it must be selected in the image size selector for the List or Single Record display.
Single Display Custom Size
This is another custom size that can be used.
Multi-Image Upload Field
Preview Thumbnail Size
This is the size of the preview image. The field shows previously uploaded images, as well as newly uploaded images as a thumbnail…this sets the size of the thumbnail.
Maximum Number of Files
This sets the global maximum number of files that can be uploaded to a field. This limit can be set on a per-field basis as well. This is explained in the Instructions section for the multi-image upload field.
Allow Users to Delete Files
If checked, users may delete individual files from the multi-image upload field. These images will be permanently deleted from the media library.
Update All Participants Database Images
This section provides a way to convert all existing Participants Database images to WP Media items. The process is performed in the background, so even with a very large number if images to process, site operations won’t be affected.
Note: set up your Custom Image Sizes (if you are using them) before running this command so that your custom sizes will be generated.
Click the “Update All” button to start the process. When it is complete, you will be told how many records and images were updated. You may need to refresh the page to see the message.
What it Does
When this process is run, it doesn’t copy or move the original images, it simply registers the image with WordPress as a media item. This generates all the defined image sizes, which will also be stored in the same location as the source image. The process is not reversable: if you deactivate the add-on, your images will stop showing.
F.A.Q.
How can I see which Media Library images are attached to Participants Database records?
On the Media Library page, when the items are viewed as a list, there is a column that will show the record ID of the record an image is attached to.
If you don’t see the Participants Database column, click on the “Screen Options” tab at the top of the page and enable the column there.
In the list display, all the images in a multi-upload field are shown. Is it possible to show only the first image?
Yes, t’s possible, it requires a bit of CSS magic. The plan is we hide all of them, then show only the first one. You can put something like this in the Custom CSS setting for Participants Database:
.pdb-list .mu-image-list > span {

display: none;

}

.pdb-list .mu-image-list .pdbiex-image-field-wrap:first-child {

display: inline-block;

}
Does the plugin support webp image files?
As of version 1.5.4, it is possible to allow the uploading and display of webp files. Webp files are a modern type of efficiently compressed image that users will often encounter when downloading images from websites.
Uploading webp files must be enabled by adding “webp” to the list of allowed file types in the Participants Database settings under the General Settings tab: “Allowed File Types.”

If the upload field has the “allowed” attribute set to control which file types can be uploaded to the field, it must include “webp” there, too.
The lightbox is not working. No matter what setting I use (lightbox, media attachment page, lightbox gallery) I get the same thing – just the image page. This is a dealbreaker for me – any suggestions?
I tried to test it (using the link you provided in the WordPress forum), if you could configure it to show the lightbox, I’ll be happy to test it and see what it’s doing.
The template is what generates the table, so using a custom template lets you modify how that works.
If you want to avoid coding, you can try using the CSS method: set the list image size to the largest size you need, then use CSS to take all the other ones back to their original size.
I want to be able to have different size images on a table I have created vs the standard image that is 150 x 150. Of course if I change “List Display Image Size”, this affects both.
The code I am using in the table is: [pdb_list filter="approved=yes&id=57" fields="photo"]
I can see there is custom sizes of either “List Display Custom Size” or “Single Display Custom Size”
How do I write the code to display images controled by either of these settings, which I assume won’t alter the main “List Display Image Size” using in the [pdb_list], which is currently set to 150 x150
Yes, the plugin does not offer a lot of flexibility when it comes to showing images of different sizes in the list display.
There are a couple of approaches to take here. If the difference in size is not large, you can use CSS to control the displayed size. This means you have all the list images loading at the maximum size, then the size is reduced with CSS rules. It’s not a good idea to try to increase the size using CSS, you’ll lose resolution. This approach probably wouldn’t be practical if the largest size you need is a lot larger than the 150×150 size you’re using as the general size for list images.
The second approach would be more code-intensive. You can use a custom template that replaces the normal display of the image field in the list with some custom code that gets the image directly from the media library and displays it. This is going to be a little complicated, you’ll need to be able to get the ID of the library item that the specific field is displaying, and then select the size to display. There will be several different sizes to choose from, based on your site configuration, and you may have to define new sizes for your purpose. You’ll need to have a good understanding of how WP handles image attachments to make this work.
I did find another way to set the image size, which should be a bit simpler on the code side. You’d use a custom template and then use the pdbiex-module_image_size filter to change the image size. That filter will get the name of the image size, with the name of the shortcode (list or single) for the second argument. With that filter, you can select a different image size…has to be a defined image size, you may need to define a custom size for that.
Hi – thank you for your replies.
What is a pdbiex-module_image_size filter please?
Also, when you say use a template, how do you envisage this to be done. Currently these images are in a WordPress Table using the code as above.
I’m talking about a Participants Database custom shortcode template. The link explans the details.
Hi – will this template work inside the table?
The problem I have is this is probably over my head to do this as I don’t fully understand this plus the reference to pdbiex-module_image_size filter
Just purchased the image expansion kit. Looking to use multi-image load. My goal is to allow users to upload whatever size they have, and then resize the files automatically for database storage. Documentation seems to suggest multiple sizes are created and stored in WordPress Media manager.
I only see a single image in Media Manager. Is there a way to choose what size image is displayed? Also, in the list, I do not get a link to open a full sized image. What am I missing?
The WP Media Library does indeed generate a set of resized images when an image is added to the library. When an image is displayed, WP determines which image size to use based on how large it will be displayed. You won’t see all those resized images in the library, this is something that happens in the background.
In the Image Expansion settings, at the top of the settings page, you can select which image size is used. If you want, you can also define a custom image size to use in the single and list display contexts. If you are using a custom image size, you need to configure that first, save the settings, then you can select your custom size for display. Any images that were uploaded prior to that will not have the new custom size, so it’s best if that is configured before uploading. It is possible to generate the new sizes for existing images using a “thumbnail generator” plugin, such as “AJAX Thumbnail Rebuild” which I recommend.
As to the show full-size image link in the list display, that is also configured in the Image Expansion settings using the “List Image Link” setting. If that is correctly configured, but the link is not working, it depends on the overall configuration what the possible issues are. If the setting is to show a “lightbox” and that is not working, there is likely some kind of javascript error on the page that needs to be addressed.
If you can’t get the full size link working, post a link to it so I can see what is going on.
Just want to let you know that I discovered an oddity within the database.
My field for multi-image upload is called “photo”. I want to count the number of images a participant has uploaded, so I tried it with a query:
select id, photo, ROUND ((
LENGTH(photo) – LENGTH( REPLACE ( photo, “,”, “”) ) )
/ LENGTH(“,”)
) +1 AS count
from wp_participants_database where photo is not null;
This gives me something like that:
264 imgp0058 1
266 dsc_0008, 2
267 dscn1287 1
271 lisa,albin_i_vandet_2,dsc00119 3
273 img-07c2f4860279a7c9107c7b6a0781b168-v, 2
As you can see, in most cases it is correct, but in some cases there is a trailing comma in the text field of “photo” which leads to wrong results.
I do not know what the reason is, maybe the user has deleted a file after uploading, no one knows.
Unfortunately I also have a filter routine in PHP which uses an array for counting, so that does not work correct either:
$stringarray=explode(“,”,$record[“photo”]);
$record[“numberofpics”] = count($stringarray);
best regards, Peter
I’ve seen this in the db, haven’t figured out how it happens. It’s not deleting images, that was the first thing I tried.
Anyway, you just need to filter the results so you’re not counting empty elements in the array. For example:
$stringarray = array_filter( explode(",",$record["photo"]));The php array_filter function.
Thank you, Roland, it works like a charm.
In case anyone is interested, I found a solution for my SQL query to ignore the trailing commas so the image count now also works correct:
WITH trimmed as (select id, photo, trim(trailing ‘,’ from photo) as trimmed_photo from wp_participants_database where photo is not null)
select id, photo, ROUND ((LENGTH(trimmed_photo) – LENGTH( REPLACE ( trimmed_photo, “,”, “”) ) ) / LENGTH(“,”) ) + 1 AS count
from trimmed;
Is there a way to enable the Lightbox Gallery for images in a log?
Thanks
These normally work, make sure you’re using the latest version of the Image Expansion plugin.
I’m sure that update wasn’t there yesterday! :-)
Thanks, all working now.
Laura
Yes, I had just posted it.
Hi Rowland – just purchased the Image Expansion Kit as I want to use it to create featured images – on this page: https://xnau.com/product_support/directory-tools/ you discuss about Featured Images, but you don’t go on to say how to make an image a Featured Image.
I am wondering if the Featured Image should then appear on the Proxy Post list page along with each Proxy Post, plus that the image will be recognised as a featured image.
Also, if you have more than one image for a post, how do you set the alt tag for multiple images, as you need to set up a field called “Photo Alt”, but you can’t use the same name for multiple fields. The same applies for a photo caption, so that if you have multiple images, you can only have one with a caption. Or have I missed something here?
Check the Directory Tools plugin settings, the “Post Featured Image Field” setting is available if the Image Expansion plugin is activated.
Whether the featured image is displayed or not and how it is displayed with the Proxy Post depends on the WordPress template that is used, and that is typically determined by the theme. If you’re using the “Display Using PDB Shortcode” setting, the featured image will simply be another field in the display. Take a look at the WP template that is in use on the Proxy Post page to see how the featured image is included in the content.
It the Image Expansion documentation on setting up alt tags this is perhaps not clearly descibed. Each image upload field can have it’s own alt tag and caption, the name given in the docs is just an example. For example, if the image field is named “picture” you can add a field named “Picture Alt” to define the alt tag for that image.
I am using “Display Using PDB Shortcode”, and I am also using “template=flexbox” to display the Proxy Posts. There is also a new setting on the Proxy Post Settings tab too “Post Featured Image Field”, this has a dropdown to select only “Photo”, which is listed five times as “Photo” in the dropdown.
There is no additional field type to select if that’s where you mean on the “Manage Database Fields” tab to add a Featured Image to a posts page, which is what I take you mean by “the featured image will simply be another field in the display”
So I am still a confused, sorry.
I don’t know if this plugin add-on doesn’t work with my theme, as I have used the WordPress “Embed” to add links to other Proxposts and to show the heading, excerpt and image, but the featured image is not showing (which is probably because it’s not been set), but if I select one of my normal posts this does show the featured image of the post, so something is not working somehow.
I’m guessing that you have several image upload fields that all have the same name. My apologies, the selector doesn’t deal with that very well, I hadn’t anticipated this and it will be hard to know which field you’re selecting. They will be in order, from top to bottom, so that should help.
There is no new field type for a featured image. When using the single shortcode to display the proxy post, the featured image is not displayed any differently from other image fields. However that does not mean the WP template can’t do that. The WP template is still controlling the display of the proxy post, and will display the featured image in a special way if it is configured to do so. It sounds like your theme will display the featured image once you get it set up.
If you need to customize the display of the proxy post, this guide is very helpful: Custom Post Type Template Files
One more thing: I’m testing this feature and it looks like you’ll need to use the “proxy post all records” button to assign the featured images once you have it configured.
Hi Roland, thank you. I realised that I had labeled each one as “Photo” and when I changed these to 1,2,3 etc, this really helped. I found this out by adding a new record and uploading new images, as this is what forced the images to show. This is now working well, thank you.
I have just transferred my site to Bitnami Multisite. I was able to recreate the database and the participants list looks fine, including the image previews. When trying to open the images in full size, there is an error. I noticed, that the path has “doubled”. Where can I change this?
wp-content/uploads/sites/7/sites/7/participants-database/
should be
wp-content/uploads/sites/7/participants-database/
Thank you and kind regards, Andres
First, take a look at the “File Upload Location” setting in the Participants Database settings under the general tab.
If you can’t get it to work by changing the settings there, try using the “File and Image Uploads Use WP Content Path” setting (advanced tab) check the help link for that setting if you’re unclear how that changes things.
Dear Roland
Thank you very much for your help! Activating “File and Image Uploads Use WP Content Path” did the trick. Now it works.
When changing this setting it resetted the max image size to 100k. Strange.
Thank you and kind regards
Andres
I try to convert images to media library but got this error and the conversion is stuck:
PHP Fatal error: Uncaught ArgumentCountError: Too few arguments to function pdbiex\PDb_File_Uploads_ML::add_image_to_library(), 1 passed in /home/tammelan/public_html/wp-content/plugins/pdb-image-expansion/pdbiex/PDb_File_Uploads_ML.php on line 378 and exactly 2 expected in /home/tammelan/public_html/wp-content/plugins/pdb-image-expansion/pdbiex/PDb_File_Uploads_ML.php:295Also when I select to show image captions, the plugin hides captions from record page (which I don’t want it to do) and still shows image without caption? The image are named as Kuva 1 (internal name: kuva_1) and caption as Kuva 1 caption (internal name: kuva_1_caption).
What I’m doing wrong?
I’m sorry abou the problem, I will release an update to the plugin later today to address the fatal error.
About your second question, what is the shortcode you are using on your record page?
Thanks, I’ll update right away when you’re finished.
The shortcode for the second question is [pdb_single class="hide-blank"]. And I can see the problem there, the plugin is apparently hiding the captions? Could it be possible to have it as an option, like “show captions only in lightbox” etc? In my case it would be nice to have captions both on the page and lightbox.
The update is available, you should see it on the plugins page.
The captions should not be hidden, hide-blank class does not affect that. What you can do is use the Developer Tools inspector to see why the captions are hidden. The captions for an image are displayed inside a <figcaption> element.
You may need to add some CSS to override whatever is hiding the captions in your case. The plugin does not hide them.
It’s not hidden by CSS. When the plugin is not activated, the source code generates like this:
<dl class="pdb-kuva_3 image-upload ">

   <dt class="kuva_3 ">Kuva 3</dt>

   <dd class="kuva_3 "><span class="image-field-wrap basename pdb-image image-field-wrap  display-mode-image"><a href...><img src="..."></a></span></dd>

</dl>

<dl class="pdb-kuva_3_caption text-line ">

   <dt class="kuva_3_caption ">Kuvateksti 3</dt>

   <dd class="kuva_3_caption ">Xxxxxxx xxxxx xx</dd>

 </dl>
but when I activate the plugin, it doesn’t generate the dl “pdb-kuva_3_caption text-line” -field at all. In fact, the caption doesn’t show on the lightbox as well? :-/
If the image was uploaded before the Image Expansion Kit was installed, the image must be converted to a WP Media item to get the caption. This is done on the Image Expansion Kit settings page at the bottom of the page there is a button to convert the exsting images.
I have approximately 1,500 images associated with my database. When I installed the Image Expansion add-on, I selected an image size but later changed my mind and increased the required image size.
Did I break it?
Although the images are still in the correct location, and the record has the correct image filename, I can no longer see the image in the backend or frontend. I also cannot see any of the images in the media library.
How do I reset? Should I deactivate and reactivate the plugin?
I don’t want to have to upload 1,500 images record by record.
I don’t see how changing the image file size limit would affect the media library or whether existing images would be seen. This setting will really only affect any uploads that happen after the change, and even then all it does is enforce a file size on the upload. It’s not going to change existing images at all.
So, it’s likely something else changed that caused the problems you’re seeing. You can try deactivating/activating, it might fix the issue, but I don’t know because I don’t know what happened. Did you install another plugin?