
Adds enhanced image display, multi-file drag-and-drop uploads, and image management capabilities to Participants Database
Product Setup
This add-on for Participants Database works by putting all its image uploads into the WordPress Media Library. This opens up a whole range of possibilities for managing images in Participants Database.
Using this plugin is extremely simple: just install and activate the Participants Database Enhanced Images add-on. Now, whenever an image is uploaded in any Participants Database form, that image is added to your site’s Media Library, and all the sizes are generated. You can now see all the images in the Media Library and edit them there.
Image Sizes
When an image is added to the Media Library, WordPress automatically generates several different sized images so that the images can be loaded more quickly, speeding up your site. In the settings for the Image Expansion Kit add-on, you can select the size image you want to use for the List ([pdb_list]) and Single Record ([pdb_single]) displays. This will give you optimized image sizes and improved performance.
Custom Image Sizes
In addition to all the image sizes your site normally has, this plugin lets you define two custom image sizes for you to use in your Participants Database displays. See the settings tab for specific instructions on setting up custom image sizes.
Converting all your Images
The Image Expansion Kit settings page offers a utility to convert all your Participants Database images to Media Library images, generating thumbnails for each one. This is done in the background, so even if you have thousands of images, your site will not be affected while the operation is taking place.
Note: it is best to set up your Custom Image Sizes (if you are using them) before you perform the conversion so that the new sizes will be generated for all your images.
Image Captions
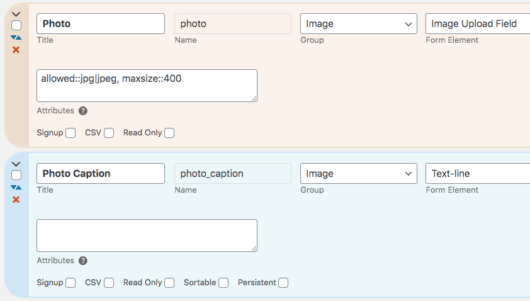
As of version 1.5, it is possible to add captions to image uploads. To do this, first you must enable captions in the plugin settings: check the “Enable Image Captions” setting to enable captions.

Next, to set up the text field that will hold the caption, create a new field with a name that uses the image field’s name and the word “Caption.” For example, if your image field is named “Photo” then you can create a caption field for that image by creating a text-line field named “Photo Caption.” Once that is set up, whatever is saved as the value in the Photo Caption field will be shown with the image field as its caption.
Each image field may have its own caption, for example, if the image field is named “picture” its caption field would be named “picture_caption”.
This same technique can also be used to set the “alt” tag for the image. Alt tags are used to represent the image when a screen reader is used. The alt tag provides a textual description of the image for the benefit of someone who can’t see it. In the example above you would create the alt field by creating a text field named “Photo Alt.”
Caption and alt fields are kept in sync with those values in the media item (as seen in the Media Library). If the media item has a caption defined, the caption field will show that value. If you change the caption field, the caption will also be changed in the media item.
Caption fields can only be a text-line type field and currently, captions are not available for multi-image upload fields. Also, note that how the captions appear is under the control of your WP theme. You can add your own CSS rules to alter the appearance of image captions, the plugin has no options for changing the appearance of captions.
Caption Fields in a Participant Log
If you also have the Participant Log add-on, and if you have an Image Upload field defined in a participant log as an entry field, you can also use the image caption feature.
To set this up, add a new field to the log (must be a Text Line field) and name it so that the first part of the name is the same as the image it is attached to, with ” Caption” added to it. (“Product Image” becomes “Product Image Caption”) This gives the user a way to add or change an image’s caption when the log entry is added or updated. Set the visibility to “private” so the caption field itself is only shown when the entry is getting added or edited.
Magnific Popup Lightbox
The add-on comes with an efficient lightbox script that pops open when the image is clicked, giving a full-size view of the image. This large-size image is only loaded when needed, speeding up your page load.
The lightbox also has a “gallery” mode that lets the user easily view all the images in the display.
The lightbox is enabled by setting the “Image Link” setting to “Lightbox” or “Lightbox Gallery” The List, Single Record and Record Edit displays each have independent settings for this.
Editing Images
All uploaded images can be edited using the Media Library. This allows you to crop, rotate, and perform other image edits in the WP admin. All images in the admin link to its image edit page so you have convenient access to editing.
 Multi-Image Uploads
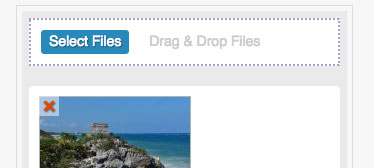
The add-on provides a new way to upload files with Participants Database: multiple-file drag & drop. This new form element provides a much improved user experience when uploading images: the upload takes place in the background and a preview of the uploaded file is immediately visible. It is possible for the user to add or delete files from the field at any time.
The Multi-Image Upload form element can be individually configured to limit the size and number of images uploaded. It is actually fully configurable and easily adapted to your language. Images are resized and display as thumbnails in the list, record edit and single record (detail) pages. The lightbox shows the images as an intuitive image gallery.
In the record edit screen, images can be re-ordered with a simple drag-and-drop interface.
To use the Multi-Image Upload form element, select it in the “Form Element” setting of a Participants Database field. The global settings for all multi-image upload form elements are in the settings for this add-on, but each field can have it’s own settings, placed in the “attributes” parameter of the field definition. The settings use the usual syntax of parameter::value, with each pair separated by commas.
Available settings are:
- maxfiles – maximum number of images that can be uploaded to the field
- maxsize – the maximum size of any one file in kilobytes
- button_text – the label for the file selector button1
- dragdrop_text – the label for the drag-and-drop target area1
- allowed – list of allowed file extensions, separated by the “pipe” character, such as jpg|png|gif2
For example: maxfiles::10,button_text::select images,allowed::jpg|jpeg|png
1Note: these settings will override the translation files. If you are setting up a multilingual site, it is better to set this in the translation files.
2Note: for security, all field-defined allowed file extensions must also be enabled in the global “Allowed File Types” setting in Participants Database.
Multi-File Upload Field
Works the same as the multi-image upload field, only it’s meant for non-image files such as text files, PDFs, word-processor documents, etc. You can set the allowed file types for the field in the same way as for the multi image upload element above. This one also adds any uploaded files to the Media Library. This new form element type was added in version 1.4.
The multi-file upload field has a setting to determine the link that is placed on the filename. The default link is the attachment page for the library item. You can also set it to link directly to the file or have no link at all. In the “attributes” setting for the field, you can put link::file or link::none to change the link setting.
 Use the WordPress Media Library to Manage Your Images
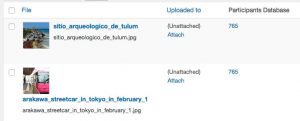
With this add-on all your image uploads are added to the Media Library for easy management and editing. The library display shows you which record the image is attached to, and provides a link to the Participants Database record for editing. Uploaded images in the record editor link to the Media File editor. It really makes managing large numbers of images a breeze!
The Media Library list view has a new filter where you can filter the list to show only Participants Database images, all images that are not Participants Database images or both.
Display Remote Images in an Image Field
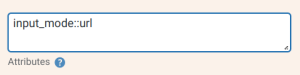 The image upload field has a “URL” input mode that allows the user to type in a URL to an image on your website or from another website. This is set up in the field configuration attributes as shown above. This feature is not available for the Multi-Image Upload field.
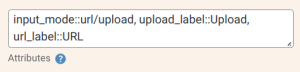
It is also possible to give the user a choice between uploading an image and typing in the image URL. The image field will show a radio button to select the input mode. There are 3 configurations you can use in the field attributes to set this up:
- input_mode – this can be “upload”, “url”, or “url/upload” for a field that supports either mode
- upload_label – sets the text next to the “upload” radio button
- url_label – sets the text next to the “url” button
Here is an example that uses all 3 configurations:
Images in the Media Library have a direct URL that can be used to display the image, which is shown on the edit page for the image. If you want to display an image from the Media Library, this is the URL to use.
Product Settings
General Settings
List Display Image Size
This setting selects the image size to use in all list displays. The sizes available are the defined image sizes of your site, but you can define a custom images size in the next section if the size you need isn’t available. The dropdown shows the name of the size and the dimensions in pixels, select the one nearest to the size you want the images to display for the most efficient load time.
Single Record Image Size
This works the same as the control above, but it is for the single record (or detail) display.
List Image Link
Note: in order for the image links to be placed, the “Link Image to Fullsize” setting must be checked in the Participants Database settings under the general tab.
This control determines what happens when someone clicks on an image in the list display. Here is a description of the options:
- Lightbox – the full-size image will open in the center of the screen, masking the page in the background
- Lightbox Gallery – the full-size lightbox image opens, but there will be < and > arrows so that all the images can be paged through in the lightbox
- Attachment Page – what this looks like depends on your theme, but it opens a special page for the image
- Image URL – this simply opens the raw image file in the browser window
- None – nothing happens when the image is clicked on
Single Record Image Link
Record Edit Image Link
Same as the above selector, but for the single record display and record edit display.
Delete Images With Record
When this is checked, images that are attached to a Participants Database record are deleted when the record is deleted. You may want to uncheck this if you are using the uploaded images for another purpose not related to the record they were uploaded with.
Custom Sizes
List Display Custom Size
This lets you create a custom size for use in all Participants Database list displays. Set the size of the image in pixels. If crop mode is not enabled, the image is resized to the largest possible size without cropping. In crop mode, the image is resized to fill the exact dimensions specified, cropping out any extra image area.
In order for the custom size to be used, it must be selected in the image size selector for the List or Single Record display.
Single Display Custom Size
This is another custom size that can be used.
Multi-Image Upload Field
Preview Thumbnail Size
This is the size of the preview image. The field shows previously uploaded images, as well as newly uploaded images as a thumbnail…this sets the size of the thumbnail.
Maximum Number of Files
This sets the global maximum number of files that can be uploaded to a field. This limit can be set on a per-field basis as well. This is explained in the Instructions section for the multi-image upload field.
Allow Users to Delete Files
If checked, users may delete individual files from the multi-image upload field. These images will be permanently deleted from the media library.
Update All Participants Database Images
This section provides a way to convert all existing Participants Database images to WP Media items. The process is performed in the background, so even with a very large number if images to process, site operations won’t be affected.
Note: set up your Custom Image Sizes (if you are using them) before running this command so that your custom sizes will be generated.
Click the “Update All” button to start the process. When it is complete, you will be told how many records and images were updated. You may need to refresh the page to see the message.
What it Does
When this process is run, it doesn’t copy or move the original images, it simply registers the image with WordPress as a media item. This generates all the defined image sizes, which will also be stored in the same location as the source image. The process is not reversable: if you deactivate the add-on, your images will stop showing.
F.A.Q.
How can I see which Media Library images are attached to Participants Database records?
On the Media Library page, when the items are viewed as a list, there is a column that will show the record ID of the record an image is attached to.
If you don’t see the Participants Database column, click on the “Screen Options” tab at the top of the page and enable the column there.
In the list display, all the images in a multi-upload field are shown. Is it possible to show only the first image?
Yes, t’s possible, it requires a bit of CSS magic. The plan is we hide all of them, then show only the first one. You can put something like this in the Custom CSS setting for Participants Database:
.pdb-list .mu-image-list > span {

display: none;

}

.pdb-list .mu-image-list .pdbiex-image-field-wrap:first-child {

display: inline-block;

}
Does the plugin support webp image files?
As of version 1.5.4, it is possible to allow the uploading and display of webp files. Webp files are a modern type of efficiently compressed image that users will often encounter when downloading images from websites.
Uploading webp files must be enabled by adding “webp” to the list of allowed file types in the Participants Database settings under the General Settings tab: “Allowed File Types.”

If the upload field has the “allowed” attribute set to control which file types can be uploaded to the field, it must include “webp” there, too.
Hi Roland,
Ever since I’ve purchased and installed the kit, I’ve not been able to display images using this method:
and I must use
in order to get photos.
However, since I need to customize my photos I need to use the former method.
I believe it must have to do with the fact that now photos are being stored in WP media folder and not PDb uploads folder.
Is there a work around for it?
Just a head up, I’m noticing that the code I put in “backticks” in my question has eliminated the PHP part of it so, I’m putting the two here with out backticks:
First code:
<img src="file_uri(‘photo’); ?>”>
Second code:
print_value( ‘photo’ ) ?>
:D
It did it again and I can’t delete my reply or comment but I think you know what I’m talking about.
If you instantiate the PDb_Template object, you can use the file_uri method to get the URI of the image… for example:
<?php
$record = new PDb_Template( $this );
echo $record->file_uri('photo');
 ?>
This works for both the standard plugin uploads and for Image Expansion uploads.
I used this but still doesn’t work yet.
I’m using the custom template.
To be safe, I turned off my Smush plugin and used the original code of custom template with only changing the photo bit of it; still no hope.
this is the exact code I’m using:
<img src="<?php echo $image_url=$this_business->file_uri('photo'); ?>">
I don’t know what the problem is!!
you can use the result of the method directly…try this:
<img src="<?php echo $this_business->file_uri('photo'); ?>">Tried the result directly but still no results.
OK, well do you have the right field name in the function? There may be some other issue with your template, I can’t say. This method does work, I just tested it. Make sure you’re using the latest version of Participants Database.
I am bummed. I recently installed the Participants Database plugin and am absolutely amazed by its scope and flexibility — and it is FREE…!!
Then I installed the Image Expansion Kit add-on — which cost me $20.00 and does not work.
When I select a file to be uploaded, the upload appears to work (it gets to 98% or 99% on the progress bar) but then throws an Internal Server Error message. When I look at the browser error log I see “POST https://[SiteURL]/wp-admin/admin-ajax.php 500 (Internal Server Error)” but when I drill down to get more information about the error I get nothing useful.
I am hoping you have a support e-mail address I can use to send you the URL of the “problem page” so you can see the error for yourself. I am reluctant to publish this URL in this public forum.
I’m sorry the plugin is giving you trouble, you can get support via email at [email protected] I’ll take a look at it
I have sent you an e-mail.
How do I change the path the images are saved in? Currently they’re going to:
/wp-content/uploads/participants-database/2019/06/
I want them to go somewhere like:
/wp-content/uploads/directory/2019/06/
or…
/wp-content/uploads/directory/
Thank you,
Ryan
There is a plugin setting under the “general” tab where this path is configured.
You can also do this with a custom function on the pdb-files_location filter.
Be aware that if files have already been uploaded to the previously configured location, the plugin won’t find them any more, you’ll need to move them to the new location.
Roland, I’m not super familiar with your functions yet. But just FYI, I can get the settings upload location to work fine until I active the Image Expansion Kit. That’s when it reverts back to “/wp-content/uploads/participants-database” basically overlooking the settings. How might you write the custom function to fix this? Also, what file would you include this in? Thanks.
The Image Expansion Kit does not use the Participants Database uploads location setting, this is because it must use the WP configured image upload path in order for the images to be included in the WP media library. It is possible to change the subdirectory (the name of the directory within the WP uploads location) that is used with a filter handler on the ‘pdbiex-uploads_dir’ filter. Such a filter handler can be placed on your theme’s functions.php file.
how do i find my support question?
all i see is 2018 comments
problem with email-expansion kit
i deleted the files through ftp and the set the names of the other plugins back to their correct name.
the site is working and i can now test all of the add on plugins except for contact button and email expansion.
also, i am not getting the answers via email – don’t know why
I recently downloaded and am working with the Image Expansion Kit. I am using Google Chrome as my browser and have WordPress version 4.9.8.
I have an image field with images that now appear in the Media Library (cool!), although the link to the file was removed in my records and the photos required reattaching to the records.
When I go to the Image Expansion Kit Setup page, I select “Lightbox” for my List Image Link. When I conduct a search, as a user of the website would, and then click on the image from the results, the website wants me to log into WordPress and takes me to the image file in the Media Library not as a Lightbox popup.
Do I have a setting wrong?
This is more of a general WordPress theme question. I don’t know how this works specifically, but when a site-wide search result is shown, format of the results is determined partly by the search.php template. You may want to see how the theme is handling that display. Images on their own are not typically shown in search results, so I’m guessing your theme (or perhaps another plugin) is changing how those results are displayed.
OK, that may be the case. I have noticed a difference in the links from the one that is provided in the Participants Database List function and the one that seems to work with Lightbox. Here they are:
website.com/wp-admin/post.php?post=5140&action=edit – link provided in the Participants Database List function.
website.com/wp-content/uploads/participants-database/2018/09/sorensen-_gary.jpg – link provided from the post that works with lightbox.
Further investigation:
I deactivated the Image Expansion Kit, deleted a few photos, re-uploaded them to the records, ran a search using the PB List function, hovered over the photo link, and noticed that the link is actually to the file now instead of the “wp-admin/post.php?post=XXXXX…”. It appears that the Image Expansion Kit is causing the images to be linked to a post instead of linked to the actual image file. I’m not a developer, but it seems like it should be linking to the actual file so that Lightbox can work. Hope this helps and I appreciate any advice that you have.
I’m not sure where my previous reply went.
If I disable the Image Expansion Kit, the Participant Database reverts back to linking directly to the image file – but doesn’t use the lightbox feature.
If I re-enable the Image Expansion Kit, the Participant Database links to a post instead of the image file which sends me to the media library.
I’m not a developer but it seems specific to the Image Expansion Kit, not WordPress in general.
The link that is placed on an image is determined by the Image Expansion Kit settings. There are 3 different different settings for that depending on the context. Check that out, and if it’s not working as expected, let me know.
I am looking to purchase this plugin add-on but I am wondering if it is the correct one for my site. I am trying to showcase images with my participants. Here is a link to a site that I would like to replicate http://www.missglobalofficial(dot)com/ (under current applicants. it randomizes photos of those who have applied).
Is there also a link to a sample of what this add-on can provide? I just want to make sure this add-on will allow me to do this before I purchase it. Thank you.
Yes, the plugin can help you create a showcase like this. It will require that you have some knowledge of CSS and HTML to get the exact layout you want. The plugin provides a basic framework, you will need to do the work to format the output the way you want it to look.
Hello Again,
I am working on my wp website on localhost right now. Is there any possibility that these updated images would disappear from the uploads folder ?
Because it seems every time I upload the images to the object, everything is fine, except they disappear on the next day.
They go to the media files, like all the other images uploaded to the wp website, but while those stick, the ones uploaded through this add-on disappear after some time…
My objects are not “approved” yet could it be it?
thanks in advance
OK, can you give me a little more detail. Are you using the multi-image upload field? Which form or page are you using to upload the image?
I am using the multi-image upload field on the “Add New Participant Record” form of the dashboard only. It uploads perfectly to the object and the media library. They appear on the search aswell. All the objects are not approved yet. and then, after sometime, some hours, they are no longer on the media library and also not on the object.
I will try now to add a participant on the form [pdb_signup] and also to add picture to one approved participant to see if sticks.
OK, the way this works is the images are uploaded with a “pending” status until the record is saved. If you want to keep the images you have uploaded, you must finalize the upload by saving the record. This is to prevent the media library getting filled up with “orphan” images.
but even when I approve a submitted object the image is still disappearing after some time,….
OK, I see the problem. I’m posting an update to the Image Expansion plugin that will fix this.
Thank you so much for all the quick responses!
Can you tell me also if it is possible to hide the empty fields on the [pdb_single]?
Yes, if you look at the HTML, you will see that empty fields have a class name ‘blank-field’ You can use this to hide them if you want with a CSS rile like this:
you can put this into the “Custom CSS” setting in Participants Database.
Hi again,
I have another question,
when I put:
“maxsize::1000”
on the values field of the multi-image upload form element
I still get the message when trying to upload:
“file is too large. The maximum file size is 100.00 KB”
I tried with “maxsize::1000kb”; “maxsize::1000.00kb” aswell and nothing seems to work, how do I increase the allowed size of each picture?
thank you in advance,
Mariana
What is the complete setting you have in the “values” parameter of your multi-image upload field?
The maxsize attribute is testing good here, so perhaps there is a problem with the setting you have in there…for instance, there should be no spaces. Also the number should just be the number, although adding the units or a decimal won’t cause a problem, they are ignored.
the complete setting is “maxsize::1000” with no spaces or more values (although when it had more attributes, they all worked fine except for this one)
Having other values in there is OK, as long as the syntax is correct, and it looks correct, so I don’t know why it’s not working for you. Did you try a different number like 1500 or 2000?
I tried everything from maxsize::150 to 2000 with and without “;” at the end, with or without capital letters and nothing works (just pictures until size 100kb), neither on the admin panel or on the signup form… I really needed this to work…
Can you give me a link to the form so I can see what it’s doing?
could you make it so it is possible to directly change it on the general settings?
This is in the Participants Database settings under the general tab.
Oh ! yes it is and it worked, thank you very much!!
All the best
I installed the log in and the Multi-Image Uploads works fine on the front end but on the admin panel, on the “Add Participant” tab, I am not able to add the images in the supposedly multi-Image uploads field, it just says “upload…” and that’s it.
Is there any way I can fix this?
Hi Mariana,
Yes, it looks like I need to fix something! I will release an update to the plugin later today that will address this issue.
Hi Roland!
Thank you so much for the quick answer and fix!
I would also like to thank you for the amazing plugin and add-on :)
All the best
I just purchased Image Expansion Kit, downloaded the plugin from the purchase site and followed the instructions to install and activate the add on to my existing participant database installation as per your instructions below…… This is the website I purchased the Image Expansion Kit for. http://ncocra.org/WordPress_v1/
Instructions Used: WordPress will upload the plugin file from your computer and install it for you. You will see a success message after installation is finished. At the bottom of the success message click on the Activate Plugin link to start using the plugin.
After I did this, I started getting errors as visible in this screen capture everytime I attempted to log in to the WordPress. http://ncocra.org/Scratch/ImageKitErrors.jpg
The website would still function in terms of page presentation (but with the above errors flashing by quickly) and the WordPress login capability was totally nonfunctional as seen in the above screen capture link.
I had to use the ISP website restore from a previous backup to get the site working again.
I would like to use the Image Expansion Kit, but need your help in getting this addon to install correctly
Thanks
Dan
for Orange County Radio Amateurs at ncocra.org
Thanks for this information, I will look into this. Those are warnings, they will not prevent the site from working, but they should not be happening. I would suggest you turn WP_DEBUG off for normal site operation so these messages won’t be seen by your users.
It looks like what is happening is the plugin settings have not yet been saved, so it’s pulling up an empty set. Save the settings and these warnings should go away.
I’m working on a release that will address this.
thanks! I was told your support is terrific and it is… Will be looking for the release update… thanks again. Dan
Appreciate any ball park estimates as to when the release will be available to fix the above problem…. Since I could not get back into WordPress at all after the failed install (and of course the normal plug in update process) I’ll need to know what the process is obtain the revised code… My order (#5046) page shows no further downloads permitted.
thanks,
Dan
for Orange County Radio Amateurs at ncocra.org.
You don’t need to download the plugin to get the update, it will appear in your plugins list.
The issue you refer to will disappear when your settings are saved. If that is not the case, let me know.