Essential for anyone using Participants Database as an online directory, this plugin selectively exposes all your entries to search engines.
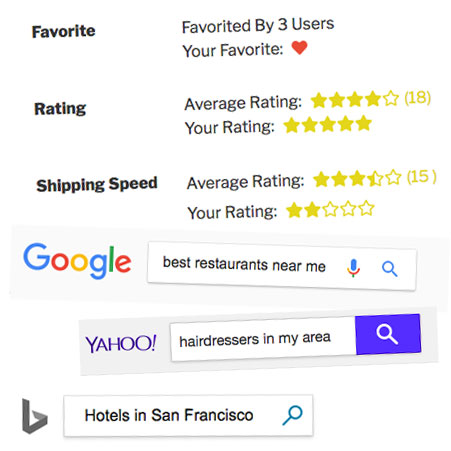
Also includes favorites and star rating widgets.
See the FAQ for instructions on setting up social media sharing and help with search engine indexing.
Product Setup
Proxy Posts
The big thing this add-on does is create something I call “proxy posts.” These are a new WordPress custom post type that mirrors the content in your Participants Database records. With this, nearly anything that you can do with blog posts, you can now do with Participants Database records. That includes social media publishing and sharing, reviews, comments, cross-posting etc… The big advantage for online directories is that now all the directory listings are exposed to search engines and can be indexed and searched like regular WordPress content. It is important to understand that proxy posts are not normally shown to your site visitors, the purpose of the proxy post is to provide searchable content to search engine spiders and general site search. When a proxy post is viewed on the website or indexed by a search engine, what is actually seen is the Participants Database single record display, and this is fully configurable and templatable.
How It Works
When proxy posts are enabled, every time a new Participants Database record is created, a proxy post is created using the information contained in the record. When a record is updated, the information in the associated proxy post is updated too, so these posts will always reflect the current data in the database. You have complete control over what information from the record gets placed into the proxy post, so you can pack lots of findable content into the proxy post while not exposing any private or administrative information you don’t need publicly visible. There is also a way to automatically create proxy posts for all your records, so if you’re coming to this with a database already full of entries, your whole database can be mirrored into proxy posts with a single operation.
Setting Up the Proxy Post Content
In order to provide the proxy post with it’s content, you need to decide which fields from the Participants Database record will be used. These are called Proxy Post Content Sources and it is necessary to set at least a minimum of them in order to create the proxy post. There are several parts to a post, and the plugin gives you control over how each part is filled with content when the proxy post is created or updated. Each part serves a specific purpose in terms of how the entry is seen and indexed by search engines or how the entry is shown in social media shares. These settings give you a way to assign which Participants Database fields will provide the content for each part.
Title – May be the most important in terms of search indexing, it should identify the listing, but should be short. Most search engines limit the length of titles, you won’t want yours to get cut off because it’s too long. Consider only using 1-3 fields here, shooting for a maximum length of 60 characters.
Content – provides the “body” of the listing, you may want to put as much information as possible in here.
Description – provides a short description of the listing, should be limited to 4-6 lines or 320 characters. That would typically be 3-6 fields, depending on what is in them. These are just general guidelines, it’s not enforced in any way.
Featured Image – If you are using the Image Expansion Kit add-on, you can also assign which field provides the featured (or thumbnail) image of the post. Only image fields can be selected for this. Together these configurations should create an accurate representation of what each listing contains.
Setting Up the Post Slug
The “post slug” is probably already familiar to you. That is the unique name that is used to show the post, and it is typically based on the title, but here, you can choose which fields are used to make up the post slug. The post slug will appear in the post URL, so it’s helpful if it is based on the name of the listing. To build the post slug, you have 1, 2 or 3 fields assigned to provide the words for the slug. The way this works is the first 1 or 2 fields are used to make the slug. If it is not unique, then the 3rd term is used. If there is no 3rd term defined or even the three together don’t make a unique slug, a number is added. You must have at least one field defined to make the post slug.
The URL Slug
So, we looked at the post slug, but what is the URL Slug that is at the top of the Proxy Post settings? This is a word that acts as a keyword to name the kind of thing you have in your listings, and also to tell WordPress that the post is one of your Proxy Posts. For example, let’s say your directory is for restaurants. You would probably want to use the word ‘restaurants’ as your URL slug because that is the kind of thing you have in your listings. That would also make sense in the URL…so if you have a restaurant called “Tip Top Lounge” The URL for that listing could then be something like https://yoursite.com/restaurants/tip-top-lounge. So think about how it will look in the URL because the word in your URL Slug setting will go just before the post slug in the URL. URLs that are readable and descriptive look more professional and authoritative, so it’s important to get it right. Also, this is not something you will want to change later because it will throw all your link rankings off because any reputation you’d built up for the old URLs would be lost.
Putting the Proxy Posts All Together
Now that you’ve got the basic configuration together, it’s time to create your proxy posts. First, make sure you have the “Enable Proxy Posts” enabled. Now click on the “Advanced Proxy Post Settings” tab. One setting you will want to check is the “Approved Records Only” checkbox. Be sure to have that checked if you are controlling the visibility of your Participants Database records with the “approved” field. Now, at the bottom on that tab is the button to create proxy posts for all your records. When you click that, it will load all the records into a queue and begin processing them in the background. When the page refreshes, it will tell you how many records it’s processing. It may only take a few seconds for a thousand records, but if you’ve got a very large number, it could take several minutes. Just check back in from time to time to see if it’s done. When the process is complete, it will give you a report on how many records were created updated, etc. You should use this function whenever you make changes to the proxy post content configuration so that all the records can be updated. If you are making individual edits, you don’t need to do this because the proxy will be updated whenever a record is edited.
Build the WordPress Permalinks
Once you’ve done this, go to the WordPress “Permalinks” settings page and save it. You don’t need to change anything, just click save so WordPress can rebuild all the permalinks. This is found under the “Settings” item in the WP admin menu. If you make any changes that affects permalinks to proxy posts, you need to do this again. You don’t need to do this when adding or deleting records.
Allowing Commenting on Proxy Posts
A proxy post is a way to display a Participants Database record in a core WordPress context. This means that all the things you can do with any WP post, you can do with a Proxy Post, including discussions (commenting).
You must have the plugin configured to show the proxy post (which has its own page generated by WP) instead of the single record display (which is done with a shortcode). The settings to look at are “Enable Proxy Posts” (of course!) and “Use Proxy Posts for Single Record Displays” With those enabled, when someone clock on a PDB record in a list display, they will be taken to the proxy post’s page instead of the single record display. There are actually many ways to set something like this up, but this is the simplest.
Now that your records are getting displayed using the proxy post, you need to enable commenting. In the Directory Tools settings under the advanced poxy post settings tab, you’ll see the “Enable Comments on Proxy Posts” setting…that should be checked. Also, if there are any global WordPress settings that affect comments, you may need to check those too.
Commenting can be enabled/disabled on a per-post basis as well. You will see this if you edit the proxy post directly (see below).
With that set, commenting on each record (via the proxy post) will be enabled. Any other plugins you have installed that affect commenting will be applied if configured to do so by that plugin.
The Proxy Post Admin List
It’s possible to see all your proxy posts in the admin section: in the Participants Database menu is an item “Proxy Posts.” This is really just for reference because you don’t need to edit them from this page, the proxy post will be updated from the Participants Database record whenever that is edited. If you edited them here, you’d lose any changes you made.
The Proxy Post Archive
WordPress has an internally-generated page called an “archive” that displays all the posts of a specific post type. Directory Tools gives you some control over the appearance of this page: you can disable it, or if you want to use it, you can change the labels and description that is used in the header of the page. See the settings section for details.
To control the appearance of the proxy post archive page, you must create a WordPress theme template for it. If you don’t do this, a default template will be used. The custom template should be named “archive-proxy-post.php”. Take a look at this article for the details: Custom Post Type Template Files
User Favorites
There is another new form element type, “Favorite” that lets your users select records as a favorite, or maybe something similar to a “like” button. The general appearance of the favorites widget is set up under the “Favorite Settings” tab. The number of favorites for each record is saved, so you can use the number of favorites to sort your lists, showing the most-favorited entries at the top. To set up your favorites widget, create a new field on the Manage Database Fields page. Set the form element to “Favorite” and the widget will display in the record according to the location (group and order) of the field. You may have only one favorite widget defined. Along with the favorite widget is the user favorites shortcode, which is used to show the user a list of all their favorites. There are several settings that go along with this shortcode. To show the user a list of their favorites use this shortcode: [[pdb_user_favorites]] which operates essentially as a shortcut to showing a Participants Database list, but only with those records that the currently logged in user has chosen. The shortcode can use the “template” attribute to set the template…for instance to show the user’s favorites as a responsive list, you could use a shortcode like [[pdb_user_favorites template=responsive]] All that does is use the regular responsive template for the pdb_list shortcode, so you can easily use a custom template for that if you want. Further customizations to the shortcode can be added in the settings.
 Star Ratings
The Directory Tools add-on creates a new type of form element, “Star Rating” that gives your logged-in users the ability to rate your listings. Under the Star Ratings Settings tab you can configure the general appearance of the star rating widget. To place the widget, you add a form element to Participants Database (on the Manage Database Fields page) so that it will be included in your listings. When you add the form element, give it a name that describes what the rating is for, then set the form element of the field to “Star Rating” You can have multiple star rating fields, so if you wanted to give your users the ability to rate several things separately, you can do that. The way this works, is when a logged-in user views the record detail display, their rating is visible. They can select the “stars” to rate the item any time. When they click, the rating is saved. Each record stores the average rating, so you can easily sort your listings by rating by selecting the rating field as your sort field.

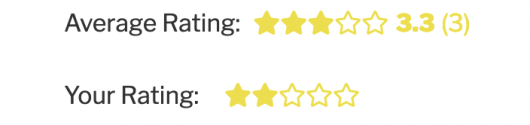
Average Rating Display
When the rating field is displayed, it shows the average for all ratings of the record. This average is normally shown as a set of star icons, but it can be configured to also show a numeric average. This is configured in the rating field definition “attributes.” To show the numeric average, use the average_numeric attribute. The value tells the number of places to use in the numeric average: 1 will show one digit after the decimal point, 2 will show 2, etc. To show only the integer value, set the value to “true” (a 0 will read as false, and prevent the value from showing at all).
To prevent the average rating star icons from appearing, use “average_stars::false.”
User Not Logged In Message
Both the Star Rating and Favorites widgets require the user to be logged in in order to rate or favorite a listing. It is possible to configure a message with a link that will be shown instead of the rating or favorite widget if the user is not logged in. This is configured in the field “attributes” parameter like this example:
login_message::Please %Log In% to rate this.
The % signs show where the login link should be placed. In the example above the phrase “Log In” will be linked to your site’s login page. The redirect will be set so that the user will come back to the listing page after logging in, so they can rate or favorite the listing right away.
The Overall Ratings Field
If you have several ratings fields defined, it might be desirable to have a way to sort and display an “overall rating” that combines all the ratings into a single number for each record. To use the Overall Ratings field, you must create a new field on the Manage Database Fields page. Next, change its form element to “Overall Rating” and then configure it to display like any other field. This field cannot be edited, but it is updated every time a new rating is submitted, so it will always show the current overall rating value.
Product Settings
Proxy Post Settings
Enable Proxy Posts
Check this to use proxy posts. It defaults to unchecked so that you can configure the proxy post content sources before turning it all on.
Use Proxy Posts for Single Record Displays
This changes how the “single record display” or detail page operates with Participants Database. When checked, the detail links usually shown in Participants Database list displays and search results will be changed to point to the proxy post instead of the regular single record display. This means you don’t need a page with the [pdb_single] shortcode on it any more, this is now handled by the proxy post. This is important if you are using third-party plugins to add functionality to your single record display. For example, if you are using Jetpack and have social media sharing enabled, this will add social media sharing buttons to your single record display. Note that you must configure your third-party plugin to add its functionality to Proxy Post custom post types.
URL Slug
This is the generic term used to identify your single listing display in the URL. For example, if your directory is for hotels, you might want to set this to “hotels” so that the URL that shows in individual listing will have /hotels/ in it. This string must be unique to your site because it is used to tell WordPress to show the proxy post for the listing. So, in the example, there must not be a regular page that uses the slug “hotels” because that will confuse things and cause problems.
Content Source Fields
Post Title Source Fields
These are the fields that are used to construct the title of the proxy post. Typically, this will be 1 or 2 fields. It does not have to be unique to each listing, but you probably want it to be.
Post Content Source Fields
These fields are used to put together the content of the proxy post. You can, and probably should, put as many fields in here as you want publicly seen. For some fields, a label is added for clarity. The fields that have labels automatically added are any kind of selection field like dropdowns or radio buttons. This is so you don’t end up with a word in the content where it may not be clear what it is, which might look “spammy” to a search engine. The plugin tries to make the content look like regular content, even though it is constructed of several components. As long as the content seen in the proxy post is similar to the actual displayed content (proxy post content is not displayed directly on your site), you will be good. You can set your own label for other kinds of fields by adding a “label” attribute to the field definition. For example if you have a text field that had the year a business was established, you might want to add a label to that field put putting something like this into the “attributes” parameter of the field definition: label::Established in %s The “%s” will be replaced with the value of the field, so in the proxy post content it would read something like “Established in 1995.”
Post Description Source Fields
Choose several fields to make up the description text for the post. This content is sometimes seen in search engine results ans social media shares. It should be fairly short, the general guideline is 4-6 lines or 320 characters. It should have content that would serve as a brief summary of what the entry is for.
Post Featured Image Field
Proxy posts may have a featured image, and this selector lets you choose which image upload field can be used to provide the featured image. This image is mostly seen in social media posts, and it will often be displayed when the proxy post is viewed on your site. This depends on your theme. This setting is only available if you have the Image Expansion Kit add-on activated, and only single “Image Upload” fields can be used.
Post Slug Source Fields
Each proxy post (like WordPress posts in general) has a unique identifier called a “slug” that is used in the URL to view the post. There are three fields here: the first two are used to build the slug, but if that is not unique, the third term will be used to make the slug. The second term is optional, and if you don’t define a second term, then if the first term does not make a unique identifier, then the third term will be used. This can work out well if there are some listings in your directory that have the same name.
For instance if you have a business listing and the business name is your first term, you have a blank second term and then the third term is the city. For businesses that only have one listing, the slug will be the business name, but if there are several with the same name in different cities, the slug name would be the business name and the city.
Slugs are built by making it all lowercase, stripping out punctuation, then replacing spaces with hyphens so it becomes valid to use in a URL. This is the same process that WordPress usually uses to make the slug from the post title. If all three terms do not make a unique slug, a number will be added to the slug, just as WordPress does. If all the fields are empty, a random number ID will be used as the slug.
First Slug Source
This one must be set, it is the primary word or words used to make the slug.
Second Slug Source
This one is optional, but if defined will be added to the first term to make up the slug.
Auxiliary Slug Source
This is the “tie-breaker” that will be used if the slug built using the first one or two sources is not unique.
Advanced Proxy Post Settings
Approved Records Only
If selected, only records that have been approved will be included in proxy posts. This will prevent unapproved records from getting indexed or found in site searches. Read the Approving Records section of the docs for more info. If you are using record approval, you should keep this checked so unapproved records don’t show up in search results. Note that for search engines, unapproving a record does not immediately remove it from search results.
With this setting set, if a record is approved, a proxy post will be created for that record. If the record is unapproved, the proxy post will be deleted.
Generate OpenGraph Tags
OpenGraph is a standard set of HTML meta tags that is used by Facebook and many other social media sites. It provides the data that the social media site uses to construct it’s shares. For example, if you share a page or post to Facebook, it will show an image, a title, some text, etc. That information comes from the OpenGraph tags in the HTML of the originating post. Enabling this places OpenGraph tags based on the proxy post content in all single proxy post pages. You may want to disable this if you are using another plugin that generates OpenGraph tags so there isn’t a duplication. To check on your OpenGraph tags, you need to view the HTML source of your page. Look at the bottom of the <head> tag. There are also several online tools for checking your meta tags. If you want your content shared to social media, it is very important these tags are included in the page HTML.
Proxy Post Display Configuration
Display Using PDB Shortcode
If this is enabled, when a proxy post is viewed on your site, a [pdb_single] shortcode is used to display the content. In most cases, this is what you want, but you can uncheck this and display the proxy post using its native formatting. If you do choose to show your content using the WP native formatting, you can use the normal WordPress templating system to format the content.
When this is enabled, a [pdb_single] shortcode is used to display the record. By default, the fields shown will be the same fields that are used to create the proxy post content, but you can override that with the settings below.
You must use this setting if you want to display dynamic content (such as Participant Logs) with a Proxy Post.
Note that the WP template for displaying the proxy post is always active, so for the general layout of the page, that template determines how that works. The difference is, with this option checked, the “content” part of the post is replaced with the single record display for the record.
For more information about using WordPress custom post type templates to control the layout of proxy post pages, check this article: Custom Post Type Template Files
Show Content Fields Only With Shortcode
With this setting, only fields that are configured in the “Post Content Source Fields” setting will be displayed. With this unchecked, all public fields will be displayed. This only applies if the “Display Using PDB Shortcode” setting is enabled.
If you want to determine which fields are shown independent of the “Post Content Source Fields” setting, uncheck this setting, and use the “Single Record Shortcode Extra Attributes” setting to control which fields or groups are displayed on the proxy post page.
The default is to have this option checked, and in most cases, that is how you should do it.
Enable Comments on Proxy Posts
This setting allows you to globally enable comments on all Proxy Posts. If you want your users to be able to leave comments on your listings, you can use this setting to turn that on for all proxy posts. Note that you will not be able to turn commenting off for individual listings if you use this setting.
With this setting unchecked, commenting will be off by default, but you can enable comments on individual proxy posts using the Proxy Posts page in the Participants Database admin menu. To enable commenting on a per-listing basis, select the proxy posts you want to allow commenting on, then do a “mass edit” on those items, enabling comments by checking “allow comments.”
Single Record Shortcode Extra Attributes
When proxy posts are using the [pdb_single] shortcode to show its content, you can use this setting to add attributes to the shortcode. You should enter the attributes in the same format you would when setting up the shortcode directly…but without the shortcode name and brackets. For example, if you wanted to use a different template and only show certain groups of fields, the normal shortcode for that could be something like: [pdb_single template=bootstrap groups="main,address"] To set that up for the proxy post display, you just need to put the attributes in the setting, like this: template=bootstrap groups="main,address"
Record List Shortcode Extra Attributes
This is just like the above setting, only for the context of a proxy post archive page or search result. You will likely want to show only a small set of fields here so the list won’t take up a huge amount of vertical space. For example: fields="address,phone,email,website"
Proxy Post Archive Configuration
Enable the Proxy Post Archive Page
When this is checked (as it is by default) there will be a page on your website that lists all of the proxy posts. It is normally accessed using the “URL Slug” value you have defined above. For example, if the URL Slug is set to “participants”, the archive page will be available at this URL: https://xnau.com/participants.
If you had this enabled and want to disable it, you must resave the WP Permalinks after you uncheck this setting so that the permalink to the archive page is deleted.
General Name
This is the generic name of your proxy posts. It names what the posts (and your PDB records) represent. For example, if you’re using Participants Database as a membership list, you might want to label the proxy posts “Members”.
Singular Name
Generic name for a singular proxy post, for example: “Member”.
Description
This is a generic description of proxy posts, which is shown under the title on the archive page. For example, “This is a list of all our active members”.
Create or Update Proxy Posts for All Records
This button initiates a full scan of all your Participants Database records and creates or updates the proxy post for each one. You must have the minimum content configured for this to be available, so if the button is missing, set up the proxy post content source fields first. When you start the process, it will tell you how many records it’s going to process…this will be all your records. After a minute or more (depending on the size of your database and how much work needs to be done) you can refresh the page and when the process is complete, it will give you a simple report on what it did:
- created – there was no proxy post for the record so it had to be created
- updated – the proxy post needed to be updated because the content or the configuration changed
- skipped – there weren’t any changes to update in the proxy post
- deleted – the record was not approved (or doesn’t exist), but there was a proxy post for it, so it was deleted
This operation should be performed just after first configuring the plugin, and then any time there are changes to the proxy post content configuration so that everything will be brought into sync. You don’t need to do this if you are editing records or importing a CSV, this happens automatically in those cases.
Star Ratings Settings
Star Icon
Select the icon to use for the star rating widget.
Star Color
Sets the color of the icons and ratings count.
Average Rating Label
When the average rating is shown, use this label. Blank it out for no label at all.
User Rating Label
When the user is shown their rating, use this label for the value.
Favorite Settings
Favorite Icon
Select the icon to use for the favorite widget.
Favorite Icon Color
Icon color to use for the widget.
Show Total Favorites
When enabled, the total count of favorites for the record is shown.
Total Favorites Label
When the total favorites value is shown, use this label.
User Favorite Label
When the user is shown their favorite status for the record, label the value with this.
Favorites Shortcode
No Favorites Message
When the user views their list of favorites, but they haven’t favorited any entries yet, this message is shown.
User Not Logged In Message
If the user views the user favorites list, but is not logged in, this message is shown. The words between the %s tokens will have a link to the login page. This link will return them to the user favorites list once they log in. Leave the tokens out if you don’t want the link.
User Favorites Shortcode Extra Attributes
The user favorites shortcode is just a wrapper for the Participants Database list shortcode, so you can customize it in the same way. If you want to add any additional attributes to the list shortcode, you can do that here. For example to make sure unapproved records are not shown, you could use a setting like this: filter="approved=yes"
F.A.Q.
How can I see if search engines are indexing my Participants Database entries?
For anyone interested in optimizing their site’s visibility on the web, an account with Google Search Console is essential. This service offers many tools for monitoring and correcting problems with your site’s Google search results. There is a similar service offered for Bing: Bing Webmaster Tools.
To see if your directory entries are getting indexed and what the Google spider is seeing, log in to Google Search Console and go to Index/Coverage. On that page, you’ll see if there are problems with indexing, and also how many pages have been indexed. If you drill down, you can even see how each individual listing is indexed.
If you are experiencing problems with the indexing, this service will help you fix them.
How can I add my listings to the sitemap?
Doing this requires a third-party plugin such as Jetpack or Google XML Sitemaps. There are several others, of course, but they all work in pretty much the same way.
When you set up the sitemap plugin, it is very important you include the proxy-post custom post type. In most cases you will have to do this in the settings somewhere, it won’t happen automatically. It does happen automatically with Jetpack because there aren’t any settings for adding custom post types, so the Directory Tools plugin does that for you.
In Jetpack, you’ll find the sitemaps setting under Traffic/Sitemaps is really just on on/off switch.
To see the sitemap, just click on the sitemap link provided by the plugin.
Once you have your sitemap set up, submit it in the Bing webmaster tools or Google search console. That will provide you with feedback about the sitemap such as if there are problems. Submitting the sitemap is not necessary: search engines will look for the sitemap anyway, but doing it in the console give you positive feedback that it is there and working.
How do I set up social media sharing like share buttons?
This will be provided by a third-party plugin…there are lots to choose from, but it must be able to support adding a share button to a custom post type so you can include the proxy-post custom post type. Once the button is visible on the proxy post’s page, that’s all you need to do. It is possible to take it to the next level by making sure the meta tags are in place and working.
Directory Tools can place meta tags for you, but first check with your social media share plugin to see if that will provide the meta tags. You don’t want to have two sets of competing tags on your page! That is very important, it looks spammy if you duplicate the tags.
You can check your meta tags in Facebook’s meta tag debugger, and there are many others. Be careful on sites that are trying to sell you “SEO” services. There is a lot of noise and snake oil in that industry, so be skeptical of the claims you will see. It is possible to optimize the search engine profile of your site, but be wary of paid services for things you can get for free or inexpensively from a good SEO plugin.
You can also (and you should!) check your meta tags yourself by simply inspecting the HTML source of your page using your Browser Developers Tools. The will usually be at the bottom of the head tag on the page.
How do I enable Comments on Participants Database records?
To enable comments on single Participants Database records, you must be using both of the “Use Proxy Posts for Single Record Displays” and “Display Using PDB Shortcode” settings. When those settings are checked, the single record link (also known as a “detail” link) on the Participants Database list display will go to a proxy post page instead of the single record page.
The proxy post page will show the content of the single record shortcode (as configured in the “Proxy Post Display Configuration” settings), but in the context of a WordPress post, which means that any functionality that is added to the “proxy-post” post type will be active on that page. This include comments.
You will need to take one further step, however, because a particular proxy post won’t show comments by default. You need to enable comments for the posts by visiting the “Proxy Posts” page in the plugin settings and enabling comments for the post. You can use the “bulk edit” functionality to enable comments on multiple proxy posts.
The comments functionality is the core “Discussion” functiuonality proivided by WordPress, so it will follow the configuration set in the “Discussion” settings for your site.
I need to change the "slug" or name of proxy posts.
The proxy post’s slug determines the permalink to the proxy post.
Once a proxy post is created, the slug cannot be changed by editing the Participants Database record. All the other proxy post content will be updated with your changes, but the slug will not. This is because once a proxy post has an established permalink changing the slug could affect it’s search engine response and possibly destroy any search engine rank it may have earned. If this doesn’t matter, then no worries, go ahead and change it, all links to the proxy post will be updated.
You have 3 options for changing the proxy post slug, depending on what you want to do.
To change the slug of an individual proxy post to anything you want: Open the “Proxy Posts” page in the Participants Database admin menu. Use the “quick edit” link to change the Slug.
Re-generate the slugs for a few proxy posts: Open the “Proxy Posts” page, select the posts you want to regenerate and use the bulk actions to delete them. Then use the “proxy Post all Records” button to regenerate the proxy posts.
Re-generate all the proxy post slugs: use the instructions below to delete all the proxy posts and start over.
Is it possible to start over and regenerate all the proxy posts?
Yes, we do this by deleting them all, then using the “Proxy Post all Records” button to regenerate the proxy posts.
Be careful about this if the proxy posts have been active on your site for a while, especially if you’re allowing comments. Comments made to a proxy post will be lost if the proxy post is deleted. If the proxy post has gained any search engine rank, that will also be lost if the slug changes.
The plugin has a method for deleting all the proxy posts, you should use this method to get a clean wipe of all the proxy posts and associated data.
To delete all the proxy posts, go the the Directory Tools settings page in the admin. In your browser location bar, add “&delete_all_pdbdt_proxy_posts” to the url, so it looks something like this:
![]()
Hit “enter” and the plugin will delete all the proxy posts. Click on the “Directory Tools” item in the admin menu to clear the “delete_all_pdbdt_proxy_posts” from the URL, so you won’t keep deleting them.
If you’re going to change the fields that are used to generate the proxy post slug, make those changes now.
Go to the advanced tab and click on the “Proxy Post all Records” button. In a minute or so, all the proxy posts will be re-created.
Hi Rowland,
So I am finally getting there with my database and proxy post setup, but one slight problem is how the proxy posts display on a mobile device.
Have you seen how the page is offset to the right, and any images are offset and cannot be seen properly if these are larger images that fit on a computer screen (images on my pages are 340 x 240 pixels).
Firstly, is there anything that can be done about this?
Secondly, and not ideal, as I like the idea that each time I add a Participant a new proxy post is created, is the alternative to use “Display Using PDB Shortcode” and uncheck this, which says “If unchecked, the proxy post will show its content as a WordPress post.”
If so, what I don’t know how to do this with Display Using PDB Shortcode.
Do I use for example [pdb_list] on a post or page in WordPress?
Is there a way to pick out field groups and/or individual fields to display on a post or page on WordPress, which would then be mobile friendly.
I have read this page:https://xnau.com/work/wordpress-plugins/participants-database/participants-database-documentation/shortcodes-and-their-attributes/ but don’t fully understand what to do.
Your help would be appreciated, and ideally that the proxy posts would become mobile friendly and resize the images to fit the page, rather than having to turn my phone on its side to showe in landscape mode.
Thank you, Russell
With reference to the above question – if you look at a Proxy Post, each of the section headings within the post, which are the “Field Groups”, and then each of the sections which are the “Fields” these are all offset to the left.
If these headings were not offset to the left and were instead above the text this would help.
For example:
Field Group 1
Field Name 1: This section is about field name 2 and is offset like this.
This could be done as follows instead:
Field Group 1
Field Name 1
This section is about field name 2 and is offset like this.
One thing to try is a different template for the shortcode. When using the “Display Using PDB Shortcode” setting, the proxy post display is handled by a [pdb_single] shortcode. There are a couple of templates available for use with that shortcode, (“flexbox” or “bootstrap” are good ones to try) but you will likely still need to put the finishing touches on the layout with your own CSS. You can configure the pdb_single shortcode that is used in the “Single Record Shortcode Extra Attributes” setting.
Questions like this are generally about how your theme is set up to display the content. The plugin provides the basic HTML for the display, your theme is the one actually laying it out on the page. Many themes do not do a good job with mobile displays, they either need some kind of add-on for that or you need to do the hard work of designing a mobile-friendly display using CSS. If you are not committed to your theme, you may want to try different themes to find one that looks the way you want.
Hi Rowland,
Thank you. A couple of follow on points/questions:
– The plugin I use is because it’s very fast and is mobile friendly and adapts both posts and pages between desktop and the mobile screen, so not sure why it doesn’t work with Proxy Posts. I am reluctant to change it as it works very well and took a while to find and set up.
– You mention “flexbox” or “bootstrap” templates, are these templates to use with my existing theme or are they themes. If they are templates to use with my current theme where do I get these from please.
Cheers, Russell
I’m not suggesting you change how the plugin works. It does work on a mobile device with Proxy Posts, it just doesn’t lay out right. Well, that is most likely because of your theme. You have a couple of options for dealing with that, one of them is you use your own CSS rules to fix the display. If you’re not familiar with CSS, that will likely be difficult.
The other suggestion is about configuring the pdb_single shortcode, I gave you the details on that, what it does is select a different template for the pdb_single shortcode that is used to display the post. For example try setting the “Single Record Shortcode Extra Attributes” to “template=bootstrap” That might get you closer to the display you want.
Hi Rowland,
Actually, in my additional question I used the word “Plugin”, theme I use is because it’s very fast and is mobile friendly and adapts both posts and pages between desktop and the mobile screen…”
Anyway, you are correct I am very limited in using CSS and this is way too complicated for me.
So I have tried “template=bootstrap”, but this didn’t appear any different to the existing display for some reason, so I tried “template=flexbox” instead, and this is slightly better.
However, when I use this I don’t get all of the “Field Groups” I have set to “Public”, I get only a small amount of information on the post, which includes what is included in “Post Title Source Fields” and in “Post Description Source Fields”.
I tried using Groups= but I wasn’t sure what separator to use between template=flexbox and group=.
I tried a comma and a semi-colon, but these changed the template back to the original.
The separator is a space character. The “flexbox” template is set up to skip displaying fields that are empty, this is why only some fields are showing. This is done with a CSS rule, you can force all the fields to display with a CSS rule like this:
.pdb-single-flex .flex-field.blank-field {display: inherit;
}
It is normal to have to adjust the CSS for specific displays, especially something as specialized as a Participants Database single record.
Hi Rowland, is there a way to remove from the post the fields that are included in the “Post Title Source Fields”, as these are in the post title, which is what I want, but they are also listed at the bottom of the “Field Group” they included in. I have tried by making this Field Group “Admin” or “Private”, but these still show at the bottom of the Proxy Post in addition to in the Proxy Post title, thank you
If you are using the “Display Using PDB Shortcode” setting, you can determine which fields are shown in the “Single Record Shortcode Extra Attributes” setting. You can use either the “groups” or “fields” attributes to control which fields are shown. This is the same as you would use in the [pdb_single] shortcode. For example:
groups=main,address
Brilliant, this much better than using the Post Content Source Fields section.
Also, is it possible to present a calculated number as a percentage, for example:
[field_1]/9*100=[?round_0]
Where field_1 = say 9, the above calculation would return 100%
At the moment it returns 100 without the % sign.
I’ve tried to use a “Combine String” to achieve this, but that doesn’t work either the page ignores the “%” symbol.
Try putting this in the “attributes” setting for the field:
data-after::%Sorry…just checked that, it’s not working.
You can also do this with some CSS…for example, this is for a field named “totals”:
#pdb-totals-field::after {content: "%";
}
Look at the HTML source to the get the selector for your case.
Hi Rowland,
I thought I’d start a new thread for a couple of subsequent questions now I seem to have the Directory Tools working.
1. If I want to bolden a text field, either as a Text Line or Text Area, what do I enter in the “Attributes” field to do this?
2. Is there a way to make the images larger on the Proxy Posts than the very small ones please?
3. I would like to create a link field that is combined from other fields, is this possible? I thought I could do it using the “String Combine” field type or the Numeric field, but the Numeric field isn’t selectable on the Proxy Posts yet, so for example:
– Field 1 = start of link field where the default is: Enquire
– The result in this example would be output as: Enquire , but this would show as “Enquire” as a link to https://xnau.com in this example on the Proxy post page.
Thank you, Russell
For your 1 and 2 questions, this is something you will need to add your own CSS rules to accomplish. The plugin doesn’t provide that level of control over the display.
There isn’t any way to build a like such as you’re asking about unless you want to write some custom code. I do have an update to Directory Tools that adds the string combine fields to the available fields for a proxy post, but it still will not be possible for you to add a link to it without custom code. You can use a link field that is configured with a default value. Whatever is in the URL part of the field value will be what the “Default” text links to. Check the linked reference for the details.
Hi Rowland,
I have fixed the image size by adjusting the “Image Size” in the settings and by increasing the file upload limit.
I will see if I can work out the CSS to bolden only certain sections of the Proxy Posts, but that’s not as important as the image.
I will see if the link field can do what I am hoping it will do too.
Also, how far are you off with an update to incorporate the Calculated fields on Proxy Posts too please?
Cheers, Russell
Hi Rowland, I’m not sure what has happened, but even now when I check the “Approved” record, these are not showing on the Participants Database Proxy Posts page. There is only one on there.
This may help, only one record had a Proxy Post Id, which says it is “read only”, but the field is editable. I have tried to enter a Post Id in this field for the ones that are not showing, but they still don’t appear.
– Is there a setting that’s somehow changed on the Proxy Post Id read only field I need to change?
– How do I get my Proxy posts to show on the Participants Database Proxy Posts page.
FYI – I have resaved the permalinks page again, just in case it was this.
Thank you, Russell
Hi Russell,
Administrators can always change the proxy post ID, so the fact that you can change it is not a problem.
Check the Directory Tools settings, make sure proxy posts are fully configured.
If you have “Approved Records Only” checked, a proxy post will be created for a record when it is is approved. If that is not happening, I would assume that there is an issue with the Proxy Posts configuration.
Hi Rowland,
Thank you.
So here’s what I’ve tried:
– Unchecking the “Approved Records Only” – still no posts.
– Even the one post that was there which was originally the only “Approved” post is no longer there, which was unchecked, but is now checked again.
– All proxy posts are “Approved” now any way.
– Tried setting up a new “Approved” test participant.
So I think it is a problem as you suggest with the configuration, so to help, the fields are completed, as follows:
Under Proxy Post Setting:
– Enable Proxy Posts – checked
– Use Proxy Posts for Single Record Displays – checked
– URL Slug – “directory”
– Post Title Source Fields – tried selecting one or two fields or leaving blank.
– Post Content Source Fields – tried selecting one or two fields or leaving blank.
– Post Description Source Fields – blank
– First Slug Source – First name field
– Second Slug Source – Country field
– Auxiliary Slug Source – None
The Star Ratings and Favourite Settings are as default, as not got to looking at these yet.
I hope you can work this out.
Thank you, Russell
Under Advanced Post Settings:
– Approved Records Only – unchecked
– Generate OpenGraph Tags – checked
– Display Using PDB Shortcode – checked
– Show Content Fields Only With Shortcode – checked
– Enable Comments on Proxy Posts – checked
– Single Record Shortcode Extra Attributes – empty
– Record List Shortcode Extra Attributes – empty
OK, generally speaking, your settings look correct. The next step would be to turn plugin debugging on, clear the debugging log, then test the creation of a proxy post, probably best to do that by creating a new record in Participants Database.
The debugging log will show the proxy post getting created. It will also log the proxy post getting updated if a Participants Database record is edited such that it would change the content of the proxy post.
Hi Rowland – thank you.
Here is the log from adding a new participant to the database, and I am hoping this means something to you. It looks like it is something to do with the calculation somehow?
Cheers, Russell
Log file initiated at: 08/02/2022 6:16 pm UTC
[02/08/22 6:16pm UTC]
PDb_List_Admin::initialize list query: SELECT * FROM wp_participants_database p ORDER BY date_updated desc LIMIT 0,10
[02/08/22 6:16pm UTC]
calculation template format not recognized for template: =[?unformatted]
[02/08/22 6:17pm UTC]
calculation template format not recognized for template: =[?unformatted]
[02/08/22 6:17pm UTC]
And followed by this, as I the comment was too long:
PDb_submission\main_query\base_query::execute_query storing record: INSERT INTO wp_participants_database SET
= NOW(),
= NOW(),
= ‘Test with debugging on’,
= ‘Maldives’,
= NULL,
= ‘0’,
= NULL,
= NULL,
= NULL,
= ‘yes’,
= ‘Enquire‘,
= NULL,
= NULL,
= NULL,
= NULL,
= NULL,
= NULL,
= NULL,
= NULL,
= NULL,
= ‘Yes’,
= ‘no’,
= NULL,
= ‘CKI1S3C’
[02/08/22 6:17pm UTC]
PDb_List_Admin::initialize list query: SELECT * FROM wp_participants_database p ORDER BY date_updated desc LIMIT 0,10
As far as I can tell, it’s not even attempting to create a proxy post. Not sure why it would do that, considering the settings you posted. I would suggest you deactivate/activate the plugin, see if that helps. After that, try reinstalling the plugin from the downloaded zip file.
Hi Rowland, this did the trip, but in the end I had to delete all the existing records and start from scratch again. But so far it is working, thank you.
Hi Roland,
Seem to be having an issue that I haven’t been able to resolve.
We have Proxy Posts enabled and I imported aprrox 780 Participants which would not create the Proxy Posts and the Date Created was in the past so it came up with “Missed Schedule”. Resolved this by clearing the Date Created field and they were all working great. Now when adding a new participant it creates the Proxy Post which is viewable with the full URL but even though we have “Use Proxy Posts for Single Record Displays” checked the new participants when searching the directory is is showing the participants page with the link for the Single Record which 404’s because the Results Page has been deleted as we opt for the Proxy Posts.
Are thoughts?
Thanks for letting me know about this. What seems to be happening is the Participants Database cache is not providing the current value for the proxy post id.
You can force the cache to clear by performing a “with selected” operation on the admin list. It doesn’t matter what operation it is, it will clear out the cache, and then your list should start using the correct link to the proxy post.
I’m working on a fix for this so it won’t happen again.
Thank you!
Have been tearing my hair out with this one, just Tested AOK.
If you could let me know when the fix is available that would be amazing.
I have similar problem as Kevin Maloney: Directory Tools causes my site to crash (started 2+ months ago but I finally troubleshooted). If I remove Directory Tools via FTP, site is OK. Error is:
Fatal error: require_once(): Failed opening required ‘/home/uiwk3nzdgboc/public_html/Running-My-Races/5k/wp-content/plugins/participants-database//vendor/wp-background-process/wp-async-request.php’ (include_path=’.:/opt/alt/php73/usr/share/pear’) in /home/uiwk3nzdgboc/public_html/Running-My-Races/5k/wp-content/plugins/pdb-directory-tools/pdbdt/Plugin.php on line 246
Could I possibly get latest version of the plugin and see if that works? Or do you have other suggestion?
I originally installed it in January 2019.
Thanks much!
The plugin update should be available on your plugins page, the latest version is 1.4.5. You can update the plugin there. Let me know if you don’t see the update.
Thanks for quick Saturday reply. I’m not able to update. If I activate Directory Tools plugin, site goes down with the error msg. So I deactivated and it shows that I have version 1.1.
Could you email me latest version?
Deactivate Participants Database, then activate Directory Tools, then update it. After that, you can reactivate Participants Database.
I love this plugin and add on, but currently my URL slug isn’t working. I set the URL Slug under Proxy Post Settings, and that works, but after setting the “First Slug Source” and hitting “Save Changes,” it only shows a random string of numbers and letters for the slug. I went to Advanced Proxy Post Settings and clicked “Proxy Post All Records,” but it isn’t updating. Any idea how to fix this?
Assigning a random slug like that indicates that the plugin wasn’t able to find a suitable text source for the slug. This can happen if the configuration for the slug source fields point to fields that are empty or don’t contain usable text.
The “Proxy Post All Records” won’t change the name or slug of an existing proxy post.
If you want to start over, I suggest you delete all your proxy posts. If you’ve only got a few, you can do this on the Proxy Posts page in the Participants Database admin menu. For a large number of proxy posts, you should open a database editor (like phpMyAdmin) and use a query to delete them all. Make sure your first slug source field will have suitable text for each post, then rebuild all your proxy posts.
In case you haven’t done this yet, I just posted to the Directory Tools FAQ the method for deleting all the proxy posts and starting over.
This was very helpful. I got it working. Thank you!
Hello. I just updated to the latest version of this plugin add-on and it’s causing my website to crash. I had to uninstall via phpMyAdmin. Each time I try to active the plugin, it crashes the site. Any ideas what’s going on?
Hi Kevin,
I’m sorry the update is crashing your site. I’m not sure what the problem is, there is a specific error happening that we need to see. Did you get an email notifying you of the problem? This email contains helpful details.
What php version are you using?
Roland,
Here is the email that came from WordPress:
WordPress version 5.7.2
Current theme: Enfold (version: 4.8.3)
Current plugin: Participants Database Directory Tools (version 1.4.1)
PHP version 7.3.27
Error Details
=============
An error of type E_COMPILE_ERROR was caused in line 250 of the file /home/nc4xv0ql5fp2/public_html/wp-content/plugins/pdb-directory-tools/pdbdt/Plugin.php. Error message: require_once(): Failed opening required ‘/public_html/wp-content/plugins/participants-database//vendor/wp-background-process/wp-async-request.php’ (include_path=’.:/opt/alt/php73/usr/share/pear’)
You must be using the latest version of Participants Database, should be minimum 1.9.7.4
Also, Directory Tools should be version 1.4.3
Hi
I’m using the proxy post to expose the pdb to search engines which works perfectly. The question I have is that the resulting URL takes the user to the proxy post page. I am using the shortcode setting and although it displays similar to my single record page they are 2 different pages. Is it possible to direct the search result (proxy url) to my single result page (the page where i have pdb_single) or do I need to style the proxy post to just look the same? I do not want people to see when the post was created, by whom, with comments etc.
Thanks
When a proxy post is displayed by WordPress, it uses a template from the theme according to the WP Template Hierarchy. The display of the post meta values is under the control of that template. The best way to take full control over the display of the proxy post is to set up a template for the proxy-post custom post type. I suggest you make a copy of the template the theme is using (usually, that would be single-post.php and rename it single-proxy-post.php, you will be able to control which elements are displayed on the proxy post page. If you strip down the template to show only the post content, it will look pretty much exactly like the plugin single record page.
Another possibility is to hide the post meta using CSS.
Hi
I set up this add-on with post slug so that my urls look like http://www.example.com/database-name/single-record when accessing a single post for a record. I also have “display using PDB shortcode” in the advanced settings unchecked.
Now I am trying to build a dynamic page with Elementor Pro, but I can’t seem to bring in just the data from one filed, for instance the shortcude [pdb_single fields="category"] returns “No records was found”. But the shortcode [pdb_single record_id="1" fields="category"] for example, works. But I want the record to be dynamically allocated depending on the page.
I guess that this could be solved with the permalink add-on, is that correct? Or does it overlap with this add-on?
I also tried to bring in just the data from a field. Either just the data entered or a comma separated string for multi-select fields using custom fields from the proxy records. But I can’t find the keys to access these fields and shortcodes seems to always be formatted with the key, value pair.
Essentially what I want is to be able to access just the raw data from a single field in the record associated with the current single page so that I can format everything else manually. Either through a shortcode or custom field or something else.
I hope that makes sense^^
Hi Erik,
What you want to do is possible, but there will be a technical challenge for you trying to use Elementor’s dynamic features. On top of that, it sounds like you are not quite getting how proxy posts work.
When you are using proxy posts to show the single record, the “page” that that takes place on is not a normal page, it is a page that is generated by WordPress. Because of that, you can’t use the Elementor editor to format that page. There is a way to use those dynamic features if you’re familiar with how things work behind the scenes and have coding skills.
However, you may want to back up a little and decide whether you need to use Proxy Posts at all. The purpose of proxy posts is to provide a globally searchable, spiderable mirror of data in the Participants Database. If you don’t need that, then you may want to disable proxy posts altogether, and use the Pretty Permalinks add on to get your single record URLs.
Pretty Permalinks does not affect or interact with proxy posts in any way, it is simply a way to view a single record shortcode using a text-based URL. Generally speaking, if you’re using proxy posts to show your records, you don’t need Pretty Permalinks because you’re not using a single record shortcode on a regular page to display the record.
If you’re not using Proxy Posts, then you will be using the single record shortcode to show your records. Because in that case it is a shortcode on a regular page and not a proxy post, you can use the Elementor editor to format the page. That may be a better choice for you.
As to presenting specific data from the record, this is best done using a Participants Database custom template for the single shortcode where you can use php to access the values in the record and display them as you wish. If you don’t use a custom template and just use the “fields” attribute of the shortcode, you can do that to display specific fields, but the plugin will format the data according to the internal defaults.
Also, I would advise you not to use the “record_id” attribute to test the shortcode: the shortcode will know which record to show if you’ve got it configured correctly, using that attribute hides the fact that you’re not using the correct page to view the shortcode, and you’ve got to get that right before anything else.
Thanks for your detailed explanation, however I opted to go another route without participant database altogether. I don’t think it was the right product for my scenario in the first place. But it’s probably a great product for the right scenario.
Thanks again for your help.