Essential for anyone using Participants Database as an online directory, this plugin selectively exposes all your entries to search engines.
Also includes favorites and star rating widgets.
See the FAQ for instructions on setting up social media sharing and help with search engine indexing.
Product Setup
Proxy Posts
The big thing this add-on does is create something I call “proxy posts.” These are a new WordPress custom post type that mirrors the content in your Participants Database records. With this, nearly anything that you can do with blog posts, you can now do with Participants Database records. That includes social media publishing and sharing, reviews, comments, cross-posting etc… The big advantage for online directories is that now all the directory listings are exposed to search engines and can be indexed and searched like regular WordPress content. It is important to understand that proxy posts are not normally shown to your site visitors, the purpose of the proxy post is to provide searchable content to search engine spiders and general site search. When a proxy post is viewed on the website or indexed by a search engine, what is actually seen is the Participants Database single record display, and this is fully configurable and templatable.
How It Works
When proxy posts are enabled, every time a new Participants Database record is created, a proxy post is created using the information contained in the record. When a record is updated, the information in the associated proxy post is updated too, so these posts will always reflect the current data in the database. You have complete control over what information from the record gets placed into the proxy post, so you can pack lots of findable content into the proxy post while not exposing any private or administrative information you don’t need publicly visible. There is also a way to automatically create proxy posts for all your records, so if you’re coming to this with a database already full of entries, your whole database can be mirrored into proxy posts with a single operation.
Setting Up the Proxy Post Content
In order to provide the proxy post with it’s content, you need to decide which fields from the Participants Database record will be used. These are called Proxy Post Content Sources and it is necessary to set at least a minimum of them in order to create the proxy post. There are several parts to a post, and the plugin gives you control over how each part is filled with content when the proxy post is created or updated. Each part serves a specific purpose in terms of how the entry is seen and indexed by search engines or how the entry is shown in social media shares. These settings give you a way to assign which Participants Database fields will provide the content for each part.
Title – May be the most important in terms of search indexing, it should identify the listing, but should be short. Most search engines limit the length of titles, you won’t want yours to get cut off because it’s too long. Consider only using 1-3 fields here, shooting for a maximum length of 60 characters.
Content – provides the “body” of the listing, you may want to put as much information as possible in here.
Description – provides a short description of the listing, should be limited to 4-6 lines or 320 characters. That would typically be 3-6 fields, depending on what is in them. These are just general guidelines, it’s not enforced in any way.
Featured Image – If you are using the Image Expansion Kit add-on, you can also assign which field provides the featured (or thumbnail) image of the post. Only image fields can be selected for this. Together these configurations should create an accurate representation of what each listing contains.
Setting Up the Post Slug
The “post slug” is probably already familiar to you. That is the unique name that is used to show the post, and it is typically based on the title, but here, you can choose which fields are used to make up the post slug. The post slug will appear in the post URL, so it’s helpful if it is based on the name of the listing. To build the post slug, you have 1, 2 or 3 fields assigned to provide the words for the slug. The way this works is the first 1 or 2 fields are used to make the slug. If it is not unique, then the 3rd term is used. If there is no 3rd term defined or even the three together don’t make a unique slug, a number is added. You must have at least one field defined to make the post slug.
The URL Slug
So, we looked at the post slug, but what is the URL Slug that is at the top of the Proxy Post settings? This is a word that acts as a keyword to name the kind of thing you have in your listings, and also to tell WordPress that the post is one of your Proxy Posts. For example, let’s say your directory is for restaurants. You would probably want to use the word ‘restaurants’ as your URL slug because that is the kind of thing you have in your listings. That would also make sense in the URL…so if you have a restaurant called “Tip Top Lounge” The URL for that listing could then be something like https://yoursite.com/restaurants/tip-top-lounge. So think about how it will look in the URL because the word in your URL Slug setting will go just before the post slug in the URL. URLs that are readable and descriptive look more professional and authoritative, so it’s important to get it right. Also, this is not something you will want to change later because it will throw all your link rankings off because any reputation you’d built up for the old URLs would be lost.
Putting the Proxy Posts All Together
Now that you’ve got the basic configuration together, it’s time to create your proxy posts. First, make sure you have the “Enable Proxy Posts” enabled. Now click on the “Advanced Proxy Post Settings” tab. One setting you will want to check is the “Approved Records Only” checkbox. Be sure to have that checked if you are controlling the visibility of your Participants Database records with the “approved” field. Now, at the bottom on that tab is the button to create proxy posts for all your records. When you click that, it will load all the records into a queue and begin processing them in the background. When the page refreshes, it will tell you how many records it’s processing. It may only take a few seconds for a thousand records, but if you’ve got a very large number, it could take several minutes. Just check back in from time to time to see if it’s done. When the process is complete, it will give you a report on how many records were created updated, etc. You should use this function whenever you make changes to the proxy post content configuration so that all the records can be updated. If you are making individual edits, you don’t need to do this because the proxy will be updated whenever a record is edited.
Build the WordPress Permalinks
Once you’ve done this, go to the WordPress “Permalinks” settings page and save it. You don’t need to change anything, just click save so WordPress can rebuild all the permalinks. This is found under the “Settings” item in the WP admin menu. If you make any changes that affects permalinks to proxy posts, you need to do this again. You don’t need to do this when adding or deleting records.
Allowing Commenting on Proxy Posts
A proxy post is a way to display a Participants Database record in a core WordPress context. This means that all the things you can do with any WP post, you can do with a Proxy Post, including discussions (commenting).
You must have the plugin configured to show the proxy post (which has its own page generated by WP) instead of the single record display (which is done with a shortcode). The settings to look at are “Enable Proxy Posts” (of course!) and “Use Proxy Posts for Single Record Displays” With those enabled, when someone clock on a PDB record in a list display, they will be taken to the proxy post’s page instead of the single record display. There are actually many ways to set something like this up, but this is the simplest.
Now that your records are getting displayed using the proxy post, you need to enable commenting. In the Directory Tools settings under the advanced poxy post settings tab, you’ll see the “Enable Comments on Proxy Posts” setting…that should be checked. Also, if there are any global WordPress settings that affect comments, you may need to check those too.
Commenting can be enabled/disabled on a per-post basis as well. You will see this if you edit the proxy post directly (see below).
With that set, commenting on each record (via the proxy post) will be enabled. Any other plugins you have installed that affect commenting will be applied if configured to do so by that plugin.
The Proxy Post Admin List
It’s possible to see all your proxy posts in the admin section: in the Participants Database menu is an item “Proxy Posts.” This is really just for reference because you don’t need to edit them from this page, the proxy post will be updated from the Participants Database record whenever that is edited. If you edited them here, you’d lose any changes you made.
The Proxy Post Archive
WordPress has an internally-generated page called an “archive” that displays all the posts of a specific post type. Directory Tools gives you some control over the appearance of this page: you can disable it, or if you want to use it, you can change the labels and description that is used in the header of the page. See the settings section for details.
To control the appearance of the proxy post archive page, you must create a WordPress theme template for it. If you don’t do this, a default template will be used. The custom template should be named “archive-proxy-post.php”. Take a look at this article for the details: Custom Post Type Template Files
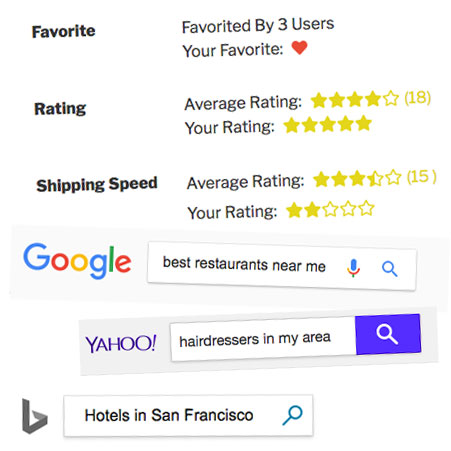
User Favorites
There is another new form element type, “Favorite” that lets your users select records as a favorite, or maybe something similar to a “like” button. The general appearance of the favorites widget is set up under the “Favorite Settings” tab. The number of favorites for each record is saved, so you can use the number of favorites to sort your lists, showing the most-favorited entries at the top. To set up your favorites widget, create a new field on the Manage Database Fields page. Set the form element to “Favorite” and the widget will display in the record according to the location (group and order) of the field. You may have only one favorite widget defined. Along with the favorite widget is the user favorites shortcode, which is used to show the user a list of all their favorites. There are several settings that go along with this shortcode. To show the user a list of their favorites use this shortcode: [[pdb_user_favorites]] which operates essentially as a shortcut to showing a Participants Database list, but only with those records that the currently logged in user has chosen. The shortcode can use the “template” attribute to set the template…for instance to show the user’s favorites as a responsive list, you could use a shortcode like [[pdb_user_favorites template=responsive]] All that does is use the regular responsive template for the pdb_list shortcode, so you can easily use a custom template for that if you want. Further customizations to the shortcode can be added in the settings.
 Star Ratings
The Directory Tools add-on creates a new type of form element, “Star Rating” that gives your logged-in users the ability to rate your listings. Under the Star Ratings Settings tab you can configure the general appearance of the star rating widget. To place the widget, you add a form element to Participants Database (on the Manage Database Fields page) so that it will be included in your listings. When you add the form element, give it a name that describes what the rating is for, then set the form element of the field to “Star Rating” You can have multiple star rating fields, so if you wanted to give your users the ability to rate several things separately, you can do that. The way this works, is when a logged-in user views the record detail display, their rating is visible. They can select the “stars” to rate the item any time. When they click, the rating is saved. Each record stores the average rating, so you can easily sort your listings by rating by selecting the rating field as your sort field.

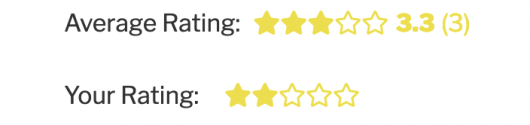
Average Rating Display
When the rating field is displayed, it shows the average for all ratings of the record. This average is normally shown as a set of star icons, but it can be configured to also show a numeric average. This is configured in the rating field definition “attributes.” To show the numeric average, use the average_numeric attribute. The value tells the number of places to use in the numeric average: 1 will show one digit after the decimal point, 2 will show 2, etc. To show only the integer value, set the value to “true” (a 0 will read as false, and prevent the value from showing at all).
To prevent the average rating star icons from appearing, use “average_stars::false.”
User Not Logged In Message
Both the Star Rating and Favorites widgets require the user to be logged in in order to rate or favorite a listing. It is possible to configure a message with a link that will be shown instead of the rating or favorite widget if the user is not logged in. This is configured in the field “attributes” parameter like this example:
login_message::Please %Log In% to rate this.
The % signs show where the login link should be placed. In the example above the phrase “Log In” will be linked to your site’s login page. The redirect will be set so that the user will come back to the listing page after logging in, so they can rate or favorite the listing right away.
The Overall Ratings Field
If you have several ratings fields defined, it might be desirable to have a way to sort and display an “overall rating” that combines all the ratings into a single number for each record. To use the Overall Ratings field, you must create a new field on the Manage Database Fields page. Next, change its form element to “Overall Rating” and then configure it to display like any other field. This field cannot be edited, but it is updated every time a new rating is submitted, so it will always show the current overall rating value.
Product Settings
Proxy Post Settings
Enable Proxy Posts
Check this to use proxy posts. It defaults to unchecked so that you can configure the proxy post content sources before turning it all on.
Use Proxy Posts for Single Record Displays
This changes how the “single record display” or detail page operates with Participants Database. When checked, the detail links usually shown in Participants Database list displays and search results will be changed to point to the proxy post instead of the regular single record display. This means you don’t need a page with the [pdb_single] shortcode on it any more, this is now handled by the proxy post. This is important if you are using third-party plugins to add functionality to your single record display. For example, if you are using Jetpack and have social media sharing enabled, this will add social media sharing buttons to your single record display. Note that you must configure your third-party plugin to add its functionality to Proxy Post custom post types.
URL Slug
This is the generic term used to identify your single listing display in the URL. For example, if your directory is for hotels, you might want to set this to “hotels” so that the URL that shows in individual listing will have /hotels/ in it. This string must be unique to your site because it is used to tell WordPress to show the proxy post for the listing. So, in the example, there must not be a regular page that uses the slug “hotels” because that will confuse things and cause problems.
Content Source Fields
Post Title Source Fields
These are the fields that are used to construct the title of the proxy post. Typically, this will be 1 or 2 fields. It does not have to be unique to each listing, but you probably want it to be.
Post Content Source Fields
These fields are used to put together the content of the proxy post. You can, and probably should, put as many fields in here as you want publicly seen. For some fields, a label is added for clarity. The fields that have labels automatically added are any kind of selection field like dropdowns or radio buttons. This is so you don’t end up with a word in the content where it may not be clear what it is, which might look “spammy” to a search engine. The plugin tries to make the content look like regular content, even though it is constructed of several components. As long as the content seen in the proxy post is similar to the actual displayed content (proxy post content is not displayed directly on your site), you will be good. You can set your own label for other kinds of fields by adding a “label” attribute to the field definition. For example if you have a text field that had the year a business was established, you might want to add a label to that field put putting something like this into the “attributes” parameter of the field definition: label::Established in %s The “%s” will be replaced with the value of the field, so in the proxy post content it would read something like “Established in 1995.”
Post Description Source Fields
Choose several fields to make up the description text for the post. This content is sometimes seen in search engine results ans social media shares. It should be fairly short, the general guideline is 4-6 lines or 320 characters. It should have content that would serve as a brief summary of what the entry is for.
Post Featured Image Field
Proxy posts may have a featured image, and this selector lets you choose which image upload field can be used to provide the featured image. This image is mostly seen in social media posts, and it will often be displayed when the proxy post is viewed on your site. This depends on your theme. This setting is only available if you have the Image Expansion Kit add-on activated, and only single “Image Upload” fields can be used.
Post Slug Source Fields
Each proxy post (like WordPress posts in general) has a unique identifier called a “slug” that is used in the URL to view the post. There are three fields here: the first two are used to build the slug, but if that is not unique, the third term will be used to make the slug. The second term is optional, and if you don’t define a second term, then if the first term does not make a unique identifier, then the third term will be used. This can work out well if there are some listings in your directory that have the same name.
For instance if you have a business listing and the business name is your first term, you have a blank second term and then the third term is the city. For businesses that only have one listing, the slug will be the business name, but if there are several with the same name in different cities, the slug name would be the business name and the city.
Slugs are built by making it all lowercase, stripping out punctuation, then replacing spaces with hyphens so it becomes valid to use in a URL. This is the same process that WordPress usually uses to make the slug from the post title. If all three terms do not make a unique slug, a number will be added to the slug, just as WordPress does. If all the fields are empty, a random number ID will be used as the slug.
First Slug Source
This one must be set, it is the primary word or words used to make the slug.
Second Slug Source
This one is optional, but if defined will be added to the first term to make up the slug.
Auxiliary Slug Source
This is the “tie-breaker” that will be used if the slug built using the first one or two sources is not unique.
Advanced Proxy Post Settings
Approved Records Only
If selected, only records that have been approved will be included in proxy posts. This will prevent unapproved records from getting indexed or found in site searches. Read the Approving Records section of the docs for more info. If you are using record approval, you should keep this checked so unapproved records don’t show up in search results. Note that for search engines, unapproving a record does not immediately remove it from search results.
With this setting set, if a record is approved, a proxy post will be created for that record. If the record is unapproved, the proxy post will be deleted.
Generate OpenGraph Tags
OpenGraph is a standard set of HTML meta tags that is used by Facebook and many other social media sites. It provides the data that the social media site uses to construct it’s shares. For example, if you share a page or post to Facebook, it will show an image, a title, some text, etc. That information comes from the OpenGraph tags in the HTML of the originating post. Enabling this places OpenGraph tags based on the proxy post content in all single proxy post pages. You may want to disable this if you are using another plugin that generates OpenGraph tags so there isn’t a duplication. To check on your OpenGraph tags, you need to view the HTML source of your page. Look at the bottom of the <head> tag. There are also several online tools for checking your meta tags. If you want your content shared to social media, it is very important these tags are included in the page HTML.
Proxy Post Display Configuration
Display Using PDB Shortcode
If this is enabled, when a proxy post is viewed on your site, a [pdb_single] shortcode is used to display the content. In most cases, this is what you want, but you can uncheck this and display the proxy post using its native formatting. If you do choose to show your content using the WP native formatting, you can use the normal WordPress templating system to format the content.
When this is enabled, a [pdb_single] shortcode is used to display the record. By default, the fields shown will be the same fields that are used to create the proxy post content, but you can override that with the settings below.
You must use this setting if you want to display dynamic content (such as Participant Logs) with a Proxy Post.
Note that the WP template for displaying the proxy post is always active, so for the general layout of the page, that template determines how that works. The difference is, with this option checked, the “content” part of the post is replaced with the single record display for the record.
For more information about using WordPress custom post type templates to control the layout of proxy post pages, check this article: Custom Post Type Template Files
Show Content Fields Only With Shortcode
With this setting, only fields that are configured in the “Post Content Source Fields” setting will be displayed. With this unchecked, all public fields will be displayed. This only applies if the “Display Using PDB Shortcode” setting is enabled.
If you want to determine which fields are shown independent of the “Post Content Source Fields” setting, uncheck this setting, and use the “Single Record Shortcode Extra Attributes” setting to control which fields or groups are displayed on the proxy post page.
The default is to have this option checked, and in most cases, that is how you should do it.
Enable Comments on Proxy Posts
This setting allows you to globally enable comments on all Proxy Posts. If you want your users to be able to leave comments on your listings, you can use this setting to turn that on for all proxy posts. Note that you will not be able to turn commenting off for individual listings if you use this setting.
With this setting unchecked, commenting will be off by default, but you can enable comments on individual proxy posts using the Proxy Posts page in the Participants Database admin menu. To enable commenting on a per-listing basis, select the proxy posts you want to allow commenting on, then do a “mass edit” on those items, enabling comments by checking “allow comments.”
Single Record Shortcode Extra Attributes
When proxy posts are using the [pdb_single] shortcode to show its content, you can use this setting to add attributes to the shortcode. You should enter the attributes in the same format you would when setting up the shortcode directly…but without the shortcode name and brackets. For example, if you wanted to use a different template and only show certain groups of fields, the normal shortcode for that could be something like: [pdb_single template=bootstrap groups="main,address"] To set that up for the proxy post display, you just need to put the attributes in the setting, like this: template=bootstrap groups="main,address"
Record List Shortcode Extra Attributes
This is just like the above setting, only for the context of a proxy post archive page or search result. You will likely want to show only a small set of fields here so the list won’t take up a huge amount of vertical space. For example: fields="address,phone,email,website"
Proxy Post Archive Configuration
Enable the Proxy Post Archive Page
When this is checked (as it is by default) there will be a page on your website that lists all of the proxy posts. It is normally accessed using the “URL Slug” value you have defined above. For example, if the URL Slug is set to “participants”, the archive page will be available at this URL: https://xnau.com/participants.
If you had this enabled and want to disable it, you must resave the WP Permalinks after you uncheck this setting so that the permalink to the archive page is deleted.
General Name
This is the generic name of your proxy posts. It names what the posts (and your PDB records) represent. For example, if you’re using Participants Database as a membership list, you might want to label the proxy posts “Members”.
Singular Name
Generic name for a singular proxy post, for example: “Member”.
Description
This is a generic description of proxy posts, which is shown under the title on the archive page. For example, “This is a list of all our active members”.
Create or Update Proxy Posts for All Records
This button initiates a full scan of all your Participants Database records and creates or updates the proxy post for each one. You must have the minimum content configured for this to be available, so if the button is missing, set up the proxy post content source fields first. When you start the process, it will tell you how many records it’s going to process…this will be all your records. After a minute or more (depending on the size of your database and how much work needs to be done) you can refresh the page and when the process is complete, it will give you a simple report on what it did:
- created – there was no proxy post for the record so it had to be created
- updated – the proxy post needed to be updated because the content or the configuration changed
- skipped – there weren’t any changes to update in the proxy post
- deleted – the record was not approved (or doesn’t exist), but there was a proxy post for it, so it was deleted
This operation should be performed just after first configuring the plugin, and then any time there are changes to the proxy post content configuration so that everything will be brought into sync. You don’t need to do this if you are editing records or importing a CSV, this happens automatically in those cases.
Star Ratings Settings
Star Icon
Select the icon to use for the star rating widget.
Star Color
Sets the color of the icons and ratings count.
Average Rating Label
When the average rating is shown, use this label. Blank it out for no label at all.
User Rating Label
When the user is shown their rating, use this label for the value.
Favorite Settings
Favorite Icon
Select the icon to use for the favorite widget.
Favorite Icon Color
Icon color to use for the widget.
Show Total Favorites
When enabled, the total count of favorites for the record is shown.
Total Favorites Label
When the total favorites value is shown, use this label.
User Favorite Label
When the user is shown their favorite status for the record, label the value with this.
Favorites Shortcode
No Favorites Message
When the user views their list of favorites, but they haven’t favorited any entries yet, this message is shown.
User Not Logged In Message
If the user views the user favorites list, but is not logged in, this message is shown. The words between the %s tokens will have a link to the login page. This link will return them to the user favorites list once they log in. Leave the tokens out if you don’t want the link.
User Favorites Shortcode Extra Attributes
The user favorites shortcode is just a wrapper for the Participants Database list shortcode, so you can customize it in the same way. If you want to add any additional attributes to the list shortcode, you can do that here. For example to make sure unapproved records are not shown, you could use a setting like this: filter="approved=yes"
F.A.Q.
How can I see if search engines are indexing my Participants Database entries?
For anyone interested in optimizing their site’s visibility on the web, an account with Google Search Console is essential. This service offers many tools for monitoring and correcting problems with your site’s Google search results. There is a similar service offered for Bing: Bing Webmaster Tools.
To see if your directory entries are getting indexed and what the Google spider is seeing, log in to Google Search Console and go to Index/Coverage. On that page, you’ll see if there are problems with indexing, and also how many pages have been indexed. If you drill down, you can even see how each individual listing is indexed.
If you are experiencing problems with the indexing, this service will help you fix them.
How can I add my listings to the sitemap?
Doing this requires a third-party plugin such as Jetpack or Google XML Sitemaps. There are several others, of course, but they all work in pretty much the same way.
When you set up the sitemap plugin, it is very important you include the proxy-post custom post type. In most cases you will have to do this in the settings somewhere, it won’t happen automatically. It does happen automatically with Jetpack because there aren’t any settings for adding custom post types, so the Directory Tools plugin does that for you.
In Jetpack, you’ll find the sitemaps setting under Traffic/Sitemaps is really just on on/off switch.
To see the sitemap, just click on the sitemap link provided by the plugin.
Once you have your sitemap set up, submit it in the Bing webmaster tools or Google search console. That will provide you with feedback about the sitemap such as if there are problems. Submitting the sitemap is not necessary: search engines will look for the sitemap anyway, but doing it in the console give you positive feedback that it is there and working.
How do I set up social media sharing like share buttons?
This will be provided by a third-party plugin…there are lots to choose from, but it must be able to support adding a share button to a custom post type so you can include the proxy-post custom post type. Once the button is visible on the proxy post’s page, that’s all you need to do. It is possible to take it to the next level by making sure the meta tags are in place and working.
Directory Tools can place meta tags for you, but first check with your social media share plugin to see if that will provide the meta tags. You don’t want to have two sets of competing tags on your page! That is very important, it looks spammy if you duplicate the tags.
You can check your meta tags in Facebook’s meta tag debugger, and there are many others. Be careful on sites that are trying to sell you “SEO” services. There is a lot of noise and snake oil in that industry, so be skeptical of the claims you will see. It is possible to optimize the search engine profile of your site, but be wary of paid services for things you can get for free or inexpensively from a good SEO plugin.
You can also (and you should!) check your meta tags yourself by simply inspecting the HTML source of your page using your Browser Developers Tools. The will usually be at the bottom of the head tag on the page.
How do I enable Comments on Participants Database records?
To enable comments on single Participants Database records, you must be using both of the “Use Proxy Posts for Single Record Displays” and “Display Using PDB Shortcode” settings. When those settings are checked, the single record link (also known as a “detail” link) on the Participants Database list display will go to a proxy post page instead of the single record page.
The proxy post page will show the content of the single record shortcode (as configured in the “Proxy Post Display Configuration” settings), but in the context of a WordPress post, which means that any functionality that is added to the “proxy-post” post type will be active on that page. This include comments.
You will need to take one further step, however, because a particular proxy post won’t show comments by default. You need to enable comments for the posts by visiting the “Proxy Posts” page in the plugin settings and enabling comments for the post. You can use the “bulk edit” functionality to enable comments on multiple proxy posts.
The comments functionality is the core “Discussion” functiuonality proivided by WordPress, so it will follow the configuration set in the “Discussion” settings for your site.
I need to change the "slug" or name of proxy posts.
The proxy post’s slug determines the permalink to the proxy post.
Once a proxy post is created, the slug cannot be changed by editing the Participants Database record. All the other proxy post content will be updated with your changes, but the slug will not. This is because once a proxy post has an established permalink changing the slug could affect it’s search engine response and possibly destroy any search engine rank it may have earned. If this doesn’t matter, then no worries, go ahead and change it, all links to the proxy post will be updated.
You have 3 options for changing the proxy post slug, depending on what you want to do.
To change the slug of an individual proxy post to anything you want: Open the “Proxy Posts” page in the Participants Database admin menu. Use the “quick edit” link to change the Slug.
Re-generate the slugs for a few proxy posts: Open the “Proxy Posts” page, select the posts you want to regenerate and use the bulk actions to delete them. Then use the “proxy Post all Records” button to regenerate the proxy posts.
Re-generate all the proxy post slugs: use the instructions below to delete all the proxy posts and start over.
Is it possible to start over and regenerate all the proxy posts?
Yes, we do this by deleting them all, then using the “Proxy Post all Records” button to regenerate the proxy posts.
Be careful about this if the proxy posts have been active on your site for a while, especially if you’re allowing comments. Comments made to a proxy post will be lost if the proxy post is deleted. If the proxy post has gained any search engine rank, that will also be lost if the slug changes.
The plugin has a method for deleting all the proxy posts, you should use this method to get a clean wipe of all the proxy posts and associated data.
To delete all the proxy posts, go the the Directory Tools settings page in the admin. In your browser location bar, add “&delete_all_pdbdt_proxy_posts” to the url, so it looks something like this:
![]()
Hit “enter” and the plugin will delete all the proxy posts. Click on the “Directory Tools” item in the admin menu to clear the “delete_all_pdbdt_proxy_posts” from the URL, so you won’t keep deleting them.
If you’re going to change the fields that are used to generate the proxy post slug, make those changes now.
Go to the advanced tab and click on the “Proxy Post all Records” button. In a minute or so, all the proxy posts will be re-created.
Hi Roland,
I am using proxy posts alright but I am having trouble trying to use them on a multilingual site.
I use Proxy Posts for Single Record Displays and display them using a PDB Shortcode.
Any idea how this could be achieved? (I am using Q Translate XT)
I can only get it to work by not using Proxy Posts for Single Record Displays but I loose the comments feature.
Thanks.
Try using the “Display Using PDB Shortcode” setting under the advanced tab. With that setting, the single record shortcode is used to provide the display on the proxy post page.
That’s what I did but it doesn’t seem to work.
I tells me the page (post) is not translated.
In the proxy posts list it says “Language not set”
I even tried to re-import the data.
Not using proxy posts the shortcode works fine in all languages.
Ok, well I tried this with the Q Translate XT plugin, and I see what you mean in the proxy post list, but I don’t know what “Languages are not set” means exactly. How are you placing multilingual content into the posts? I see that the feld titles are getting translated.
When I look at the list of regular posts or pages in the WordPress backend I have a column called “Languages” that tells men in what languages the single posts are available in. In the list of proxyposts in that column it says ‘Languages are not set’ for each post.
I place multilingual content by adding [:en][:de][fr] etc. or by using the flagged tabs at the top of posta and pages.
Field titles are translated and the detail’s page works fine in all languages if I do not use proxy posts for single records display.. If I use proxyposts, as soon as I visit a single record display it works fine in the site’s main language (English) but in all other language it says: ‘This content is not available in this language’
In my tests, the multilingual strings in the record content were successfully translated when viewed in the proxy post when using the “Display Using PDB Shortcode” setting. I can change languages, and the multilingual string changes as it should.
If the Q-Translate XT plugin is configired to work by showing a different post for each language, it won’t work with proxy posts because there is only one proxy post for each record. However, it does appear to work with multilingual strings. I didn’t see the “not available” message, so I’m guessing you’re using a different configuration that needs a separate post for each language. Proxy posts won’t be able to work like that, they will only work using multilingual strings.
I don’t think proxy posts will ever be able to work such that there is a separate post for each language unless Participants Database is somehow set up to provide a separate record for each language. It is not set up to work like that, and it would require some significant structural changes to work that way.
Am I understanding the problem correctly?
Just a short note to let you know that I solved it and the problem had nothing to do with your great plugin. I had a filter in the theme’s functions.php file with some multilingual text and I found that if a bit of translated text was missing in that code the whole post would show up as not translated.
Hi, Is it possible to combine the favorites shortcode with the locations map shortcode to show a map of the pins on the favorites page?
Yes, you can use the “automatic placement” feature for the map…but this also means you’ll have the map on all of your record list dispays, not just the favorites.
It is also possible to use a shortcode like this:
[pdb_user_favorites template=dynamicmap-shortcode class="pdb-listmap g-dynamic-map" ]Hi,
When I submit a record from the front end it gets registered all right, but when I check the ‘Proxy Posts’ it shows the post as ‘Scheduled’ and under Date it shows ‘Missed Schedule’.
When I open the post it shows the ‘Date Created’ and ‘Date Updated’ Time 8 hours ahead.
I have tried to change the time setting in Word Press’ General Settings but it did not change the problem.
I wonder how this can be since ‘regular’ posts show up with the actual time I create them.
One thing you can do to help see what’s going on is to turn plugin debugging on to “verbose”, then check the debugging log after a proxy post is created, it will show the parameters that were used to create the post. The proxy post is created using the timestamp of the Participants Database record that it is attached to, which is determined by the database timezone, not the WP or php timezone.
Most of the time, this is not a problem, even with an offset of 8 hours like you’re seeing. It may help to set the database timezone to something closer to your locality (this is done in the server configuration). I am not real familiar with how WordPress’ scheduled publishing works, but another approach would be to see if you have some kind of configuration on that feature (such as another plugin) that is setting up the post as scheduled instead of immediately published.
Finally, it is possible to customize the initial parameters that are used to create the proxy post with a filter: you write a small snippet of php that changes the date used to create the post. I can give you the details on that if you want.
I tried the “verbose” debugging and below is the result re proxy-post creation.
If it is not too much trouble could you help me out with the filter as suggested in the last paragraph of your anser? Thanks.
[06/16/20 12:33pm UTC]
pdbdt\proxy_posts\Post::create_proxy_post new post config array: Array
(
[ID] => 0
[post_content] => verbose test
verbose
verbose
verbose
verbose
verbose
[post_title] => verbose test
[post_excerpt] => verbose
[post_status] => publish
[post_type] => proxy-post
[meta_input] => Array
(
[pdbid] => 402
)
[post_thumbnail] => 0
[post_date] => 2020-06-16 22:30:49
[post_date_gmt] => 2020-06-16 22:30:49
[post_name] => verbose-test
)
[06/16/20 12:33pm UTC]
proxy post created with id: 544
Are you sure there is no configuration elsewhere on your site that might be marking the post as “scheduled” As far as I know, that is not automatic. You can see from the log that the plugin is setting the post to be published immediately, so something else is altering that status.
You can alter the parameters used to create the proxy post using the pdbdt-proxy_post_parameters filter, which passes in the parameters as an array. The second argument is an array of the record values. Your filter handler would alter the parameters array then return the altered array.
Doesn’t the log tell me that the post_date is 22:30 while the proxy post was created at 12:33?
It is an almost fresh installation of WordPress.
Your lines about the pdbdt-proxy_post_parameters filter are totally beyond my knowledge sorry. Any chance to have it coded?
Well, I explained how there could be a difference: the WP timezone and the database server timezone can be very different. As to the code, this is something you need to do with your own resources. I suggest you talk to your web host about setting the database timezone to UTC. That may solve the problem.
Ive just loaded this plugin and got everything working with the exeption of the favorites and star rating. I have added the fileds into the database and I can show them on the single record page but they are read only. Nothing happend when I try and click them. No error message. Anotehr question, do the logged in users need to be in the participant database or WP users? I have tried both and I cant get either to work. I deally I want useres to be work press users and the participant database fileds are very different to info I would collect on a user.
Loving the database adn was so excited to see this functionality availble. If only I could get this last bit to work
Thanks
In Participants Database, the “readonly” attribute of a field operates according to the context where the field appears. It has nothing to do with the user being logged in or not (well, not directly anyway). The way this works is readonly fields can be edited in the backend (by an admin or editor) and not on the frontend.
People in the Participants Database database are not users, and there is no login for them. They are simply entries in the database. When a participant gains access to their record, they use a special “private link” that lets them edit their record. There is no login, the link itself grants the access and anyone could use it.
I hope that clarifies things, if you have more questions, I’m happy to help.
Sorry Im not sure it does. I still cant get the favorite option to work. How dies a user select a favorite? Or rate a record?
Rating a record or marking it as a favorite does require that the user be logged in. I didn’t realize you were asking about that specific functionality. The field will show a message that you need to log in in order to rate the record. This is so we know who it is that is rating the record or marking it as a favorite.
Thanks. Thats the bit I cant get to work. I have cretaed a user and logged in as that user but I just see the “your favourite”, “Your rating” etc by each participant, but no way to click and of the stars to select them? And If I click the heart (icon i picked for favorite) nothing happens. No message and no selection. I understand the functioanlity is that a logged in user can look at any participant and like or rate it?
Yes, you’re correct about how it is supposed to work. I’m not sure why it’s not working for you, but if you want to email me a test login and a link to the page, I’ll take a look at it.
[email protected]
What is the best way to protect the proxy posts from google or public access? I need them to be available only to WP logged-in users. I can’t figure out how to access the post structures.
Thank you!
I just got this add-on. Thanks, it makes life a lot simpler.
To add comments to a record, I must show the proxy post as a wp post instead of using the shortcode right? That’s what I did to show the discussions. I have a couple of questions:
1. I am also using the Edit Link template. On each record, I use the business name to link to the read-only shortcode and an edit link at the end. What is the best way to link to the proxy post on this list? The url is different for proxy posts. Ideally I would love to have the comments on the edit record but am not sure if it’s possible.
2. If using the proxy post is the only way to add comments, how do I show all the fields in the record? I am only able to add up to 3 fields. I must be missing something here.
Thanks again for everything.
In the Directory Tools settings is a setting called “Display Using PDB Shortcode” which will do what you ask. When the user goes to the proxy post’s page, the [pdb_single] shortcode is used to display the record. You can customize the shortcode attributes that are used, so custom templates and other things can be defined for that display.
With a setup like this, you probably also want to use the “Use Proxy Posts for Single Record Displays” setting so that the single record link in the list will go to the proxy post page. Ideally, there will be only one way to show the record: the proxy post page. This will avoid duplicate content and also the confusion of having two pages for a PDB record.
Hi Roland,
Since proxy posts are read-only, how can I add a link on a post to point to a page with [pdb_record] to let users edit that record?
I need the post structure in order to let users add comments, but also need to let them edit fields as well. I don’t know if there’s a more elegant way than having to provide two different pages to add comments and edit fields.
Thanks
This is somewhat technical, and will require simple php skills. The best way to add a link to the editable record on the proxy post page is to use a custom template for the single record shortcode that is used to show the record on the proxy post page, and put the link in the custom template. If you use the Template Helper Class it’s easy to get the link to the editable record. You must have the “Participant Record Page” set up, this is in the main plugin settings under the Record Form tab.
With this setup, editing the record does take place on a separate page (the Participant Record Page that you set up), but it’s possible to put the [pdb_record] shortcode in the custom template so that the editable record is also on the same page as the record display on the proxy post page. Php skills definitely required for this.
Once your custom template is built and uploaded, you need to add the template attribute to the shortcode in the Directory Tools settings in the “Single Record Shortcode Extra Attributes” setting.
Hi! I am currently figuring out the Star Rating form field, and for some reason when I try to rate an item the spinner appears and keeps spinning. After a while I reload the page and find out the rating isn’t saved.
Also I find out a request is made when I try to rate and the response was HTTP status 400 with a content of a single number zero. The request was made to /wp-admin/admin-ajax.php?action=pdbdt-star&record=6&rating=5&field=rating.
Thanks!
This can be a server configuration issue, but I’m not sure of the exact cause. I don’t see this problem in my tests here.
Can you send me a link to test it myself? [email protected]
How can I delete fields that I have added to
Post Description Source Fields
Post Content Source Fields
on Proxy Post Settings page
when I added the field (by mistake)
Each field in those settings has a little “x” next to it. Click the “x” to delete the field from the setting.
How can i delete fields from Post Content Source Fields and Post Description Source Fields once I have added them (by mistake).
Each field in the setting has a little “x” that you can click to remove the field from the setting.
You should update your proxy posts after doing this.
Hi! I LOVE this addon. I am hitting a hurdle. For setting up the Proxy Post content, when I click on the featured image dropdown in the settings, nothing shows. I DO use the image expansion addon.
Also, where are the files located for the favorites and reviews? I would like to manipulate how the look a bit. When I post the reviews onto the record, it shows 2 lines…the public reviews and the user’s reviews. I would like to separate them from one another. Put them in different locations…Is that possible? Similar question for the favorites. I’d like to have the heart to favorite, then have the data on how many people have favorited it somewhere else.
Thanks!
I’d also love to have the “favorite” and “review” user functions visible to people who aren’t logged in. And when they try to use it, a modal login/register box pops up. Is that possible?
And can all of the review fields add up to a master rating field? Like an “Overall Average”?
Possible, but perhaps a little more complex than I’d prefer. I’m thinking a message that says something like “log in to rate this listing” with a link to the login page that returns them to where they were afterwards. That is very simple to do.
I had another thought about how you could change how the ratings field is displayed. You could set up a custom template that showed the rating field in the two places you wanted it shown, the use CSS to hide the listing rating in one place and the user rating in the other.
Yes! That will work!