Use Participants Database with your MailChimp account: new signups can be added to your list, and your members can opt-in or out of the mailing list on their profile page. If someone opts-out directly at MailChimp, their Participants Database record is updated with that info.
The plugin also support CSV imports: records that are added or updated with a CSV import will be added or have their subscriptions status updated on the MailChimp list.
Instructions
This plugin requires you have an account established with MailChimp before you configure it. Once you have your MailChimp account set up, you’ll need to get an API Key.
Getting Your MailChimp API Key
On your avatar menu (upper right corner while logged in to MailChimp) click on “account.” Once there, under the “extras” menu, select “API Keys.” On that screen, you’re given a way to create an API key. You can have several keys, so even if you have a key, it’s a good idea to create a new one for this purpose. Give it a name so you know where it is being used. Once the key code is generated, copy and paste it into the “API Key” setting in the MailChimp Integration settings menu, found under Participants Database in the WP admin.
Setting Up Your Mailing List
When you click on “Save Changes” the API Key will be used to get your list of mailing lists at MailChimp. You will need to have at least one mailing list established in order to use the plugin because new subscribers have to go to a specific list. In the “Subscription List” dropdown will be your mailing lists at MailChimp. If you don’t see it, click on “Save Changes” to refresh the list.
Select the list you want your Participants Database signups to be subscribed to.
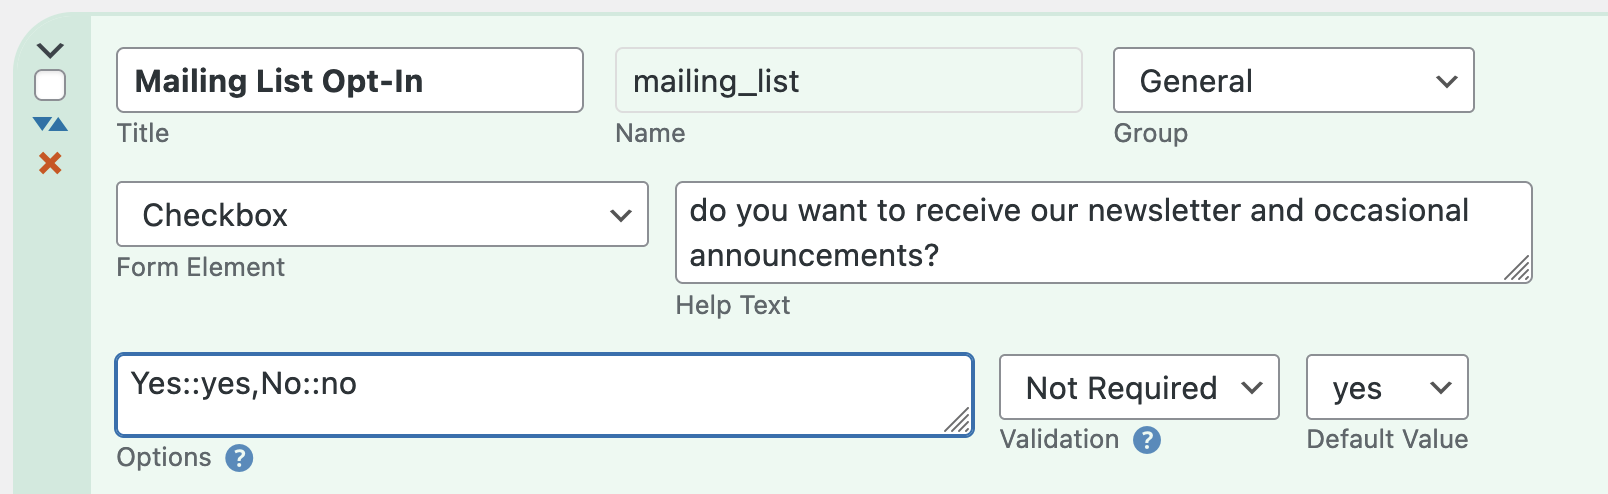
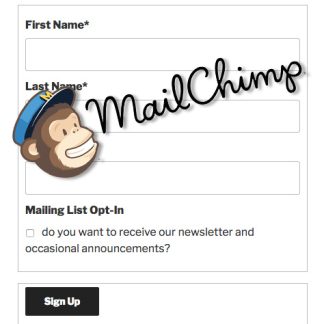
Set Up Your “Opt-In” Checkbox
In most cases, you’ll want to provide a way for your users to opt-in to your mailing list. Do this by creating an opt-in field that consists of a check box with the values “yes,no” You can default it to “yes” if you want it checked to begin with. If you are not showing the field to the user in the signup form, you must set the default value to “yes” if you want the person siogning up to be automatically added to your subscription.
Once that is set up, you need to tell the plugin which field it is in the List Select Field setting.
If you want to use another language or give the checkbox a different label, you can use the value label format like this: Yes::yes,No::no
As long as the saved values (the second of each :: pair) are “yes” and “no” it will work.
Completing the Setup
Once you have the API Key and mailing list set up, you can make sure the rest of the settings are what you want. Take a look at the “Settings” tab here for more explanation.
Importing Subscribers
When you import records using a CSV file, these will also be synchronized with your MailChimp list. You can use a CSV import to add a bunch of subscribers or update their subscription status over at MailChimp.
If you already have records in your Participants Database and you want to add them all to your MailChimp list, you need to export them, then re-import them (using the record ID as a match field so you won’t end up with duplicates) which will update all of them with your MailChimp list. Be sure the needed fields are configured to be included in the CSV export by having the “CSV” box checked in the field definition.
Note: CSV imports must contain both the “email” and “list select field” data in order for the subscriber to be added or updated at MailChimp.
Two-Way Synchronization
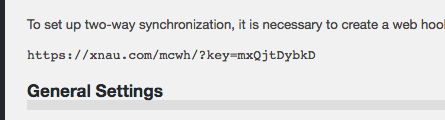
the webhook link…yours will look different.
When a subscriber receives an email you’ve sent using MailChimp, there is an unsubscribe link they can use to be unsubscribed. In order for this to be reflected in your Participants Database record, a communication link between MailChimp and your WordPress site must be established. This is done using a “webhook” which is a secure URL that the MailChimp list can use to communicate to your WP site.
To set up a webhook, first find the webhook URL that you will see at the top of the MailChimp Integration settings page in your WP admin. Copy that URL. We’re going to use that over at MailChimp, but first you must flush the permalinks to activate the webhook URL. To do this, go to the “permalinks” setting under the Settings item in your WP admin. On the permalinks settings page just click on “Save Changes” and that will flush the permalinks and make sure the webhook URL is set up to receive data from MailChimp.
Now, go to MailChimp and select the list you are using with Participants Database. Go to the settings page for that list and find the “webhooks” setting.
On the webhooks page, click on the “Create New Webhook” button found on the upper right. This will open a form where you can paste the webhook URL you got from the plugin settings. Once that is saved, you will be able to select what type of messages will be sent. Just accept the defaults and save the webhook.
If you get some kind of error message when trying to set up the webhook, make sure you copied in the exact URL given in the plugin settings. Also, flush the permalinks to be sure WP has the URL set up. Errors such as a 500 or 403 indicate possible security rules on your web server designed to block unauthorized access. Talk to your web host about the problem in cases like this. MailChimp also has a support page for webhooks that could be helpful.
Manually Updating Multiple Records
As of version 1.5, it is possible to update multiple records in a single operation. This is done on the “List Participants” page in the Participants Database admin, there are new MailChimp functions in the “With Selected” dropdown.
To update (synchronize with MailChimp) multiple records, selected the records you want updated, then select “Update to MailChimp” and click “Apply.” All your merge fields and subscribe statuses will be updated to MailChimp, so all the subscriber’s info there will match the info in Participants Database.
Mass Subscribe/Unsubscribe
If you need to subscribe or unsubscribe multiple records, you can to that in a similar way.
Settings
API Key
This is the key code provided by MailChimp that is unique to your MailChimp account.
Subscription List
Once you have entered your API key and saved the settings, you can select which list people will be signed up to when they register.
List Select Field
This is the name of the field used to opt in to your list. Usually, it’s a checkbox where they simply say “yes” to being added to the list.
Use Double Opt-In
This means that when someone signs up and indicates they want to join the list, MailChimp sends them an email where they can confirm that choice. This is a really good idea to avoid trouble such as people getting your newsletter who actually don’t want it, or getting spam email addresses into your list. Please note that in some countries, a double-opt-in is a legal requirement for mass email.
The way this works is new registrations will have a “pending” status when they sign up. When (or if) they confirm the subscription, their status will be changed to “subscribed.”
Note: when using double opt-in, new registrations will not be visible in MailChimp until they confirm their subscription. Before they confirm, they are considered “pending” and will not show up in your lists at MailChimp. You can find those registrations at MailChimp if you search for the email address.
Pending Label
While a registrant has a pending status, this label is used for the value of the List Select Field. You can use this in list searches to find people who have not confirmed their subscription yet.
Merge Fields
This setting uses a special string to define additional fields that will be saved in the MailChimp list. Typically, this is their first and last name, but it can be just about anything. It does have to be a field that is included in the Participants Database form because otherwise there won’t be any value to save to the MailChimp subscriber list. The default value for the setting is:
first_name:FNAME,last_name:LNAME
The way this works is this is actually a map of the Participants Database field to the MailChimp field. The format is pdb_field:MAILCHIMP_FIELD with each field pair separated by commas. This is a simple one-to-one mapping: for instance it’s not possible to combine several Participants Database fields into a single MailChimp field.
The Mismatched Merge Fields Warning
If the list of merge fields you have defined in this setting don’t match the list of merge fields defined at MailChimp, you will get a warning message. You can ignore this if you want, the main functionality will work as expected, and any merge fields that do match will work.
What it means is that, for instance, if you didn’t have a “city” merge field defined here, and you did at MailChimp, the data for the registrant’s city will not be sent to MailChimp. The warning is so you will know why your merge fields are not getting populated with data.
Additional information
Site License
Multiple, Single
2 reviews for MailChimp Integration
Rated 5 out of 5
Frank Graziani (verified owner)–
The Mailchimp integration works like a charm! Makes newsletter handling very easy!
Rated 5 out of 5
Robert Lachner (verified owner)–
does exactly what its supposed todo, and makes working with contacts through mailings so much easier
If you find my plugins useful, and would like to encourage or support its further development, please drop a little something into the tip jar or give the plugin a rating.
This website uses cookies to improve your experience. We'll assume you're ok with this, but you can opt-out if you wish.AcceptRead More
Privacy & Cookies Policy
Privacy Overview
This website uses cookies to improve your experience while you navigate through the website. Out of these, the cookies that are categorized as necessary are stored on your browser as they are essential for the working of basic functionalities of the website. We also use third-party cookies that help us analyze and understand how you use this website. These cookies will be stored in your browser only with your consent. You also have the option to opt-out of these cookies. But opting out of some of these cookies may affect your browsing experience.
Necessary cookies are absolutely essential for the website to function properly. This category only includes cookies that ensures basic functionalities and security features of the website. These cookies do not store any personal information.
Any cookies that may not be particularly necessary for the website to function and is used specifically to collect user personal data via analytics, ads, other embedded contents are termed as non-necessary cookies. It is mandatory to procure user consent prior to running these cookies on your website.

Frank Graziani (verified owner) –
The Mailchimp integration works like a charm! Makes newsletter handling very easy!
Robert Lachner (verified owner) –
does exactly what its supposed todo, and makes working with contacts through mailings so much easier