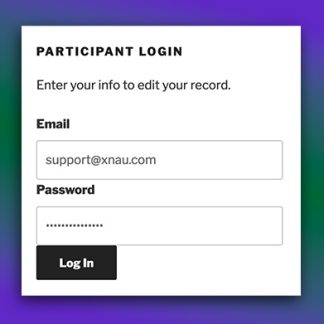
This plugin provides a convenient, familiar way for participants to gain access to their record using a username and password. If the user has a password manager in their browser, the sign-in credentials will be remembered.
The username field can be any uniquely identifying field, such as an email, made-up username or even an ID number.
The password field any be any text field and is used to verify the user’s identity. Passwords can be stored encrypted or in plaintext. Encrypted passwords requires the use of a “password” type field.
The password field is optional, making it possible to use the login form to gain access to the editable record with a single input such as an access code.
The login form is protected from brute-force attempts to guess the credentials, limiting the number of times a form may be attempted in a period of time.
Note: the “login” provided by this plugin is not a WordPress user login, it is for the purpose of securely accessing a Participants Database record for editing.
Also note, this plugin is not compatible with the Participants Database WordPress User Profile plugin, which links a Participants Database record with a WordPress login account. You cannot use this plugin to provide a login for WordPress users.
Instructions
To configure the plugin for use, start by making sure your “Participant Record Page” is correctly configured by visiting the “Record Form” tab in the main Participants Database settings. This tells the login form which page to go to when the login is accepted.
Setting up the Participant Record Page
Configure the Login Form
On the Participant Login settings page, you can configure the form to show one or two fields that the user will need to fill in to access their editable record. The first field is called the “Username” field, and it is used as the primary identifier. This can be an email address, an ID number of some kind, or really anything that can be used to uniquely identify the user.
The second field is called the “Password” field, but it can also be anything you want. It is usually used to verify the user, especially if the Username field is something that would be generally known, such as an email address. It is also possible to set up the form to use only a single input field by unchecking the “Require Password” checkbox. When this is unchecked, only the Username field will be shown in the form. You might do this if your username field was something only the user would know, such as an ID number.
When selecting the field to use for the password field, it is important understand that “password” type fields store the password in encrypted form, which means an administrator cannot know what the password is. If you need to be able to tell people what their password is, use a text-line field for your password field, then you will be able to look up their password because it will be stored in plaintext.
Create Your Login Page
Once you have configured the login form, you should create a page that will be the login page. On that page, place the [pdb_login] shortcode to show the login form. It is possible to use a custom template for the login form if you need.
This shortcode will accept the following attributes to override the global settings if needed:
template for using a custom template
record_page to set the page (use the page name or ID) that the user goes to after successfully logging in; that page must have the [pdb_record] shortcode.
login_button_text to set the text on the submit button for the login form
The login will also work with the
No record was found.
shortcode, but to do this, you will need to set the “record_page” attribute to send the user to the page with the
No record was found.
shortcode on it.
Use with the Signup Form
When using this plugin on a site with a signup form, you may want to change the default way the “Signup Thanks” email is set up: sending the user the Private Link to use to edit or complete their record. Instead, you can send new users a link to the PDb Login form, along with the credentials they should use to gain access.
Cookies and Persistent Login
The “Use Cookie” preference places a cookie on the user’s browser when they use the login form, which authorizes them to open their record for editing. When the “Extended Access” preference is checked, the user will be able to access their record without logging in for a 24 hour period. This period can be changed using a code filter.
If cookies are disabled, the login form will use the private link to take them to their record for editing. They will need to use the login form again if they want to go back edit their record after they leave the record edit page, but they can use their private link any time to access the record as usual.
Logout
To end the persistent login before it expires, you can use a logout link. You may need to use this if you have users that must have access to more than one record. The logout URL is simply the login URL with “?pdb-logout” appended to it. For example, if your Participants Database login page is at /pdb-login, your logout link would look like this:
/pdb-login?pdb-logout
If you are not using pretty permalinks, you need to do it slightly differently. For example, if your login page is on a page with an ID of 2034, your logout link would look like this:
/?p=2034&pdb-logout
It’s a good idea to put the logout link in a menu somewhere where the user can find it.
Settings
Login Form Settings
Username Field
Selects the field that holds the username. This could be an email address, a made-up username, or even a member ID number. If the password is not required, this will be the only field shown. This field should hold a value that uniquely identifies the record. If more than one record matches the value, the first record found will be used.
Username Not Found Feedback Message
Message to show if the username does not match any record.
Username Field Extra Attributes
This setting provides a way to add attributes to the username input element. This can be used to add client-side validation to the input, which can be helpful to users typing in the correct thing for the input. It can also be used to add simple javascript interactivity to the input.
This setting uses the same format as the “attributes” setting in the field definition: name::value,name::value etc. Because the comma is used to separate attributes, you must use the HTML entity , to represent the comma if it is in the value.
To set up a client-side validation, use the required and pattern attributes. The link provides the details on using the pattern attribute. Here is a simple example setting:
pattern::[a-z]{3,20},required,title::username must be all lowercase letters between 3 and 20 characters
That pattern will only accept lowercase letters and the length of the input must be at least 3 characters and no more than 20. You can use the “title” attribute to add a message to the pop-up that is seen when the validation fails.
Require Password
If this is checked, both the username and the password must match an existing record for the login to be accepted. If unchecked, no password will be required, and a correct entry into the username field will take the user to the record edit screen. Be careful with this, it could allow data to be changed by unauthorized persons.
Password Field
This is where you set the field that is used for your “password.” This field can be a “Text Line” type or a “Password” type field. If the field you want to use does not appear in the selector, you should either create it if it doesn’t exist or change its form element type to one that is valid for this setting.
If you select a text-line field for this, it will be stored in the database as plaintext. This will often be the case if you are using something like a customer ID for this field. If you use a “password” type field, the password will be encrypted in the database when the user saves their password.
It is important to understand that you cannot switch from or to a password field after the record data has been entered. Changing the field type cannot encrypt or decrypt passwords, so if there is data in this field, it will become incompatible with the field type. If the password field is empty, that is OK, the password will be saved in the correct format when the user enters it.
Login Button Text
This is where you can set the text that is shown on the login form submit button.
Bad Password Feedback Message
Message shown if the password doesn’t match the value in the database.
Use Cookie
If checked, a cookie is stored on the user’s browser when they successfully log in, so that when they are directed to the record edit page, the URL does not show the private ID of the record. This can also be used to allow the user to bypass the login for a while if the setting below is set. If this is unchecked, the login form will use the “private link” to take the user to their record. The private link can be used any time to access the record without using the login form which is how things normally work.
Extended Access
This sets the cookie to stay valid for 24 hours, allowing them to bypass the login for that period of time. This requires the the “Use Cookie” setting be selected as well. When a user with such a cookie visits the Participant Login page, they will be immediately redirected to their record edit screen. The 24-hour period can be changed to another value by using a code filter.
Password Recovery Settings
Show Lost Password Link
Provides a way to send the direct link to the user’s record so their password can be changed or recovered. This requires the the “Resend Private Link” functionality in Participants Database be correctly configured. This does not send the password or set a new password, it functions in the normal way for Participants Database: it provides the recipient with a private link to edit their record. They may use that link to change their password if they wish.
Lost Password Form Shortcode
This shortcode is used to generate the lost password form. This setting allows you to customize the shortcode, primarily so that a custom template may be used. the default value here is [pdb_request_link].
One-Time-Use Private Link
Password recovery works by emailing the user a “private link” which can be used to access their record edit page, bypassing the login form. When checked, this setting will change the private ID every time it is used to access the record edit page. This keeps the private link secure because it can only be used once. This feature uses a cookie on the user’s browser so they can submit changes to the record without getting logged out. Don’t use this if your users need to be able to use a static URL to access their record edit page. This plugin is often used as a way to make it easy for users to get access to their record, while other users may be using the “Private Link” to gain access to their record. Don’t use this feature if you have users using their private link to access their record.
Reset Private ID on Page Access
If the “One-Time-Use Private Link” is used, this setting determines when the private id code is changed. Unchecked, the code is only changed when the user saves the record. If checked, the code is changed when they open the record edit page, they don’t need to make any changes for the link to expire.
Additional information
Site License
Multiple, Single
1 review for Participant Login
Rated 5 out of 5
Frank Graziani (verified owner)–
The participant login is a great extension for the standard version of the database. I like the login much more than handling with the private link. Use the private link only for customers who forget the password ;-)
If you find my plugins useful, and would like to encourage or support its further development, please drop a little something into the tip jar or give the plugin a rating.
This website uses cookies to improve your experience. We'll assume you're ok with this, but you can opt-out if you wish.AcceptRead More
Privacy & Cookies Policy
Privacy Overview
This website uses cookies to improve your experience while you navigate through the website. Out of these, the cookies that are categorized as necessary are stored on your browser as they are essential for the working of basic functionalities of the website. We also use third-party cookies that help us analyze and understand how you use this website. These cookies will be stored in your browser only with your consent. You also have the option to opt-out of these cookies. But opting out of some of these cookies may affect your browsing experience.
Necessary cookies are absolutely essential for the website to function properly. This category only includes cookies that ensures basic functionalities and security features of the website. These cookies do not store any personal information.
Any cookies that may not be particularly necessary for the website to function and is used specifically to collect user personal data via analytics, ads, other embedded contents are termed as non-necessary cookies. It is mandatory to procure user consent prior to running these cookies on your website.


Frank Graziani (verified owner) –
The participant login is a great extension for the standard version of the database. I like the login much more than handling with the private link. Use the private link only for customers who forget the password ;-)