To create a new record on the frontend of your site, you must use the “signup” form. This form is shown by using the [pdb_signup] shortcode.
Which fields are included in this form is normally configured on the Manage Database Fields page, where there is a checkbox labeled “Signup” that assigns the field to the signup form, as shown below.
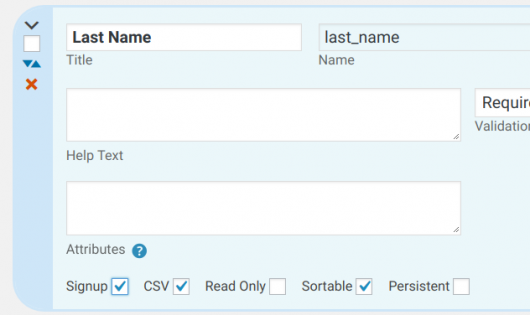
You can assign or unassign multiple fields to the signup form by selecting the fields and using the “with selected” control at the top of the field list.
Setting the Signup Form Fields in the Shortcode
You can override the global signup form field assignments in the shortcode itself using the “fields” attribute of the shortcode. The fields attribute takes a comma-separated list of field names. This is one way it is possible to have several different signup forms on your site. It also allows you to include fields that normally would not be included, such as fields in a private group.
The “groups” attribute may be used instead to determine which groups of fields are shown, but don’t try to use both.
For example:
[pdb_signup fields="first_name,last_name,email,city,country"]
Or
[pdb_signup groups="main,address,personal"]
Sending a Signup Receipt Email
When a user fills out and submits a signup form, they can be sent a receipt email confirming the submission. This is configured in the plugin settings under the “Signup Form” tab.
This email may also contain a “private link” to a page where their record may be edited. The private link is a special URL that contains an access code for the record that the user created when they used the signup form.
It is also possible to have an email notification sent to an admin when a signup occurs. When a signup form is submitted, the user can be directed to a “thank you” page acknowledging their submission.
Setting Up the Signup Form “Thank You” Page
By default, when a user submits the signup, they will stay on the same page and be shown a “thanks” message, as defined in the “Signup Thanks Message” setting.
To have your visitors go to another page after they submit a signup, first you must have a page set up for that purpose. That page must have the [pdb_signup_thanks] shortcode on it in order to complete the signup submission, send the confirmation emails, and show the “thanks” message.
Once you have the thanks page set up, go to the plugin settings page under the Signup Form tab and set the “Signup Thanks Page” setting to point to your page. The Signup Thanks Message setting sets the message shown on the thanks page, and gives you a way to thank them using their name if you want.
If you want to force your users to fill out a form before visiting a hidden page on your site, you can use the signup thanks page for that.
It’s also possible to determine which page the user goes to after a successful submission in the shortcode, by using the “action” attribute. For instance, of you were using more than one signup form, this makes it possible to send users to a different thank you page depending on which signup form was used.
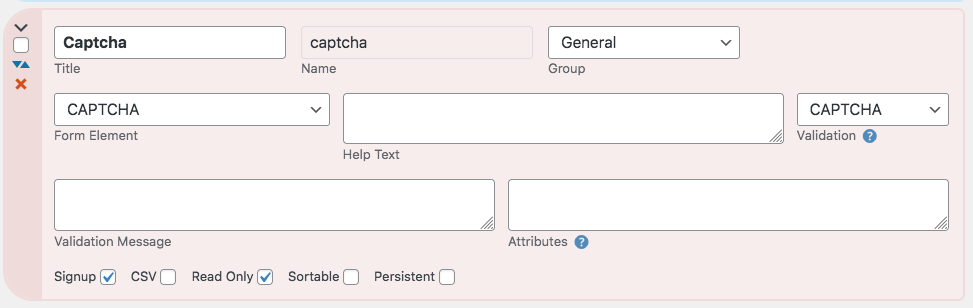
Verifying a Human User with CAPTCHA
If you need a simple way to stop registration bots from sending in spam submissions, there is a CAPTCHA field that asks a random simple math question.
For coders, the Plugin API provides an easy way to add your own custom test.
Please note that it is not uncommon for spammers to use cheap human labor to fill out forms with spam content. CAPTCHA is ineffective against this form of spam. Setting up Approved Records is one way to combat this problem.
I also offer an add-on to use the Google reCAPTCHA widget to validate a human user. This add-on provides a sophisticated continuously-updated form of bot protection. There is also a “no-interaction” mode where the user doesn’t have to complete any kind of quiz, it just analyzes the user’s interactions with the form to determine if it is a bot or a human.
Verifying Critical Input
Sometimes, you want to make sure that the user has input the correct value in a form. This is most often used with an email address where you want to make sure that they typed it in correctly.
The way to do this is to add a second input field that is validated by checking the first input field. If the two do not match, an error is shown.
For example, you have a field named “email” that holds the users main email address, and you want to make sure they type it in correctly. Set up another text-line field that uses “regex/match” validation, putting the name of the main email field in the validation value.
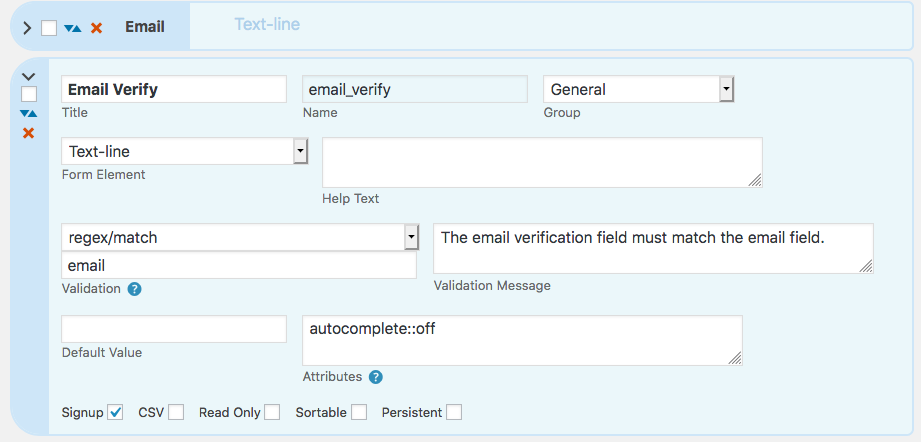
The validation message will be shown if the verification field does not match the main field. The optional “autocomplete::off” attribute prevents the user’s browser from simply filling it in, the user has to type it in.
Dynamic Hidden Fields
Hidden fields can be used in signup forms to add data to the submission without the user having to enter it. For example, you can capture the name of the page the form is on, or the user’s ID if they are logged in.
To do this, you use a hidden field to capture a dynamic value. For instance, if you had the signup form in multiple locations on your blog, you could know which page the user was on when they signed up because the page name would be placed in a hidden field and included in the saved record.
Here is a quick tutorial showing how to add a field that captures the name of the page the signup form is on:
- Go to the Manage Database Fields page
- Add a new hidden field with a descriptive name, like “source page”
- For the default value, put “post->post_name”
- This will fill in the title of the page the signup form appears on.
When the form is submitted, the information in the hidden field will be included.
For use in dynamic hidden fields, two WordPress objects are available: $post for the WP_Post object and $current_userfor the WP_User object.
The way this works is simple: just put the name of the property in the default value field for the hidden field. For instance “current_user->user_login” will put in the user login of a logged-in user. You don’t need the dollar sign, it will ignore it if you do put it in.
Capturing the User Locale
On a multilingual site, it can be helpful to know which language was chosen by the user. To do this, create a hidden field and set the default value to “current_user->locale” to capture the current user’s locale setting.
Capturing a Literal Value from the Shortcode
As of version 2.0, it is possible to set up a hidden field that simply records a value present in the shortcode. This is done by placing the name of the shortcode attribute in the hidden field definition (as “shortcode->attribute_name”), and then in the shortcode you can set the value that will be recorded when the form is submitted, like this: [pdb_signup attribute_name="value"]
For example, if you had 2 different signup forms, and you want to be able to tell which one was used to create a particular record, you can set up the hidden field’s default value like this:
shortcode->source
Then in each shortcode for your signup forms, you provide the identifier for the source:
[pdb_signup source="homepage"]Be careful not to use a name for your attribute that is already used for another purpose, this could cause unexpected effects.
Capturing Global Values
You can also access some php “Superglobals.” For instance, to get the IP of the user, put this into the default: “SERVER:REMOTE_ADDR” You can access these superglobals: POST, GET, REQUEST, COOKIE, SERVER, SESSION. This means you can get a value from a cookie and put it into the form, saving it when the form is submitted. You don’t need the ‘$_’ that is used in php. The php site has a good reference for using superglobals.
Superglobal values that are arrays can be accessed with an index like this COOKIE:location[city] where “city” is the index of the value in the array $_COOKIE[‘location’]. In other words, this is the equivalent of accessing $_COOKIE[‘location’][‘city’].
Referral Tracking
For example, if you wanted to set up referral tracking for the signup form, you would create a hidden field to hold a referral code. Set the default value of the hidden field to get:ref This means that it will be looking for a variable named “ref” in the URL, for example:
https://yoursite.com/signup?ref=12345
When that URL is used to open the signup form, the referral code 12345 will be saved with the signup data.
If you just want to put in a fixed value, the hidden field will include any string you put into the “default” for the field. This can be useful as a place to put links in a list or single record display.
For those with some Javascript skills, you can use these hidden fields to store dynamic information about a signup or record edit form. For example, a dynamic hidden field with no default value provides a place to put a value gathered from the page via javascript, which would then be saved with the record. A custom template file makes a convenient place to include your custom javascript.
Dynamic hidden fields also work in the form presented by the [pdb_record] shortcode. If the dynamic field’s value is empty when the record edit form is opened, it will be filled in with the configured dynamic value. A dynamic hidden field can only be filled once: once the field has a value it remains unchanged.
Dynamic hidden fields are visible and editable in the admin edit page.
Back to the Main Participants Database Documentation Page…