Integrates Participants Database with your MailChimp account.
Product Setup
This plugin requires you have an account established with MailChimp before you configure it. Once you have your MailChimp account set up, you’ll need to get an API Key.
Getting Your MailChimp API Key
On your avatar menu (upper right corner while logged in to MailChimp) click on “account.” Once there, under the “extras” menu, select “API Keys.” On that screen, you’re given a way to create an API key. You can have several keys, so even if you have a key, it’s a good idea to create a new one for this purpose. Give it a name so you know where it is being used. Once the key code is generated, copy and paste it into the “API Key” setting in the MailChimp Integration settings menu, found under Participants Database in the WP admin.
Setting Up Your Mailing List
When you click on “Save Changes” the API Key will be used to get your list of mailing lists at MailChimp. You will need to have at least one mailing list established in order to use the plugin because new subscribers have to go to a specific list. In the “Subscription List” dropdown will be your mailing lists at MailChimp. If you don’t see it, click on “Save Changes” to refresh the list.
Select the list you want your Participants Database signups to be subscribed to.
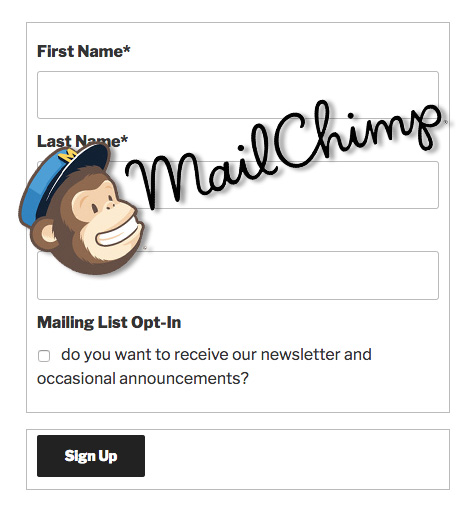
Set Up Your “Opt-In” Checkbox
In most cases, you’ll want to provide a way for your users to opt-in to your mailing list. Do this by creating an opt-in field that consists of a check box with the values “yes,no” You can default it to “yes” if you want it checked to begin with. If you are not showing the field to the user in the signup form, you must set the default value to “yes” if you want the person siogning up to be automatically added to your subscription.
Once that is set up, you need to tell the plugin which field it is in the List Select Field setting.
If you want to use another language or give the checkbox a different label, you can use the value label format like this: Yes::yes,No::no
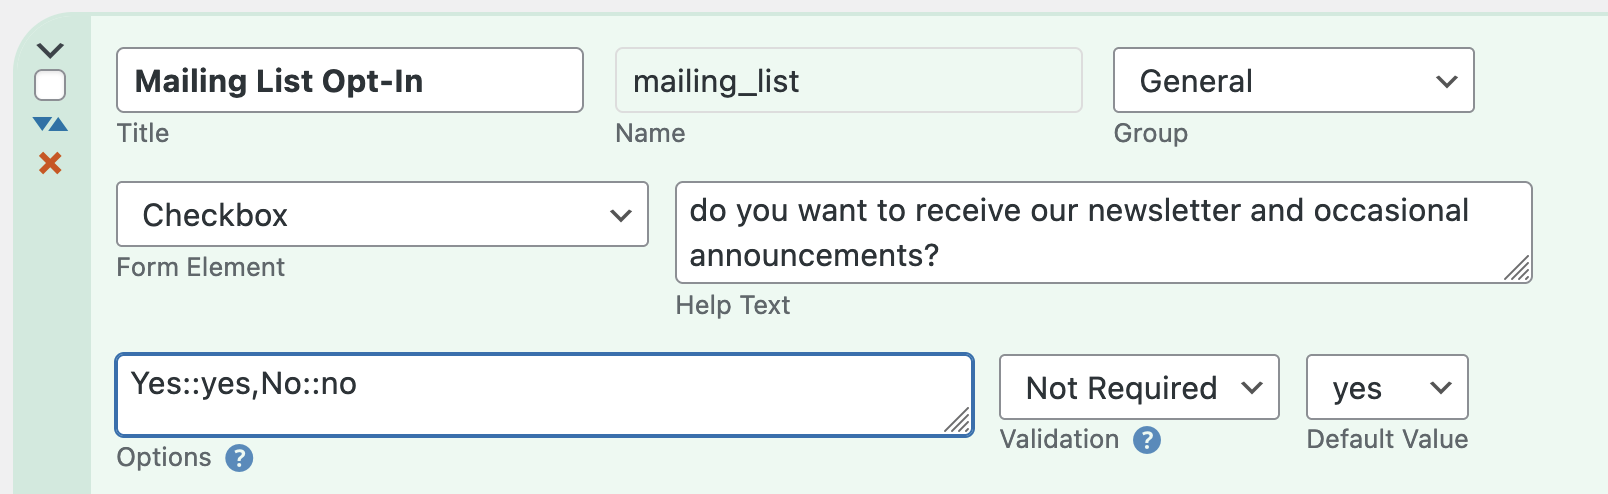
As long as the saved values (the second of each :: pair) are “yes” and “no” it will work.
Completing the Setup
Once you have the API Key and mailing list set up, you can make sure the rest of the settings are what you want. Take a look at the “Settings” tab here for more explanation.
Importing Subscribers
When you import records using a CSV file, these will also be synchronized with your MailChimp list. You can use a CSV import to add a bunch of subscribers or update their subscription status over at MailChimp.
If you already have records in your Participants Database and you want to add them all to your MailChimp list, you need to export them, then re-import them (using the record ID as a match field so you won’t end up with duplicates) which will update all of them with your MailChimp list. Be sure the needed fields are configured to be included in the CSV export by having the “CSV” box checked in the field definition.
Note: CSV imports must contain both the “email” and “list select field” data in order for the subscriber to be added or updated at MailChimp.
Two-Way Synchronization
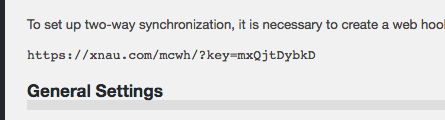
When a subscriber receives an email you’ve sent using MailChimp, there is an unsubscribe link they can use to be unsubscribed. In order for this to be reflected in your Participants Database record, a communication link between MailChimp and your WordPress site must be established. This is done using a “webhook” which is a secure URL that the MailChimp list can use to communicate to your WP site.
To set up a webhook, first find the webhook URL that you will see at the top of the MailChimp Integration settings page in your WP admin. Copy that URL. We’re going to use that over at MailChimp, but first you must flush the permalinks to activate the webhook URL. To do this, go to the “permalinks” setting under the Settings item in your WP admin. On the permalinks settings page just click on “Save Changes” and that will flush the permalinks and make sure the webhook URL is set up to receive data from MailChimp.
Now, go to MailChimp and select the list you are using with Participants Database. Go to the settings page for that list and find the “webhooks” setting.
On the webhooks page, click on the “Create New Webhook” button found on the upper right. This will open a form where you can paste the webhook URL you got from the plugin settings. Once that is saved, you will be able to select what type of messages will be sent. Just accept the defaults and save the webhook.
If you get some kind of error message when trying to set up the webhook, make sure you copied in the exact URL given in the plugin settings. Also, flush the permalinks to be sure WP has the URL set up. Errors such as a 500 or 403 indicate possible security rules on your web server designed to block unauthorized access. Talk to your web host about the problem in cases like this. MailChimp also has a support page for webhooks that could be helpful.
Manually Updating Multiple Records
As of version 1.5, it is possible to update multiple records in a single operation. This is done on the “List Participants” page in the Participants Database admin, there are new MailChimp functions in the “With Selected” dropdown.
To update (synchronize with MailChimp) multiple records, selected the records you want updated, then select “Update to MailChimp” and click “Apply.” All your merge fields and subscribe statuses will be updated to MailChimp, so all the subscriber’s info there will match the info in Participants Database.
Mass Subscribe/Unsubscribe
If you need to subscribe or unsubscribe multiple records, you can to that in a similar way.
Product Settings
API Key
This is the key code provided by MailChimp that is unique to your MailChimp account.
Subscription List
Once you have entered your API key and saved the settings, you can select which list people will be signed up to when they register.
List Select Field
This is the name of the field used to opt in to your list. Usually, it’s a checkbox where they simply say “yes” to being added to the list.
Use Double Opt-In
This means that when someone signs up and indicates they want to join the list, MailChimp sends them an email where they can confirm that choice. This is a really good idea to avoid trouble such as people getting your newsletter who actually don’t want it, or getting spam email addresses into your list. Please note that in some countries, a double-opt-in is a legal requirement for mass email.
The way this works is new registrations will have a “pending” status when they sign up. When (or if) they confirm the subscription, their status will be changed to “subscribed.”
Note: when using double opt-in, new registrations will not be visible in MailChimp until they confirm their subscription. Before they confirm, they are considered “pending” and will not show up in your lists at MailChimp. You can find those registrations at MailChimp if you search for the email address.
Pending Label
While a registrant has a pending status, this label is used for the value of the List Select Field. You can use this in list searches to find people who have not confirmed their subscription yet.
Merge Fields
This setting uses a special string to define additional fields that will be saved in the MailChimp list. Typically, this is their first and last name, but it can be just about anything. It does have to be a field that is included in the Participants Database form because otherwise there won’t be any value to save to the MailChimp subscriber list. The default value for the setting is:
first_name:FNAME,last_name:LNAME
The way this works is this is actually a map of the Participants Database field to the MailChimp field. The format is pdb_field:MAILCHIMP_FIELD with each field pair separated by commas. This is a simple one-to-one mapping: for instance it’s not possible to combine several Participants Database fields into a single MailChimp field.
The Mismatched Merge Fields Warning
If the list of merge fields you have defined in this setting don’t match the list of merge fields defined at MailChimp, you will get a warning message. You can ignore this if you want, the main functionality will work as expected, and any merge fields that do match will work.
What it means is that, for instance, if you didn’t have a “city” merge field defined here, and you did at MailChimp, the data for the registrant’s city will not be sent to MailChimp. The warning is so you will know why your merge fields are not getting populated with data.
F.A.Q.
If a user unsubscribes on their profile page, will they be unsubscribed at MailChimp?
Yes, every time a record is updated on your site, that info is passed to MailChimp, so they can unsubscribe in either place, it won’t matter, they stay synchronized.
I'm not getting subscriber updates from MailChimp, how do I get webhooks working?
To troubleshoot webhooks, follow these steps:
- Check the “Subscription List” setting in the add-0n settings and make sure you have the correct list selected
- Check the webhook URL at the top of the page. Now go to MailChimp and check the webhook for the list (found in the list’s settings page) Make sure they are the same.
- Copy the webhook URL and try it in a browser. You should get a “No request details found.” message. If you get a 403, or a 500, check your site security filters or contact your web host with the information.
- If you get a 404, refresh the permalinks in the general settings of your WordPress site, then try to open the webhook URL in the browser again.
I have Double Opt-In checked, and I'm getting signups, but they aren't appearing at MailChimp, what's happening?
Having Double Opt-In checked changes how things work in several ways.
If you have “Use Double Opt-In” checked, and someone signs up, their info is sent to MailChimp only if they have the “List Select Field” checked. In both cases, you won’t see them at MailChimp at first.
If they agree to be on the list when they sing up, their info will be sent to MailChimp, but you will not see them in the list there until they confirm the opt-in by email. You can still find them with a search, however. You’ll see their status is “pending.”
If they don’t agree to join the list, their info won’t be sent to MailChimp at all. In this case, if they later update their record to join the list, their info will be sent to MailChimp at that time and they will need to confirm in order to join the list.
How do I set up user-selected list segmentation?
“Segmentation” is the technique of using only part of your mailing list based on some value in the person’s subscription data. For example, if you have several newsletters based on various interests, you can provide a control such as a multi-checkbox where the user can select their areas of interest.
To make this work, you need to set up a merge field for this purpose. In Participants Database, create your field where the user can make their selection. Then go to your MailChimp account and set up a merge field for this information.
In the PDB MailChimp Integration settings, add your merge field to the list of merge fields. In the merge field setting, use the “name” of the field you created and the merge field name provided by MailChimp. This establishes the relationship between the field you created in Participants Database and the merge field in MailChimp. When the user signs up or edits their record, the value is sent to MailChimp to update the merge field value in the user’s subscription data.
When you want to send your newsletter, you can segment your list using the value in the merge field. The instructions for doing this are available from MailChimp.
When a signup is submitted, a new subscriber is not added to the MailChimp audience
To start with, here is a checklist of things to make sure your configuration is complete:
- The merge field list must match what is defined for the list at MailChimp. You’ll see a warning about that on the settings page, that must be resolved for things to work
- Email field in the signup form must be the same field as selected in the “Primary Email Address Field” setting in Participants Database
- The “List Select Field” must be correctly configured: check the documentation for the details on that, pay close attention to the “options” setting
- If your signup form should automatically add the person to the MailChimp list, you must set the default value of the List Select Field to “yes”
This is less likely than a configuration issue, but the data transfer to MailChimp can fail if there is something in your server configuration that is blocking the communication. For example, a security setting that blocks the request. If you do not manage your server, you will probably need the help of your hosting provider to address issues like this.
I'm getting a warning message about merge fields, how do I clear it?
First thing to check is the message will describe an issue with a specific merge field. Correct this in your settings, either at MailChimp or in the MailChimp Integration plugin settings.
Also make sure you have the correct audience selected in the MailChimp Integration settings, and that you’re looking at that same audience at MailChimp.
Be sure to dismiss the warning message before saving the settings, so if it comes back you know it pertains to the newly-saved settings.
If the warning comes back, first double-check the merge tags settings all around. If it looks good, but the messages keep coming back, then there are a couple of steps you can take to re-synchronize the settings.
First, check the merge fields in your MailChimp audience settings. Each tag will have two names: the default name and the user-defined name. The default name will be something like MERGE4. Try using that iname in the MailChimp Integration merge tags settings instead of the user-defined name. Clear the warning message and save the settings. This should force the settings to resync.
You can change it back to the user-defined merge tag name if you want. It works the same either way.
Aloha Roland,
Our PDB registration has the ability to add additional participants with their own email address. Is there a way to add the second participant email to our mailchimp list? Or will I have to add those manually?
You’ll probably have to do it manually. The way MailChimp works is there is one email address per subscriber, so there’s no way to update the subscriber list with two email addresses for a single subscriber.
Hi Roland,
Thank you for your reply to my previous query. I have set up the Merge fields in Mailchimp integration and I now get the basic fields transferring properly. ‘Fname’, ‘Lname’ etc. So that is a great improvement.
However I am still having trouble with fields such as, foe example my ‘treewarden’ field.
The relevant field is set as so:— treewarden:TREEWARDEN
Uploading a CSV file of an exported list to mailchimp works fine. The field is transferred ok. It is a text field and is transferred as ‘TW’ or left blank.
The problem occurs when using the automatic ‘update to mailchimp’ tag or the ‘subscribe to mailchimp’ tag on the list participants page. Basic details are transferred but not the additional fields.
This all means I cannot use the ‘TW’ entry to accurately send emails unless I manually update the mailichimp entry. Doing the update in two separate places is time consuming and, more importantly, risks generating errors. (I have 300 or so entries)
How can I overcome this please?
In general, this is working in my tests so it looks like the basic functionality of updating the custom merge tags using the “with selected” function on the admin List Participants page is working.
To get a more detailed picture of what’s happening, I suggest you turn plugin debugging on, clear the debugging log, then test updating a single record. The transaction with MailChimp will be logged, including any errors that are generated. Merge field errors are often because the data from a Participants Database field isn’t compatible with the matching merge field configured in MailChimp. If a merge field error occurs, the subscriber data is not updated.
Hi Roland, Thank you for your advice.
I cannot turn plugin debugging on. As I see it I have to go to the original ‘settings’ link in the installed plugins wordpress page to turn this on. I am logged in as administrator but I cannot access the ‘settings’ clicking the link takes me to our STWN ‘not authorised’ page — very strange
Why is this? Do I have to have a paid subscription to access settings? Or is there another way to turn on debugging?
You’ll find the plugin settings link in the Participants Database admin menu:
I am trying to setup PDB which I have used for years to to integrate with mailchimp. I am new to mailchimp.
The problem I have is that my name fields do not match. In PDB they are ‘forename’ and ‘surname’. Mailchimp seems the use FNAME an LNAME as the basic name fields.
Short of exporting the whole PDB data as a csv, deleting the lot and re-uploading with new FNAME and LNAME. is there any way I can get my name field names to integrate wit mailchimp?
Thanking you in anticipation.
Richard
The PDB MailChimp settings include a setting for translating the MailChimp merge field name to the PDB field name. Take a look at the documentation for the Merge Fields setting, that will get you set up.
Thank you for your product mailchimp integration/participants database (WordPress).
Two-Way Synchronization is working very well.
However, in the Participants Database/WordPress Admin/List Participants, I would like to see the Mailchimp tags that are associated with an individual contact. These are not normal “merge tags” that identify specific fields, but are rather the audience tags that allow segmented mailings (one may send a campaign to a segment of a list, targeting only those contacts with specific audience tags (a contact may have one, more, or no tags).
In the PD Field Management section, I have added a text field ‘TAGS’, I but I cannot figure out how to map it to where mailchimp stores these audience tags (On mailchimp, I cannot find a ‘merge tag’ for this type of audience tag. I would be very grateful for a suggestion on how to map to this mailchimp data. Thanks, Ray Owens, Paris France
This is probably a question for MailChimp. The plugin only syncs merge fields, so if there is information on the MailChimp side that cannot be held in a merge field, Participants Database cannot access that data.
Thanks Roland for your reply. Will pursue with mailchimp and post here if I find a solution. Thanks. Ray
I’ve just installed the plugin on an existing PDB site. I type in the MailChimp API, and hit SAVE, and then get the mailing list I want available in the “Subscription List” drop down. I select it and hit SAVE again. I now expect that the “List Select Field” will be a dropdown with all of the current PDB fields to choose from. That’s not happening; all I see is a single “Type” field displayed as the dropdown. I’ve installed this in the past without problems on another site; what could be wrong this time?
The fields available to the “List Select Field” are limited to checkboxes, dropdowns, radio and hidden fields. If you don’t see the field you need, you should create it. This is covered in the plugin instructions under “Set Up Your “Opt-In” Checkbox”.
It seems that the toggle switch of the subscribe field in MailChimp is behaving adversely. If the member is currently subscribed and I update a different field in the database (LastPaid), it toggles the subscription field off in MailChimp. This is not good. I’ve had to manually resubscribe many members.
‘
Note: I’m having to manually updated the LastPaid field because the Member Payments add-on is not updating it. (pdbmps_payment_date)
Was it working before? Did you change the configuration of the subscription checkbox?
Can you be more specific about the problem you’re seeing with the last payment date? What payment method is used?
Hi, the possibility to integrate with Mailchimp was one of the reasons for us to try to use the participants database plugin. So far we are able to use the available adjustments to tune its usage to our needs. Great!.
As mailchimp did not work as expected, we have now switched to the newsletter wordpress plugin (tnp).
We are considering to buy the mailchimp integration, and then convert it to work towards tnp. Or is there already development for that ongoing?
I don’t currently have any plans to adapt MailChimp integration to work with a WordPress newsletter plugin.
It would be a very different plugin because it would be two plugins communicating, rather than a plugin communicating with an external service.
It may not be that difficult to synchronize the two, it really depends on the newsletter plugin’s API.
Hmm, the newsletter plugin is on another server. I think I am going to try…
For a few days now, all of my records are going to Mailchimp as unsubscribe even though the subscribe_to_email field shows T. Today, it created the new record for Sue Test but didn’t automatically send to Mailchimp. I manually Subscribe to Mailchimp and it again sent it as unsubscribe. See attached.
Will you please help me find out what is wrong with my setup? Thanks!
The “opt in” field has to be configured in a specific way to work as expected. Take a look at the plugin setup instructions under ‘Set Up Your “Opt-In” Checkbox’ for the details.
It can also be helpful to turn plugin debugging on (in the Participants Database settings, Advanced tab), then when a record is created or updated, you can use the debugging log to see the data that is sent to MailChimp.
If you have “Double Opt In” enabled, new records will not appear in your MailChimp audience until the user opts in.
That was the problem. Sorry! Thanks for everything. It looks good now and is working well with Mailchimp.
Hi Roland,
I have a lot of trouble exporting .csv from list participants. It only has the header row. I have to go to another page of WP, back and try it again. Today none of that helps with a search for records that have a @ in the home phone field (people put their email address in there).
Any suggestions?
This indicates a problem with your php sessions, which remembers the query used to generate the list. I suggest you reset this by using a filter (doesn’t matter what) on the Admin List Participants page to reset the stored query, you can then clear the filter if you don’t want to use it on your export.
Your other question about a search for records, can you be more specific about what you are doing? Having a “@” character won’t be a problem unless you are using a numeric field for your phone field.
I found what I was looking for: Limits for audience fields under Manage Audience and Signup Form Fields bottom left sidebar.
“Audience field values are limited to a maximum of 255 bytes of information. In many alphabets, this is equal to 255 characters. However, some alphabets or symbolic characters, like stars, use more than one byte of information per character.
Labels for form fields are limited to 50 bytes (usually about 50 characters).
After you add a field, the field type can’t be changed. If you chose the wrong field type, delete the field and add a new field with the correct field type.
Audiences are limited to a maximum of 30 data fields for each contact. If you want more than 30 fields of information about your contacts, use groups to help consolidate audience fields, or use tags instead.
Mailchimp accounts on a Premium plan can map up to 80 fields.”
I can shorten some of mine and maybe get all the fields I need.
Thanks, I just released an update that should address the issue of the error message appearing when the fields are actually correctly configured.