
Shows a customizable Google map with location markers for all your Participants Database records.
Product Setup
First install and activate the plugin. This will add the “Locations Map” menu item to the Participants Database admin menu. Click that item to open the Locations Map settings screen. The first step is to get your API key.
Getting Your API Keys
To use Google maps services, you must have an API key. It’s no big deal: they are free, you just have to have a Google account, and then set up the API access through Google Developers.
- Visit https://cloud.google.com/maps-platform/
- Click on Get Started, you may be asked to log in to your Google account
- Select Maps, click continue
- Select or Create a Project: Just create a new project and give it the name of your website
- The project will be created, it can take several seconds
- Set up billing: Google requires that you have a billing account in case you start to run up charges (you probably won’t…see below)
- The Maps API will be enabled
- You will then be given your API key. Copy this and paste it into the “Maps JavaScript API Key” setting in the Locations Map settings.
- Go to your Google Cloud APIs Dashboard, make sure you have the right project selected, then on the left, select “Credentials.”
- To set up the Geocoding API key, add another API key by clicking on the “Create credentials” button. This will be used only for Geocoding, so give it a name that identifies it for that purpose. Paste it into the “Geocoding API Key” setting.
Static Maps require an additional Google Static Maps Signing Secret key. Instructions for setting that up can be found on this page: Generate a Digital Signature
Google Maps Services is Free—To a Point
For each service used, Google provides a limited number of free loads (every time someone loads a page with a map on it, that’s one load). Unless your site has very high volume, it won’t cost you anything to show maps. This plugin uses three Google services: Dynamic Maps, Static Maps and Geocoding.
Every time a page with a dynamic map is opened on your site, it will generate a Dynamic Map load. You can have up to 28,000 of those per month for free. You’d probably have to be getting several thousand visits a month (with them all seeing your map) to hit that.
Static Maps has higher limits: you’ll get 100,000 free map loads per month with those. Static maps lack the user interactivity of dynamic maps, but they are cheap, fast and really all you need for many applications.
Geocoding also has limits, but it’s not used very often. We only need to geocode when a record is created or updated. You’ll get 40,000 of those for free per month. If you have a lot of records, you might get over that number when you geocode the entire batch, but after that you’re unlikely to hit charges for geocoding.
Get all the details in the Google Maps Pricing Table…
Once you have the API keys in place, you can show the map in your list and single record displays. A detailed explanation of the plugin’s settings is found under the “Settings” tabs here.
Dynamic Maps or Static Maps?
You should decide whether you need to use Dynamic Maps or Static Maps. They are used differently and result in a different display…here are the pros and cons:
| Map Type | Pros | Cons |
|---|---|---|
| Dynamic |
|
|
| Static |
|
|
Placing Dynamic Maps
Dynamic maps can be placed automatically, without the need for custom templates, by selecting a location in the list or single record displays using the Automatic Map Placement settings. In the list display, the map will show in the selected location (top or bottom) with markers for all the records shown in the list results. A search result will show a repopulated map with markers for the result set.
It is also possible to enable a map display on a specific list shortcode (instead of using the auto placement setting which will place the map on all list shortcodes) by adding the “listmap” attribute to the list shortcode: [pdb_list listmap=true]
The map for the single record shows a marker for the location of that record.
Dynamic Map Shortcodes
If you want to just show a Dynamic map with it’s markers, they can also be shown with a shortcode. Don’t use these shortcodes to add a map to the list display, they are for showing a map on it’s own.
[pdb_listmap] shows a map with all your located records as markers. You can use the “filter” attribute in the shortcode to determine which records are included or excluded.
[pdb_single_map] shows a map for a single record with a marker for its location. You will need to access it’s page using a ?pdb=id type of URL (typically, by using the “single record link” in the list display), so that the shortcode knows which record to show. Or, if you are a coder, you can use it in a custom template and set the record id in the shortcode, using the ‘record_id’ attribute.
Dynamic Map Templates
Dynamic maps can also be displayed using a custom template. The add-on comes with two example templates for showing a dynamic map: pdb-list-dynamicmap-default.php and pdb-single-dynamicmap-default.php You can use them as-is or use them as a starting point for your own custom templates.
If you are already using a custom template, take a look at these examples, you’ll see it’s very simple to add a map to a template.
Placing Static Maps
Static Maps are used in three ways: as a custom form element, the [pdb_list_static_map] shortcode or using a special template.
The Static Map Form Element
Setting up the map as a Participants Database field is convenient if you want to show a small map in a list display or you want the map to be part of the single record display.
Static maps must have their width and height set beforehand. If you don’t define the width and height in the field definition, it will use the global map height setting for the width and the height (resulting in a square map).
You can set several parameters in the field definition to set up your map:
- ‘width’ sets the width, in pixels for your map display
- ‘height’ sets the height in pixels
- ‘located_only’ when set to true will only show a map if the record has been located (i.e., has latitude and longitude data)
- ‘zoom’ sets the zoom level of the map; if omitted, the zoom level is determined by the global zoom setting. Values here range from 1 to 20.
- ‘maptype” can take one of 4 values: roadmap, satellite, terrain, hybrid and determines the type of map display to use
- ‘center’ allows you to set a default center for the map: if there is a marker present, it will center on that marker. You must use the | (pipe) character instead of a comma to separate the latitude and longitude values.
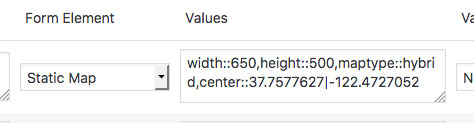
For example: this field is configured to show a map of width 650 pixels wide by 500 pixels in height, showing a hybrid map centered on San Francisco.
Zoom levels range from 1 to 20, this is from the Google Maps documentation to give you an idea what to set it to:
- 1: World
- 5: Landmass/continent
- 10: City
- 15: Streets
- 20: Buildings
Note: map sizes are limited by your Google API plan type. Normally, this is 650 pixels, but if you upgrade your plan, you can get up to 2048 pixels. Details here…
You can manage the appearance like any other Participants Database field. If you want the map to show up in your list display, make sure the map field is configured to do so. For single displays, it will appear like any other field.
Map fields do not display in signup forms or record edit forms.
The [pdb_list_static_map] Shortcode
This works much the same as the [pdb_listmap] shortcode, only it shows a static map. The shortcode uses the ‘width’ and ‘height’ attributes to set up the dimensions of the map display. You can use these attributes in the shortcode:
- width – in pixels
- height – in pixels
- zoom – sets the base zoom level of the map, 1 to 20 as explained above.
- center – longitude | latitude for the center of the map, defaults to auto-centering the map on the markers
- maptype – can be roadmap, satellite, terrain, or hybrid
For example, to show a map that is for someone’s address, you could use a setting like this:
[pdb_list_static_map zoom=15]
The the map display here is static, that means that the user won’t be able to zoom it themselves.
The Static Map Template
This add-on includes a special template for showing all your record markers in a static map. If you need to set up a custom list template using a static map, you can use the included pdb-list-static-map-default.php template as your starting point or as an example of how to include the map.
To use the static map template in your list shortcode, use a shortcode like this: [pdb_list template="static-map-default"].
Configuring the Appearance of the Dynamic Map
There are several preferences for determining how the dynamic map will look. First, you can select the Map Style, which is the color scheme of the map. There are several available, and it is possible to create your own color scheme if you want.
The Map Height setting sets the size of the map display. The map will always try to be as wide as possible, filling the available horizontal space. It is necessary to give the map a specific height to determine how much vertical space it will take. The usual size is around 300 pixels, this will look good on most handheld devices. You don’t want to try to show a map that is larger than the screen size of the device since the user can scroll within the map window.
Map Controls determine what the user can do with the map. You have several controls that you can enable or disable depending on your needs. It is probably a good idea to have as few of these enabled as possible to avoid unneeded clutter in the display.
Each location is marked on the map with a Marker Icon, you can select the type of icon and color.
Marker Info Pop-Ups show information from the record when the marker is clicked on or hovered over. You can configure the content of the info box: it’s possible to put pretty much anything you want to show in there, the template gives you a way to determine which fields are shown and how they are laid out in the box.
Geocoding
Most of the time, your records will have an address that defines its location. Geocoding takes this address information (from anywhere in the world!) and converts it to the latitude and longitude values needed to place the marker on the right spot on the map.
You’ll need to tell the plugin which fields are your Address Fields, it uses the data in those fields to determine the location. It’s possible to locate markers with partial information, such as a state or city, but it will be more accurate with a complete address.
If your records already have latitude and longitude data, you don’t need to use geocoding, just make sure the Latitude and Longitude Field settings tell the plugin where to find that info.
Mass Geocoding
If you already have a records when you set up the map plugin, you’ll want to geocode those so that their markers will be placed. The Geocode All Records button does this for all the records in the database. The operation takes place in the background, so once you start it, you can do other things. You’ll need to refresh the page after a few minutes to see the results of the operation.
Geocoding Status
With version 1.9, we added a new internal field to the record that holds the current geocoding status of the record. This will be helpful if you have a lot of records to manage because you can use this field to find records that didn’t get geolocated. In the admin List Participants page, the list filter section now has a Geocoding Status field that you can select for the filter. When this is selected, it will give you the option to filter for a specific status.
You can also use this field to filter a list display if you only want the records that have been geolocated to be included. The name of the field is “pdbgmap_geolocation_status” so you can use it in a list shortcode filter like this:
[pdb_list filter="pdbgmap_geocoding_status=geocoded"]
API Key Restrictions
API keys should be restricted to prevent their use by others. Key restrictions will only allow the website that is authorized to use them to gain access to the API and its services.
For our purposes, there are only two kinds of restrictions we are concerned with: “HTTP referrers” and “IP addresses.” HTTP referrer restrictions are for requests from the client side, and so this includes Dynamic Maps and Static Maps. IP address restrictions are for requests directly from the web server to Google: this is what the Geocoding API needs. Here is a handy chart:
| Plugin Feature | Google API | Restriction to use |
|---|---|---|
| Dynamic or Static Maps | Maps JavaScript API | HTTP Referrer |
| Geocoding (Location Markers) | Geocoding API | IP Addresses |
Setting Up Restrictions
HTTP Referrer restrictions should contain the domain name of your website. If you want to use the same key on multiple sites, you can add more domains. It’s a good idea to use wildcards in the setting…for instance, for this site, I would use: https://*.xnau.com/* so it will cover all subdomains and paths in the site.
IP Address restrictions require that you know the IP address of your web server. You can usually find this on your hosting control panel, or you can just ask your web host. In some cases, there are multiple possible IPs that your server could use, so you should add all of them to the restrictions setting for the API key.
Product Settings
Google Maps API Settings
Maps JavaScript API Key
You must have an API key to use Google’s map service. Instructions for getting your API key are found under the “Instructions” tab.
Geocoding API Key
If you are using restrictions on your API keys, you will need to use a different API key for Geocoding. Without restrictions, you can use the same key for both. Restrictions are optional, but it is recommended you set them up to prevent your API keys getting misused.
Google Static Maps Signing Secret
This key is optional, and you’ll only need it if you’re using Static Maps and want to increase the number of free loads you can have. More information on digital signatures here…
General Map Settings
Default Zoom Level
Normally, the map will auto-zoom to include all the markers. If the map has no markers, this is the zoom level to use. This also works as a minimum zoom level so that your maps won’t be zoomed in too close if there is only one marker or they are all clustered in a single location.
Details that would be seen at several example zoom levels:
- 1: World
- 5: Landmass/continent
- 7: Country
- 10: City
- 15: Streets
- 20: Buildings
Default Location
The center of the map is normally determined by the markers. If there are no markers, this location will be used as the center of the map.
Map Height
All maps require a height setting. Choose a value in pixels that looks good in the normal display you are using. This value can be overridden by individual maps. The maximum size available here is 650 pixels, unless you have a premium Google API plan.
For dynamic maps, the width of the map will be determined by the display, so it will be responsive to the viewing device screen. Static maps require a fixed width value, which is set in the configuration of the static map. Static maps can be made responsive with appropriate CSS, your responsive theme may take care of that for you.
Marker Icon
Choose the style of marker icon from a preset list of icons.
Custom Marker Icon
If you want to use a custom icon, put the URL to it here. This means it needs to be hosted on a server. The easiest way to do this is to upload the image to your site’s media library. To get the URL, open the image in the media library editor, then copy the URL for the image (seen in the upper right of the edit screen).
An icon should be a 32×32 pixel PNG with a transparent background.
Dynamic Map Features
List Display Automatic Map Placement
Single Record Automatic Map Placement
This selection inserts the dynamic map in your List or Single Record displays in the location specified.
This will be active in all single or list displays. If you need to selectively display a dynamic map, you must use a custom template. The plugin includes some default custom templates which you can use as-is or as a guide to creating your own.
Map Style
This chooses a color scheme for your map. There are several built-in ones to choose from, or you can build you own. See the “Custom Map Style” setting for details.
Map Controls
There are several different controls available to users on a dynamic map. This setting lets you decide which ones will be available. Note that this can’t prevent users from zooming and panning using their keyboard and mouse, all this does is hide or show the specific on-screen control.
Enable Marker Info Pop-Up
Checkbox to enable/disable informational pop-ups for markers. These pop-ups show information from a record when its marker is clicked or hovered over.
Show Paginated List Markers
When checked, the markers displayed in the list map will only be the ones that correspond to the current page of record in the list. If unchecked, all markers from the whole list will be shown, ignoring pagination.
Keep this checked if you want to declutter a map with too many markers.
Marker Info Show Action
Determines the action that will show the informational pop-up: click, the marker must be clicked on or hover, the info box for each marker is shown as the pointer hovers over it.
Marker Info Template
This mini-template determines which pieces of information will be included in the informational pop-up and how it will be formatted. It uses the same “value tags” as available in Participants Database email templates. Each tag will be replaced by the record data in the named field.
You can use simple HTML in the template, but it may break if you try to put too much in there.
Custom Map Style
Here is where you can add your own custom map color scheme. You’re expected to paste a valid JSON object, an error will result if there are syntax issues with the JSON object.
There are several online services that make developing your own map style fairly easy.
These services will all generate the JSON for you: just copy and paste into the custom map style to use it.
Geocoding
In order to place markers on a map, it is necessary to know the coordinates for each one. In most cases, your records will have an address of some kind. Geocoding is the process of taking a descriptive address of a place and converting it to the geometric coordinates of the place on the globe: the latitude and longitude.
Enable Auto-Geocoding
When enabled, a record is automatically geocoded when it is created or edited. You can disable this if your records already contain latitude and longitude information.
Address Fields
To geocode a place, we need the address information. This setting tells the geocoder which fields to use to find the coordinates. The address can be a mailing address or any other kind of descriptive address that is normally used. The address can be incomplete (for instance, just a city or even a country), the geocoder will place the coordinates as accurately as it can using whatever information it is given.
For example, if you give the geocoder the only name of a city, it will place the marker in the center of that city. If given a locality (such as “Hell’s Kitchen”) it will place it in the center of that locality, so even if your records don’t contain complete addresses, markers can be meaningfully placed.
Latitude Field
Longitude Field
Select the two fields where this information is held in your records. Normally, the plugin will add these fields and you won’t have to change this setting. If your records already have coordinate fields, you can set those here so the plugin knows where to get the information to place the marker.
Geocode All Records
When you first set up the plugin, you will probably need to get the coordinates for all the records that are already in the database. This button will start the process of geocoding all of your records.
It does this in the background, so you won’t see much happening until it is done. Refresh the page after a minute or two to see the results of the bulk geocoding operation.
Remember, there is a limit to the number of free geocoding requests you can make, and if you have a large database you could easily reach that limit if you perform this operation multiple times. You should only have to do this once.
F.A.Q.
My records won't geocode, I just get the "Processing complete. 0 records geocoded." message when I try to geocode my records.
There are several things that could be going wrong here, so here is a checklist of things to verify:
- API Keys: Make sure you are using the correct key and that the key is set up for the correct APIs. The keys should be set up on the Maps JavaScript API and the Geocoding API. You must have a valid billing account set up with Google for the key to work.
- API Key must be valid for the domain making the request. This will be under the “restrictions” for the key. If it is unrestricted, it will also work.
- If the keys are restricted, you must use a separate key for the Maps JavaScript API and the Geocoding API. The JavaScript API must use HTTP Referrer restrictions and the Geocoding AP must use IP Address restrictions. Make sure these restrction settings are correct. If you turn the restrictions off, and then it works, you know the restriction settings are not correct.
- If you have Participants Database debugging on, you may see pertinent information on the geocoding attempt. For example you may see
pdbgmap\geocoder::geocode request failed with status: REQUEST_DENIEDwhich indicates a problem with the API Key. - Check the Geocoding Address Fields setting. This must be a comma-separated list of valid field names. Do not include any non-address fields. For example:
address, city, state, country - Your records must have enough valid data in the address fields to locate the record. Check a single record with a good address, it should geocode when saved so you can see if that record is working and make any changes to get it working. Even just a country and city is enough to place a pin. If you find it geocodes with just the city and country, then maybe something about the street or house address is confusing. There is a Google geocoding tester you can use to see if you’ve got a readable address.
- If after you’ve verified the first 3 items on this list and your address tests OK on the geocode test page, you still can’t get it to geocode your records, it can be helpful to do a little debugging. In the Participants Database settings under the advanced tab, select “plugin debug” in the Enable Debugging setting. Now attempt to geocode your test record in the backend record editor (you only have to save the record to do this). The log (debugging log item in the Participants database admin menu) will tell you what errors happened during the geocode process. Most of the time, the problem is with the API keys. Setting up the keys is a bit complex and everything has to be correct for them to work.
I'm using Locations Map with Combo Multisearch, and the map shown in the list doesn't update to show markers for the search results.
Make sure you are using the latest versions of both Participants Database and the Location Map plugins, there was a bug in earlier versions that prevented the map fields getting updated when using Combo Multisearch.
Don’t try to use the [pdb_listmap] shortcode to display the map on a page that has the [pdb_list] shortcode with a search…they won’t be in sync. If you want to show a searchable list and a location map that follows the search results, it is best to use the “Map Auto-Placement” feature or the dynamic map list template for that.
Another approach is to use a custom template. While Locations Map does include a list template that adds a dynamic map, for Combo Multisearch, you need to combine the template that Combo Multisearch uses and the Locations Map one.
I have put such a template together, it is available here…
Take a look at the linked page if you are unfamiliar with the use of custom templates in Participants Database.
How can I prevent the automatic list placement from happening for a specific shortcode?
If you want to control whether the dynamic map shows with a list display on a per-shortcode basis, you need to turn automatic placement off for lists. Then, in the list where you want the map to show, use the “dynamicmap-default” template, like this:
[pdb_list template=dynamicmap-default]
I'm getting a blank display when using the listmap shortcode.
Depending on how your map markers are configured, you can run into memory issues when too many markers with info windows are displayed. This problem is most likely to happen when using the [pdb_listmap] shortcode because this shortcode will show all possible markers by default.
If you have a lot of records with markers that include info windows that have a lot of content, it’s very demanding on the system to display all of that. If you’re getting memory errors, you’ll see it as a missing map display or even on the backend you can’t save the page with the shortcode.
There are some things you can do to avoid the problem:
- Slim the info window down: don’t try to show so much in the window. you can fix this in the info window template setting.
- Push less HTML into the info window by using the “Marker Info Tags as Raw Values” setting. You may need to adjust the info window template if you do this.
- Use a filter in the shortcode so that you’re not trying to show all the markers.
[pdb_listmap filter="state=CA"] - Show fewer markers: you can add the list_limit parameter to the shortcode…for example:
[pdb_listmap list_limit=100]which will limit the number of markers to a maximum of 100: still a lot of markers!
I want to add a KML file to the map, is that possible?
Yes, it will require some coding knowledge because you’ll need to set up a filter callback to insert the KML. I’m providing some very brief instructions here, it will be up to you to get it working on your site.
The general reference at Google for adding a KML to the map configuration is here: Displaying KML
The filter to use is pdbgmap-additional_map_code which allows you to add a javascript object to the map configuration. Here is an example of how to use this filter based on the example in the page linked above:
To add your own KML, you will need to upload it to your site, then use the absolute URI to the file to add it to the map.
Sometimes, the dynamic map loads very slowly and/or doesn't show all the pins.
This can happen after importing a large number of records. What is going on is if there are a lot of markers that aren’t cached yet, the map will slow way down to build them all. If it doesn’t finish building all the markers before it’s time to display the map, not all of them will make it. The map will display only the markers that have been built and cached.
There are two solutions to this. First, the map will progressively cache uncached markers, so every time the map is loaded, more uncached markers are added to the cache. In 2 to 3 loads (depending on how many markers you are trying to show) all the markers will be cached, and map load times will be good.
Second, you can “prime” the marker cache manually. To do this, go to the Locations Map settings page, and add “&prime_marker_cache” the the URL in the location bar of your browser. The hit return. This will begin a background process to load the marker cache. It may take a couple of minutes, but once this is done, all your markers will load quickly.
![]()
The marker cache will also be automatically primed if you change the “Marker Info Template” setting because this changes all the markers. Wait a couple of minutes after changing this setting before loading your map.
Priming the cache is not something you need to to more than once. You may need to do it after importing a large number of records.
Thanks Roland it worked the link is now active.
But how do I get the link anchor text in the marker pop up to display the title of the field as the link, currently the link anchor text displays as the form element name “Link Field”.
A link fields has two components: the URL and the clickable text. You can check that to see what the clickable text is set to in that record.
If you want to use something else as your clickable text, you need to go back to using the raw value, then build your link into the marker template. For example:
<a href="[website]">Click Here</a>Thanks Roland its working just the way I want it to :)
In the marker pop up info I have a website Url in a “link field”. When I display the record in database list view the Url is a live hyper link but I cannot get the live link to display in the marker pop up?
In the Locations Map settings, under the “Dynamic Map Features” tab is a setting “Marker Info Tags as Raw Values” this should be unchecked in order for the link tag to be clickable.
Hello Roland,
Thank you for such a great plugin and all the add-ons! Unfortunately, the latest update of the locations map addon-on ended up crashing the site. Disabling the locations map plugin fixed the issue, but I am not quite sure what happened. Has anyone else reported having issues with the update?
Thank you!
Bryan
We haven’t had any other reports of a crashing bug with the update. The best way for me to help you is to first make sure you’ve got your php error log set up (you may need to talk to your hosting provider about that) then clear the log and try to activate the plugin. There should be an error message in the log with specifics about what happened.
Hi Roland,
Thanks for the quick response! Here is the error message that came up, along with some basics about the install. Unfortunately, the full info is too long for the comment thread, so let me know if you would like me to just email the full details:
WordPress version 5.7.1
Current theme: Mosaic (version 1.0)
Current plugin: Participants Database Locations Map (version 1.7)
PHP version 7.3.27-1~deb10u1
Error Details
=============
An error of type E_ERROR was caused in line 18 of the file /var/www/mosaicmennonites/public_html/wp-content/plugins/pdb-locations-map/pdbgmap/bg_process.php. Error message: Uncaught Error: Class ‘WP_Background_Process’ not found in /var/www/mosaicmennonites/public_html/wp-content/plugins/pdb-locations-map/pdbgmap/bg_process.php:18
Make sure you are using the latest version of Locations Map, should be 1.7.1. You’ll find it in the plugins page…you’ll probably need to revert to a working version of the plugin first, you won’t see the update unless the plugin is activated.
Good reminder to check on the version that was being updated. Sounds like the client updated the version up to 1.7 when the site crashed. We reverted back to 1.6 and were able to update to 1.71 without any issues. So, not quite sure what happened, but we are good to go now! Thanks for the help!
Thanks Roland, great additions in the last update. Loving being able to see all the markers without pagination. Interested in the changes to allow the import of kml files. Where would I find this function and how does it work? Thanks
You can do this by setting up a filter that adds the KML to the map configuration. It’s going to require some coding knowledge, you’ll be inserting javascript into the configuration object, you’ll need to know how to do that to get it to work.
You’ll find an explanation and an example in the Locations Map FAQ
Hi Roland,
We use the map with 3 kinds of participants (category). We would like to display a map for each kind.
De detail page is different for each kind, so each map has to link to the detail page containing pdb_single for the kind of participant. Is this possible?
In short:
3 pages with a map (for each category 1 map containing that kind of participants)
each page has to link to the specific single page containing pdb_single for that kind of participant.
You can find the map of one of the category here: menu —> vertellers —> vertellers-op-de-kaart
With an example of the single page: …/bio-verteller/?pdb=298
One of the other maps (not displayed yet) has to link to this kind of single page: …../informatie-vertelpodium/?pdb=357
Long story, I hope you understand what i mean.
Thanks in advance.
Kind regards,
Simone
You can use the [pdb_listmap] shortcode to display your 3 maps, using a filter in the shortcode to determine which records are included. That part is easy, you probably already know how to do that.
Getting each one of them to use a different template for the info window (which is how you change the single record link) is a lot more difficult. You will need to implement a filter (that is, write custom code) to alter the template that is used to generate the info box content so that it will go to a different single record page. The name of the filter is “pdb_locations-map-info_window_template” and you can use that filter to change the info window template according to which page the map is on.
A simpler approach is to use a custom template for the single record display that will show a different single record display depending on the type of record. With this setup, all your record types will go to the same page to show the detail, but each type will see a different display. I have an example of a template that does this here. You will need to alter that example to your specific needs.
Hello! I am having an issue with the map. For some reason the map on the page with the entire list of participants only shows 2 locations (and one is in the incorrect location).
However, on each participant’s page, the maps show up and with the correct location.
I realized that I had the map set to show the incorrect field. When I changed it from last name to business name, all the pins showed up.
Hi Roland.
Love the location maps plugin! Is it possible to show all pins in the map despite showing the reocrds over multiple pages. Currently I have hundreds of records and I would like all pins shown on the map but I dont want hundreds of records listed on the page. When I limit this to say 20 per page, I only see 20 pins on the map until I go to next page. Hope the question makes sense. Thanks
YOu can use a separate shortcode for the map that will show all the pins. Turn “List Display Automatic Map Placement” to “none” then add the [pdb_listmap] shortcode to the page to to show all your pins.
Thank you. The list_map is great for showing all pins on the general pages but I am using the combo search function. When I search and it returns say 200 pins, previously it would only show pins for the number of search results on that particular page (25 lets say). Now using the List Map shortcode it shows all my pins regardless of what I search for. I would like to be able to search and return 200 pins lets say and all 200 pins will show up on the map even though I only show 25 per page. Or am I using the Listmap short code incorrectly? Thanks
OK, now I understand your question. That is an interesting possibility, but it is not set up to work that way. I don’t know how you’d achieve that with the current plugin, I would have to add that as a new feature.
Hello,
I am very happy with PdB. It was with great pleasure that I tested the “Locations Map” supplement.
I have a question about google maps. Do you know a process for removing the places indicated by Google (hotels, monuments)?
Yes, take a look at this section on generating custom map styles:
Custom Map Styles
Roland,
I am using the list shortcode on a restricted access page to show lists of people attending a meeting. Is there a way to stop the map appearing on the list please
If you need to determine whether to show the map or not on a per-shortcode basis, you need to turn off “List Display Automatic Map Placement” and use the “dynamicmap-default” template for the list where you want the map to show.
[pdb_list template=dynamicmap-default]Hi Roland,
Many thanks for the Locations Map Plugin, it works great with our Participant Database.
As well as individual locations on the map, we’re hoping to include KML polygon information that we have in a different Google Map.
The problem with the Google map is that it is copyable and downloadable, which I believe your Participant Database Map is not.
It would great if there was a way to include this KML data in the custom map.
Thanks in advance
Robert
Hi Robert,
I’m not familiar enough with how you would add that layer to the map to be specific, but the plugin does offer a filter that lets you add your own configurations to the map configuration object. the filter is pdbgmap-dynamic_map_add_configs and it expects a set of property:value pairs which are used to configure the dynamic map display.
Okay, I’m attempting to revisit this.
I have kml information containing polygon shapes of areas to show on a map.
Something like this for example:
https://www.google.com.au/maps/d/edit?mid=10VZXxB97uybu6qh18T18xFh35VVDnQYL&usp=sharing
I can convert the kml to any form we need, but I don’t know where the data in locations map is pulled from to produce the map – . If I wanted to replace/append with the extra shape data?
Make sense?
The plugin does not provide a way to add code to the initialization javascript, you can only add to the configurations object. In order to use a KML, you need to modify the javascript that initializes the map to include your KML data.
You can use a modified version of the plugin’s initialization javascript, but the changes will be vulnerable to updates, which will delete them. The configuration javascript is found in the plugin file pdbgmap/gmap.php.
Here are the details on adding a KML layer to a Google map: Displaying KML