One of the the main pages you will use to work with records in the backend (admin) of your site is the “List Participants” page. Here is a quick explanation of what you can do on this page.
Set the Columns to Display
The admin list participants page has its own configuration for which fields (columns) will be shown in the list. This happens on the Manage List Columns page which provides a drag-and-drop interface for managing the columns that are displayed. Scroll down the page to get to the configuration for the admin list columns.
Filter the List Display
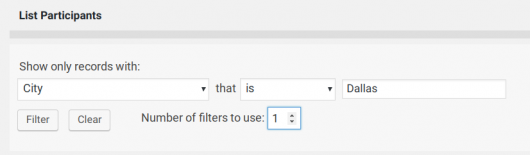
In the admin list display, a flexible multiple-field search control is available. A simple search is performed by selecting the field to search on, the type of search to use and the search term.
To add additional filters, click on the “Number of filters to use” control to add or subtract filters from the control. Additional filters are combined using “and” or “or” logic.
Recently Used Fields
At the top of the field selector in the filter will be a list of recently used fields. This will save you the trouble of locating the field in the regular list for fields you’re searching on regularly. Version 1.9.8 and later.
Multi-Field Filters
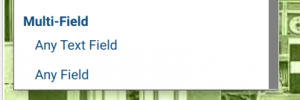
It is possible to filter the list based on the content of multiple columns. In the first input of the filter, where the target field is selected, you can select either “Any Text Field” or “Any Field.” Selecting one of these will give you a way to make a database-wide search for specific words. “Any Text Field” limits the search to fields that store text, while “Any Field” searches in all fields.
This filter works best with specific search terms that will yield a small number of results.
Filtering by a Range of Dates
The admin listing allows a range of dates to be entered in the search field: just type in the first and last dates you want to see, separated by the word “to” like this:
July 1, 2013 to Aug 1, 2013This works for timestamp fields as well.
Selecting and Modifying Records
Delete a Record
To delete a record or multiple records, select it with the checkbox on the left, then select “Delete” in the “With selected” dropdown. Click “apply” then confirm the delete in the pop-up window.
Edit A Record
To edit an individual record, click on the “pencil” icon. That will take you to a record edit page where all the fields of that record may be edited. If the user is an “editor” they won’t be able to view or edit fields that are in an administrative group. That is a group that has the “admin” checkbox checked.
Edit Multiple Records
There are a few things you can do to a number of records at the same time.
- delete
- approve
- unapprove
To perform these operations, click on the the record’s checkbox to select the record, then select the operation you would like to perform, then click “apply” to complete the operation on the selected records.
Mass Edit
As of version 2.0, it is possible to perform a “mass edit” which lets you set the value of a field for multiple records in a single operation.
Select “Mass Edit” in the “with selected” selector. This will open a selector for the field you want to edit. When that is selected, the appropriate input is displayed. Type in or make your edit selection, then click “Apply”
Be warned: there is no undo here!
If the operation is critical and you want to be able to walk it back, you can use a database backup for that.
Additional Edit Options
Installing add-ons will add additional capabilities. For instance with the Email Expansion Kit add-on, you can also:
- send signup receipt email
- send private link recovery email
- send custom template email
Back to the Using Participants Database page…