OK, so we covered some essential CSS syntax in the previous article. Now, we’re going to see the CSS at work on a web page.
Inspecting Page Elements
To change the appearance of an element on a page, the first thing to do is understand why it looks the way it does. This means seeing which CSS rules are affecting it, and the easiest way to do that is to use the inspector in your browser developer tools.
If you are unfamiliar with using the developer tools in your browser, I’ve written an article explaining the basics for that:
Accessing Your Browser Developer Tools
For the purpose of this article, I will be using and showing examples from the Chrome developer tools. They all work pretty much alike, but it may be easier to follow if you are using Chrome also.
Using the Inspector

With your developer tools open, click the “inspector” icon. In Chrome, this is a square with an arrow icon in the upper left corner of the tool pane:
While this is active, any page element you click on will be shown in the HTML/CSS pane (the “Elements” tab in Chrome). This is what I see when I click on a paragraph on my blog posts page: (you can open that page in another tab and follow along, it might help you remember what you’re learning)

There are several pieces of important information about the paragraph in this display. First, on the left, I can see the HTML with the selected element highlighted. This shows how the element is nested, and what elements come before and after it. The element itself is collapsed, so I don’t see what’s inside it. That’s helpful because it’s not really a concern, and it helps clean up the display. By clicking on the triangle to the left of the tag, I can see it’s contents if I want to.
If I mouse over the element, it turns blue on the actual page so I see where it is. This comes in very handy if you want to see, for instance, what elements are wrapped by a particular element.
On the left at the bottom, I see the absolute DOM hierarchy of the element. This can be helpful in seeing what elements are hierarchically “above” the selected element. Since rules applied to those elements can be inherited by the selected element, it’s good to know what they are.
On the right is the CSS rule pane showing the rules that are applied to the element. This is a scrollable list with the highest priority rules on top, and going down to the lowest priority rules. It’s important to understand what this is showing because you’ll be figuring out what to change based on what’s shown here.
For this next part, if you’re unfamiliar with how CSS selectors work, read this quick overview: CSS Selector Quick Reference
Understanding the CSS Rule Pane

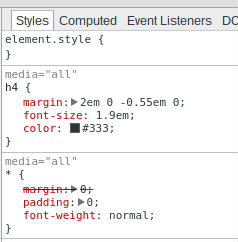
To explain how the CSS rule pane works, we’ll select an element on the blog page: the category link that appears above the title of each post. In the CSS rule pane, we see the rules that are affecting this element:
At the top of the list is something called “element.style” which is where any rules defined in the “style” attribute of the element would be shown.
Next, we have the highest-priority rule from the theme stylesheet that applies to the element. There are two selectors in this rule, and the one that is selecting our element is in black. On the right is shown the file the rule was loaded from…generally, you can ignore this.
In the next rule, you can see the rule that is applied to all “a” tag elements, with one of the declarations struck through. This means that the declaration is being overridden, and you can see the declaration in the rule above it is doing the overriding, setting the color of the text.
The next rule is a general rule applied to all elements: the star selector means “any element.” This selector is sometimes used to set default attributes.
Below that is the “user agent stylesheet” which means the styles the browser itself is applying. Usually, you’ll ignore this.
From here on down, the list is showing all the inherited rules: that is, all rules that are applied to elements up the hierarchy. Most CSS rules are inherited, so for instance if a paragraph has a rule giving it black text, any elements within that paragraph will also have black text, unless another rule of higher priority changes that.
This last rule shows that it is responsible for the size of the type in our “a” tag, but not the font weight…that is overridden by the star rule above. The “margin-bottom” declaration is grayed out because the “a” tag is an inline element, and margins aren’t applied.
Making Live Changes to the CSS
Now that we’ve gone over what the entries in the CSS pane mean, we can begin to use it to help us make some changes.
For example, if you decided the text of the category link was too small, you can try changing the size to see just how much larger you wanted to make it. It would be a bit tedious to do this by changing the setting, saving it, then reloading the page to see the effect. Using the CSS rule pane, you can set the size and see immediately the effect of the change.

To change the font-size value, double-click on it (in the font-size declaration toward the bottom of the list) and it will pop out and become editable. You can use the up/down arrow keys to shift the value, but it might be too coarse an adjustment. You can also type in the value, using decimals if you want. The units must always be included.
As you can see, all the type on the page that is affected by that rule will change size as you change the value, allowing you to find the desired setting. I’ll tell you what to do with that information in the next part.
Using Live CSS to Help Solve a Problem
If you’re not sure what attribute to change, you can use the live edit to alter a value and see if it’s going to help. In most cases, the changes you’ll be making will involve attributes that are already defined in the rules, so you’ll often be able to find the right one to modify by messing around with the existing values. If you get lost with a lot of changed values, not knowing which ones really need to be changed, reload the page and start over.
This can also serve as a way to determine if the changes you want to make can be achieved with a few CSS rules. As mentioned before, changes to a page that involve moving elements to a different position can be pretty complicated to execute (if they’re possible at all) and using the live CSS can help you determine what is possible.
Next: Creating Effective CSS Rules
In this part, we’ve covered using the browser developer tools, specifically the inspector, to see the page’s HTML structure and what CSS rules are affecting a page element. We’ve also touched on how to make temporary changes to the page CSS. Next we’ll discuss how to create new rules that change the page presentation permanently.